WARNING:
All procedures are GENERALIZED.
Always fly per Pilot Operating Handbook procedures,
observing any relevant Standard Operating Procedures (SOPs)
Understanding Wind & Wind Drift:
- As with water flowing down a river, air is a fluid in motion
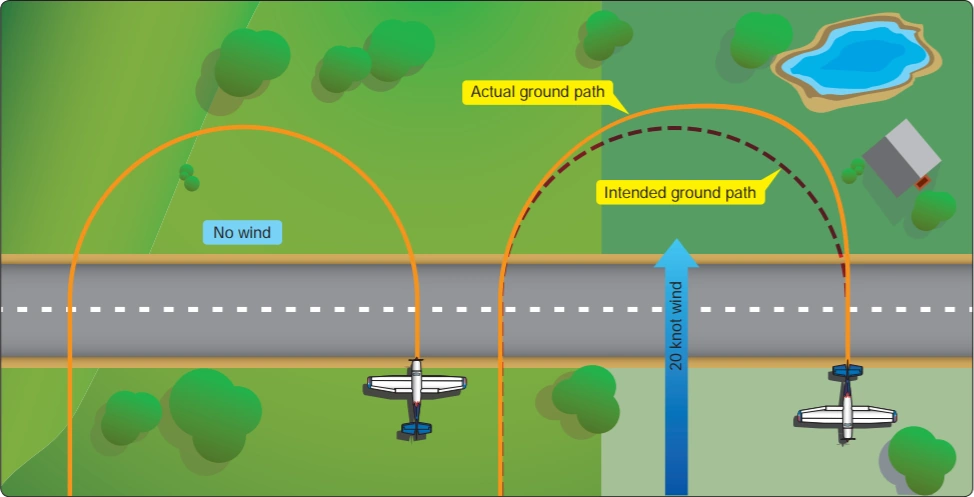
- To maintain the airplane's desired path across a surface, pilots must correct for wind (wind correction angle) in the same way a boat must do for current [Figure 1]
- The principles and techniques of varying the angle of bank to change the rate of turn and wind correction angle for controlling wind drift during a turn are the same for all ground track maneuvers involving changes in the direction of flight
-
Wind Drift When Straight and Level:
- Consider a flight with a wind velocity of 30 knots (knot=nautical mile per hour) from the left and 90° to the direction the airplane travels
- After 1 hour, the body of air in which the airplane is flying will have moved 30 nautical miles to the right
- Since the airplane is moving within this body of air, it too will have drifted 30 NM to the right
- In relation to the air, the airplane moved forward, but in relation to the ground, the airplane moved forward as well as 30 NM to the right
- To correct for this, the pilot applies a wind correction angle (into the wind), which is proportional to the wind velocity
- When the drift is neutralized, the airplane will follow the desired ground track
-
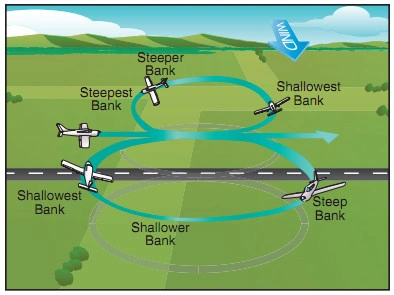
Wind Drift During A Turn:
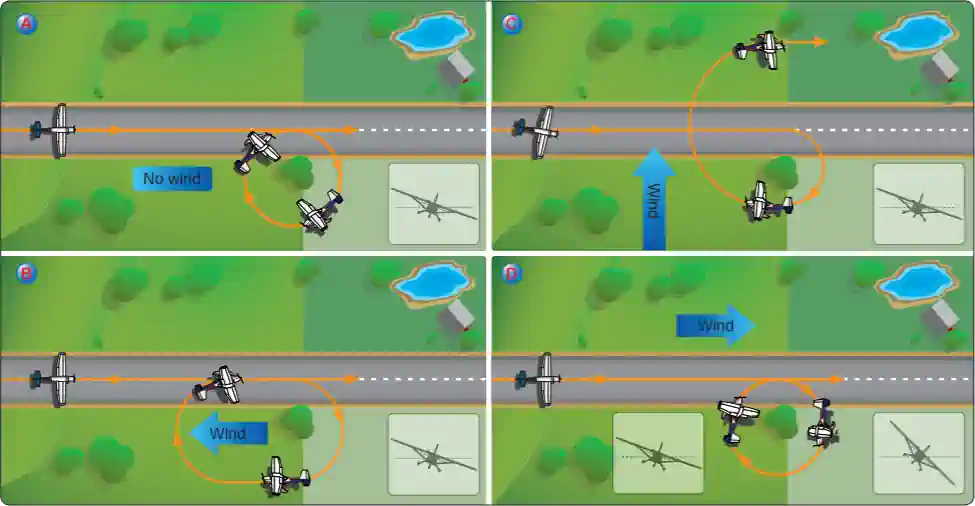
- The effects of wind are different when turning [Figure 2]
- Recall from turn performance how speed impacts the angle of bank regarding a constant radius turn:
- The faster the airplane, the more angle of bank is required to maintain a fixed radius of turn
- The slower the airplane, the less angle of bank is required to maintain the same fixed radius of turn
- Since the relative wind angle is constantly changing, so does ground speed, impacting the ground track and time it takes for the airplane to progress through any part of a turn
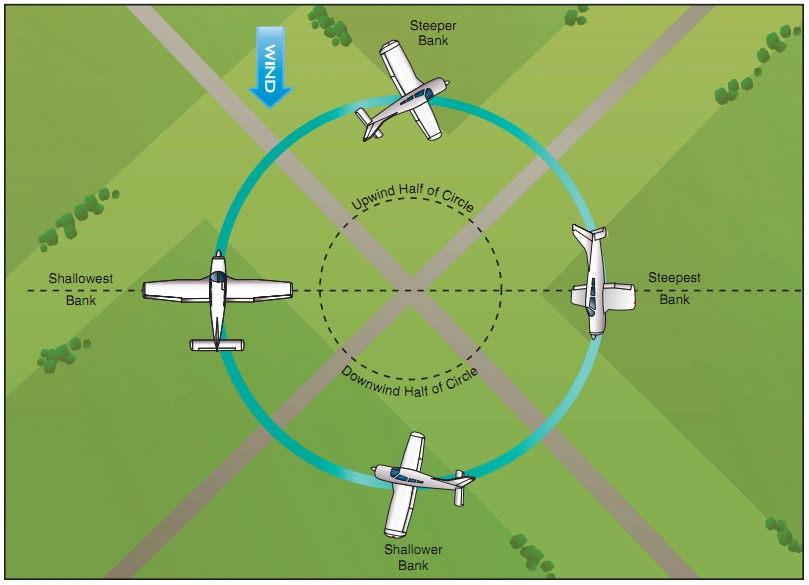
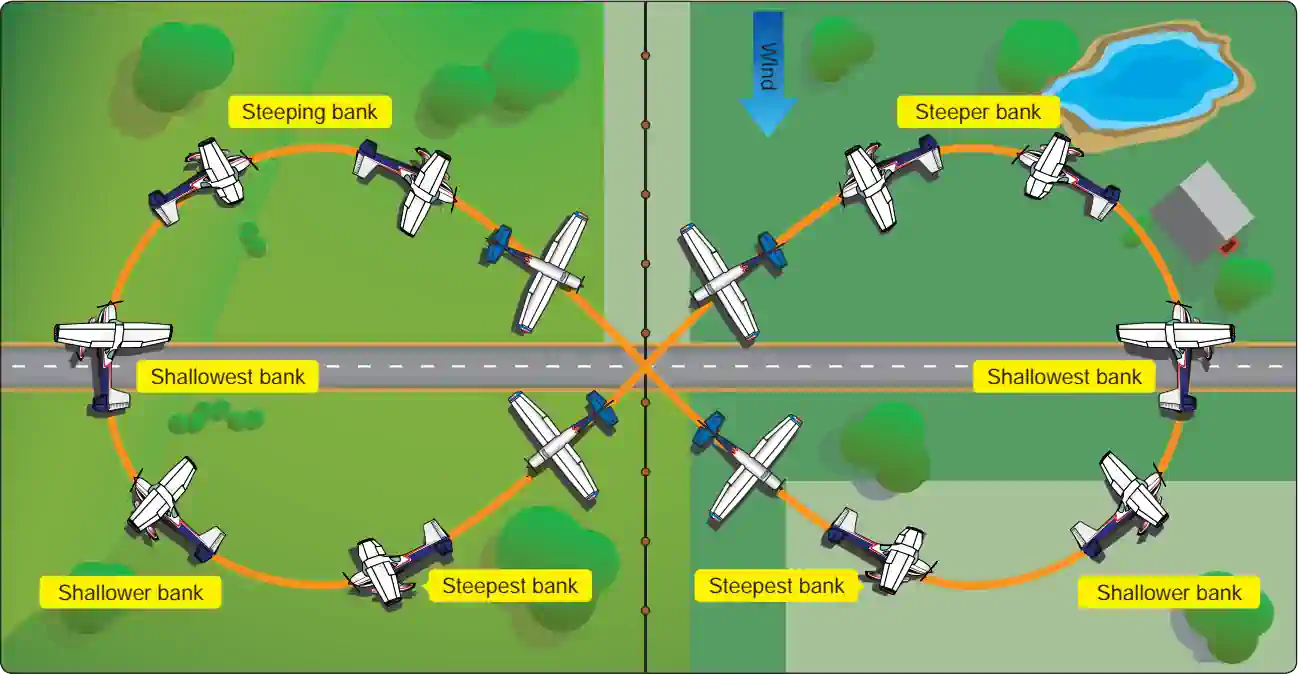
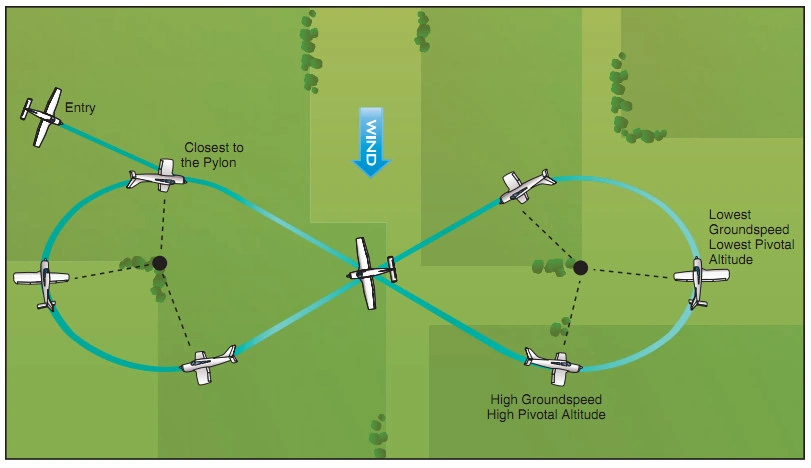
- The amount of wind correction to follow a desired circular ground track is dependent upon ground speed [Figure 3]
- When flying into the wind, the ground speed decreases, reducing the required bank angle
- When flying away from the wind, the ground speed increases, increasing the required bank angle
- Wind velocity speed also plays a factor in maintaining a desired circular ground track:
- The faster the ground speed, the faster the appropriate bank angle must be established
- The slower the ground speed, the slower the appropriate bank angle must be established
- The steepest bank and fastest rate of turn is on the downwind portion of the turn, and the shallowest bank and slowest rate of turn is on the upwind portion
- When there is no wind, it should be simple to fly along a ground track with an arc of exactly 180° and a constant radius because the flight path and ground track would be identical
- To determine the direction of the wind, pilots can observe flags, water, or perform a wind drift circle

Selecting Ground Reference Points/Lines/Areas:
- When selecting ground reference points, lines, or areas, consider:
- Location of probable traffic transiting the area
- Collision hazards, to include aircraft, terrain, obstacles, and wiresin the area
- Ease of recognition/uniqueness of reference so as not to mistake with another like feature mid-maneuver
- When selecting a point from which to perform a wind drift circle or turn around a point, consider:
- Select static points like towers, intersections, or buildings
- Avoid moving objects such as vehicles, generic/ill-defined areas
- When selecting a reference line from which to perform a maneuvers such as S-turns, rectangular course, and eights along a road, across a road, around pylons or on pylons, consider:
- Length of ground reference line such as a road, river, or treeline
Wind Drift Circle:
- The wind drift circle helps pilots determine wind direction and strength (velocity) while in flight and recognize the effect of wind on the airplane's ground track
- Primarily a training maneuver, the effects of wind during a turn are demonstrated by referencing a road, railroad, or other ground references that form straight lines parallel to the wind while flying a constant medium angle of bank for 360° of turn [Figure 3]
- The airplane will return to a point directly over the line but slightly downwind from the starting point, depending on the amount of wind velocity and the time required to complete the turn
- The path over the ground will be an elongated circle despite being a perfect circle in the air
- Straight flight during the upwind segment after completion of the turn is necessary to bring the airplane back to the starting position
-
Wind Drift Circle Procedure:
- Perform clearing turns looking for traffic and ground obstructions
- Select a reference point in an area where an emergency landing can be made if necessary
- Establish and maintain traffic pattern speed and 800-1,000' AGL
- Enter the maneuver from any direction to the reference point
- Over the reference point, roll into a 30° bank and perform a 360° turn, maintaining a constant bank angle
- Any error in AoB or coordination will have some degree of effect depending on how bad
- Initiate a roll-out at a point where the wings will be level when completing the turn
- Note any difference in position between the starting and finishing positions
- The airplane will finish the maneuver downwind from the initial starting point by the magnitude of the wind
- Determine the approximate wind direction and strength based on any differences in the starting and finishing positions
- Upon completion of the maneuver, resume normal cruise and trim as necessary
- Complete cruise flow/checklist
-
Wind Drift Circle Common Errors:
- Failure to adequately clear the area
- Skidding or slipping turns
- Excessive gain or loss of altitude
- Not entering the pylon turns into the wind
- Failure to assume a heading that will compensate sufficiently for drift
- Abrupt control usage
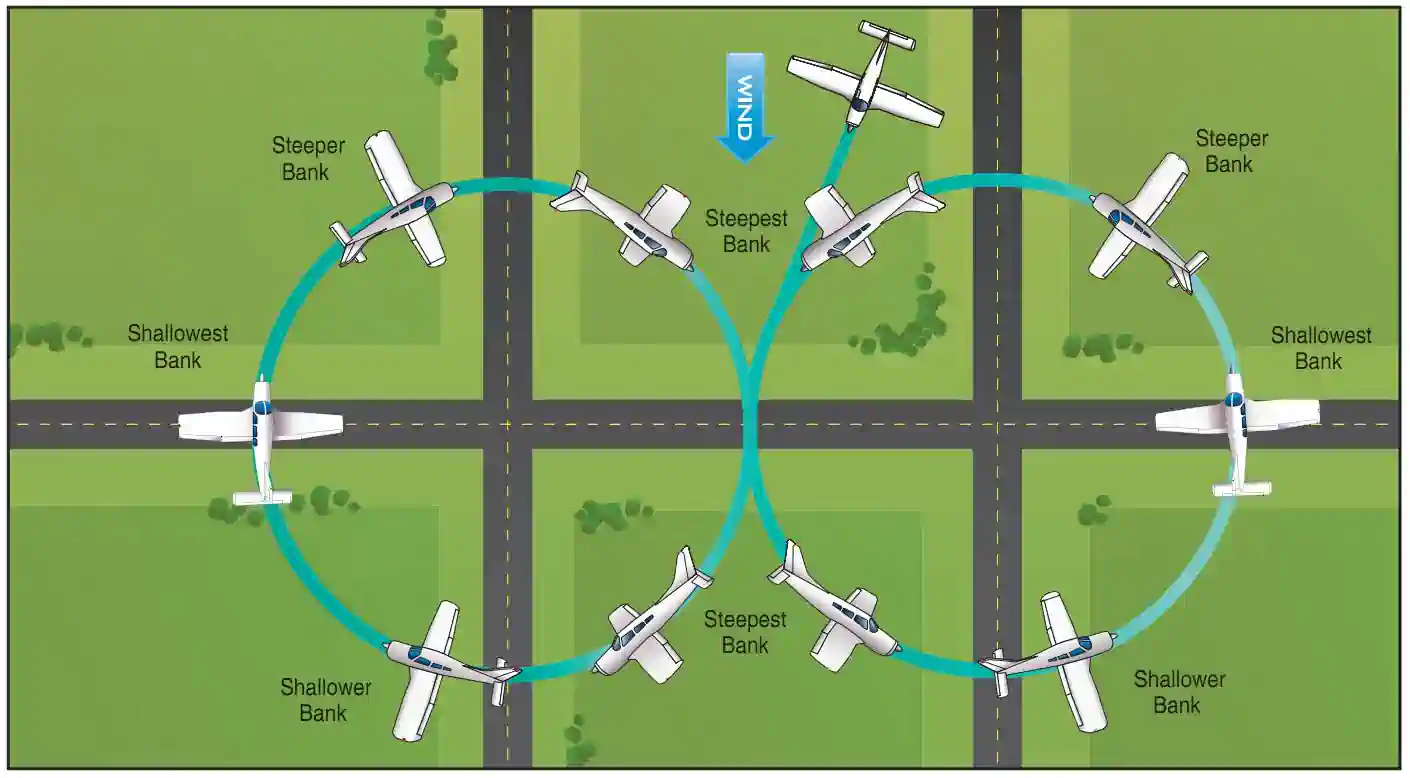
Turns Around a Point:
- Turns around a point is an extension of s-turns across a road where the airplane flies in two or more complete circles of uniform radii or distance from a prominent ground reference point [Figure 4]
- Turns around a point teaches the radius of a turn is a distance that is affected by the degree of bank used when turning about a definite object
- Perfects the ability to subconsciously control the airplane while dividing attention between flight path and ground references in a turn
- Develops a keen perception of altitude
- Use a maximum bank of 45° while maintaining altitude
- As experience and understanding of the effects of wind drift, bank angle, and wind correction angle improve, you may enter the maneuver from any point
- Take into account ground speed and wind velocity to determine the angle of bank required initially to maintain the proper ground track
- Radius distance must permit seeing the point throughout the maneuver, even in a bank
- In addition to varying the bank angle, "crabbing" is also necessary:
- Crab in during the downwind half of the circle, crab out during the upwind half of the circle
-
Turns Around a Point Procedure:
- Determine wind direction
- Wind direction determines the entry heading and reference point
- Perform clearing turns looking for traffic and ground obstructions
- Select a reference point in an area where an emergency landing can be made if necessary
- Select a point easily distinguished and small enough to present a precise reference
- Isolated trees or crossroads work well
- Establish and maintain traffic pattern airspeed and 600' to 1,000' AGL
- Enter on a downwind to one side of the selected point at a distance equal to the desired radius of the turn
- Directly downwind and abeam the reference point, roll into the steepest bank to initiate maintaining a constant radius
- The downwind leg will have the highest ground speed
- Turn not to exceed 45°
- As the turn continues, begin to shallow the bank, as necessary, to continue maintaining a constant radius
- Ground speed will decrease
- Directly upwind, the bank should be at its shallowest
- Ground speed will be slowest
- As the turn continues, begin to steepen the bank, as necessary, to continue maintaining a constant radius
- Ground speed will begin to increase
- Continue the maneuver for another set of turns or depart on the entry heading as directed
- Upon completion of the maneuver, resume normal cruise, RPM
- Trim as necessary
- Complete cruise flow/checklist
- Determine wind direction
-
Turns Around a Point Common Errors:
- Failure to adequately clear the area
- Failure to establish appropriate bank upon entry
- Failure to recognize wind drift
- Failure to maintain a constant radius turn on each side of a selected reference line or point
- Excessive bank and/or inadequate wind correction angle on the downwind side of the circle, resulting in a drift toward the reference point
- Inadequate bank angle and/or excessive wind correction angle on the upwind side of the circle, resulting in drift away from the reference point
- Skidding turns when turning from downwind to crosswind
- Slipping turns when turning from upwind to crosswind
- Gaining or losing altitude
- Inadequate visual lookout for other aircraft
- Inability to direct attention outside the airplane while maintaining precise airplane control
- Failure to maintain altitude and airspeed parameters consistent with current airman certification standards
S-Turns:
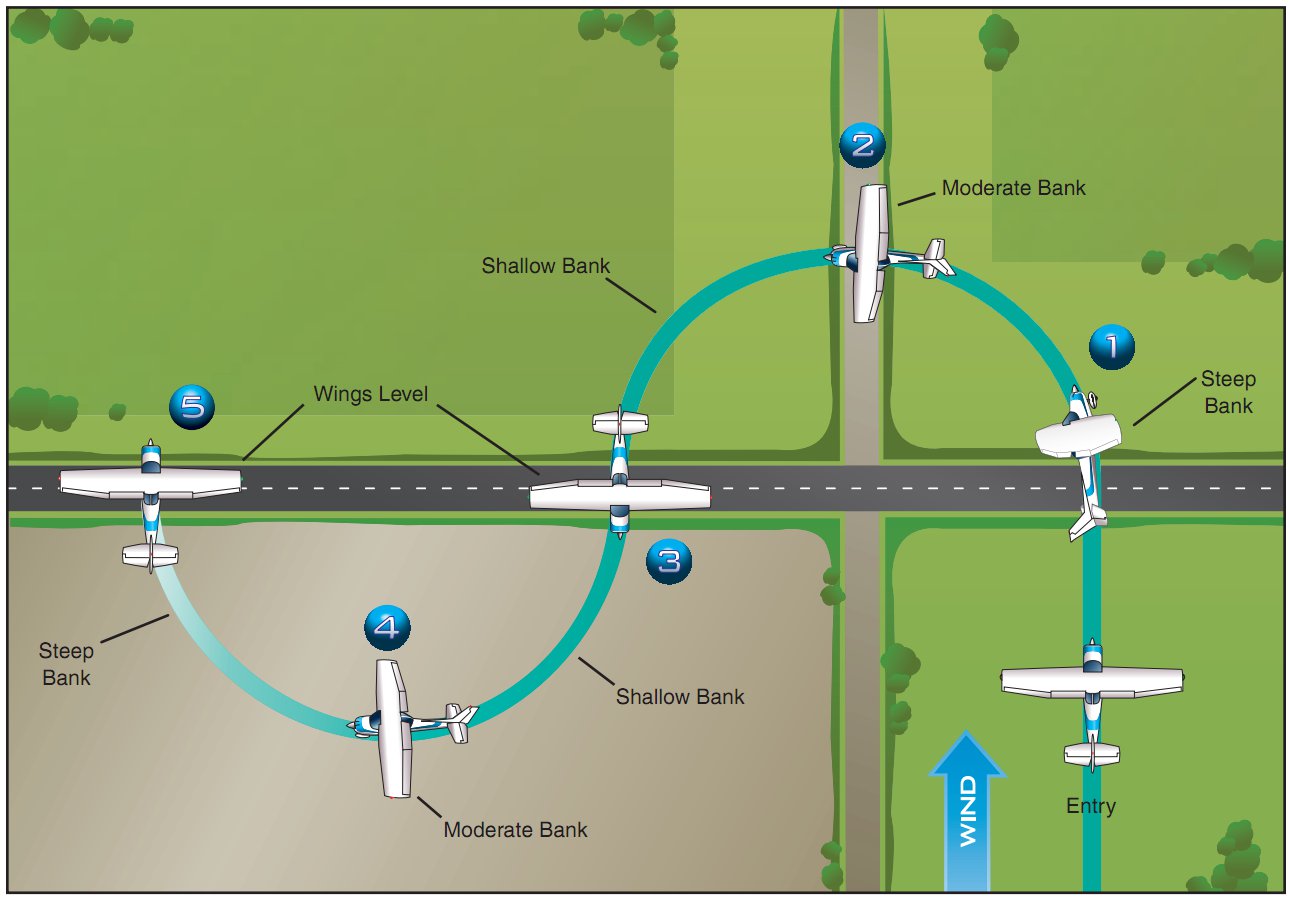
- S-Turns develop the ability to compensate for drift during turns by flying semicircles of equal radii on each side of a reference line on the ground [Figure 5]
- You may need to be creative, but the end state is a straight line, approximately 1 mile or longer
- Builds wind drift skills developed with the rectangular course but introduces constant turns
- The maneuver is flown to arrive at a specified point, at specified headings, while compensating for drift, orienting the flight path with ground references by changing roll rate and angle of bank to establish correction to compensate for ground speed changes
-
S-Turns Procedure:
- Determine wind direction
- This is important for the entry heading and reference line
- Perform clearing turns looking for traffic and ground obstructions
- Select a reference line perpendicular to the direction of the wind
- Select an area where an emergency landing can be made if necessary
- S-turns may be performed on any straight line, such as a road, fence, or railroad
- Select the point while flying upwind and turn back for a downwind entry
- Establish and maintain a cruise airspeed to enter the maneuver between 600-1,000' AGL
- Enter on a downwind to one side of the selected point at a distance equal to the desired radius of the turn
- When abeam (perpendicular) or over the reference line (highest ground speed), begin the turn to roll into the upwind
- Apply adequate wind-drift correction to track a constant radius turn on each side of the selected reference line
- Start with a steep bank, as ground speed is highest
- Transition to a moderate angle of bank around 90° as ground speed begins to slow
- Shallow rolling out around 180° as ground speed is lowest
- Roll wings level at 180° to be straight and level directly over and perpendicular to the reference line
- Crabbing is also necessary (crab in during the downwind half of the circle, crab out during the upwind half of the circle)
- Apply adequate wind-drift correction to track a constant radius turn on each side of the selected reference line
- When abeam (perpendicular) or over the reference line (lowest ground speed), begin the turn to roll back into the downwind
- Start with a shallow bank, as ground speed is lowest
- Transition to a moderate angle of bank around 90° as ground speed begins to rise
- Steepen the bank angle to roll out around 180° as ground speed is highest
- Roll wings level at 180° to be straight and level directly over and perpendicular to the reference line
- Crabbing is also necessary (crab in during the upwind half of the circle, crab out during the downwind half of the circle)
- Depart on entry heading and resume normal cruise
- Trim as necessary
- Complete cruise flow/checklist
- Determine wind direction
-
S-Turns Common Errors:
- Failure to adequately clear the area
- Poor coordination
- Gaining or losing altitude
- Misjudging the rate of turn
- Inability to visualize the half-circle ground track
- Poor timing in the beginning and recovering from turns
- Faulty correction for drift
- Inadequate visual lookout for other aircraft
- Inability to adequately divide attention between airplane control and maintaining ground track
- Rolling into an angle of bank too quickly will not result in crossing perpendicular to the reference line
- Rolling into an angle of bank too slowly will result in a portion of the maneuver being straight and level to return to profile
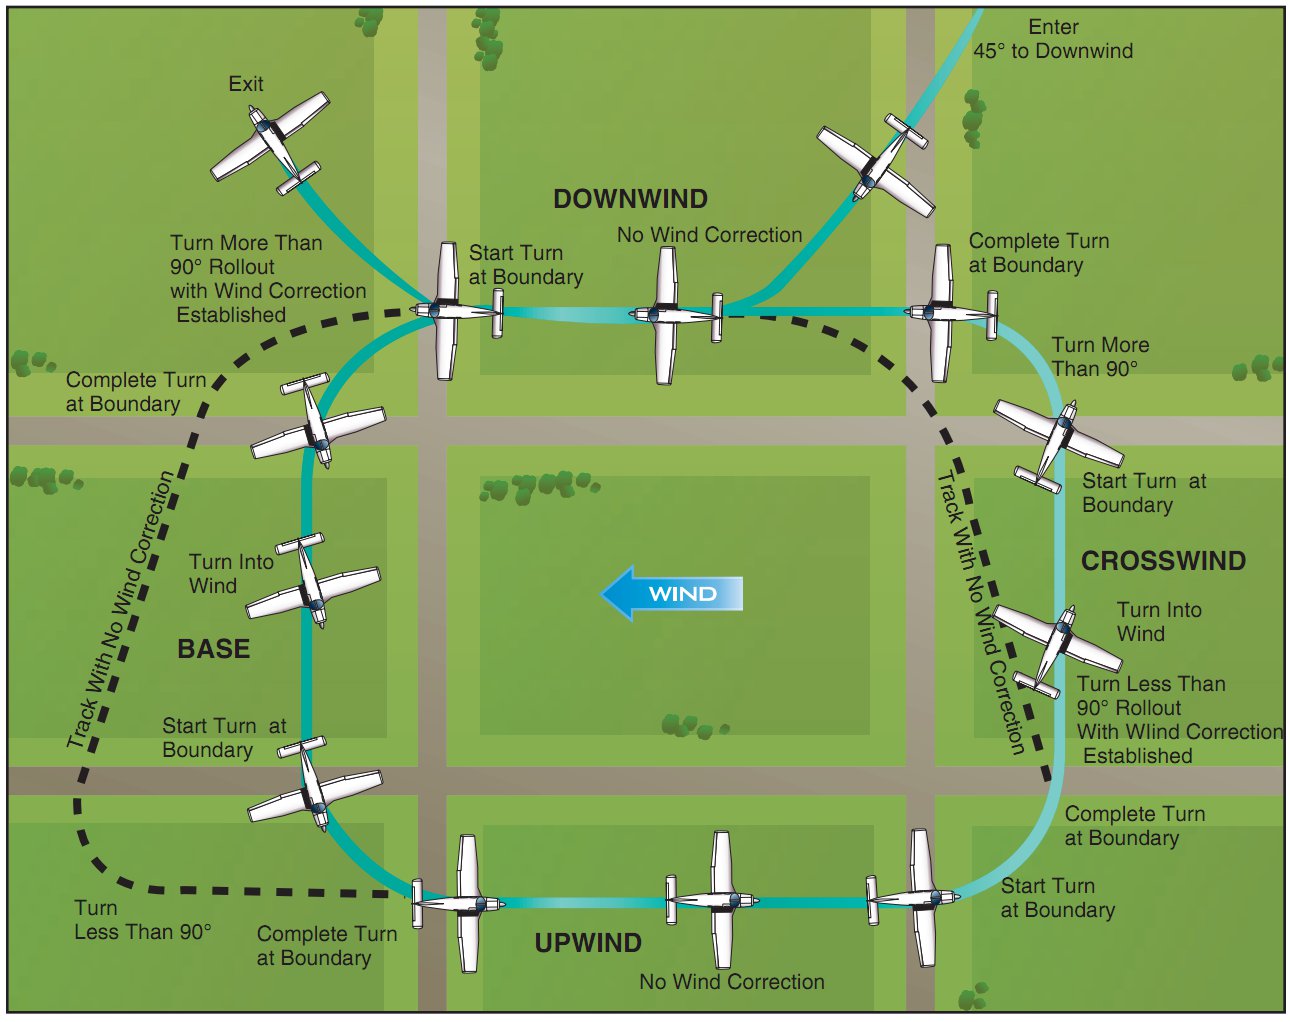
Rectangular Course:
- The rectangular course maneuver simulates the airport traffic pattern, demonstrating the effect of wind on an aircraft throughout [Figure 6]
- The maneuver assists the student pilot in perfecting:
- Practical application of the turn
- The division of attention between the flightpath, ground objects, and the handling of the airplane
- The timing of the start of a turn so that the turn will be fully established at a definite point over the ground
- The timing of the recovery from a turn so that a definite ground track will be maintained
- The establishment of a ground track and the determination of the appropriate "crab" angle
- It is unusual to find a situation where the wind is blowing exactly parallel to the field boundaries so slight wind corrections on all legs may be required
- It is important to anticipate the turns to correct for ground speed, drift, angle of bank (AoB), and turning radius
- When the wind is behind the airplane, the turn requires a larger AoB due to the turn radius/rate and vice versa
- Because of this, you will need to anticipate your turn at different points around the box pattern
- The higher the ground speed, the earlier you must anticipate the turn
- When the wind is behind the airplane, the turn requires a larger AoB due to the turn radius/rate and vice versa
- Altitude and airspeed should be held constant
- Requires utilization of ground track with wind forming a "crab" angle to maintain an equidistant track from all sides of the rectangle
- Approximately 1/4 to 1/2 mile away
- For a Cessna, this will be when the edge of the rectangle bisects the wing strut
- The closer you fly, the steeper the turns will have to be; the farther, the shallower
- Establish crab angles as necessary to maintain a uniform distance from the area boundaries for each leg of the maneuver
-
Rectangular Course Procedure:
- Note wind direction and strength, if able
- Important for finding the downwind and anticipating ground speed
- Wind direction can be determined by trees, water, flags, etc.
- Perform clearing turns looking for traffic and ground obstructions
- Pick a reference rectangle in an area where an emergency landing can be made if necessary
- Fields or perpendicular roads are best as they provide reference lines
- Distances should be about 1 mile in length and maintained at the same distance throughout the maneuver
- Establish and maintain downwind speed and 1,000' AGL (simulating traffic pattern) throughout the maneuver, maintaining 1/4th to 1/2 mile of lateral distance from the rectangular edges
- Enter the maneuver on a 45° mid-field downwind
- Ground speed will increase as you enter the pattern
- Turn base at boundary:
- AoB: Steep AoB, not to exceed 45°, transitioning to medium bank as the turn progresses
- GS: Decrease due to lost tailwind
- Degrees: Turn greater than 90° to compensate for wind, so as you roll out, you have established a crab
- Turn upwind at boundary:
- AoB: Medium AoB, transitioning shallow as the turn progresses
- GS: Decrease, you are now flying directly into the wind
- Degrees: Turn less than 90° due to the crab already set before your turn
- Turn crosswind at boundary:
- AoB: Shallow AoB, transitioning to medium as the turn progresses
- GS: Increase due to the loss of the complete headwind component
- Degrees: Turn less than 90° to allow for wind correction
- Turn downwind at boundary:
- AoB: Medium AoB transitioning to a much steeper AoB than earlier, not to exceed 45°
- GS: Increase, due to the increasing tailwind
- Degrees: Turn more than 90°
- Depart the maneuver on a 45° mid-field downwind
- Upon completion of the maneuver, resume normal cruise speed
- Trim as necessary
- Complete cruise flow/checklist
- Note wind direction and strength, if able
-
Rectangular Course Common Errors:
- Failure to adequately clear the area
- Failure to establish proper altitude before entry (typically entering the maneuver while descending)
- Failure to establish appropriate wind correction angle, resulting in drift
- Gaining or losing altitude
- Poor coordination (Typically skidding in turns from a downwind heading and slipping in turns from an upwind heading)
- Abrupt control usage
- Inability to adequately divide attention between airplane control and maintaining ground track
- Improper timing to beginning and recovering from turns
- Inadequate visual lookout for other aircraft
Eights Along A Road:
- Consists of two complete adjacent circles of equal radii on each side of a straight road or other reference line on the ground [Figure 7]
- Develops the ability to maneuver the airplane accurately while dividing your attention between the flight path and the selected points on the ground
- Should not be introduced until the student has a complete grasp on fundamentals (Rectangular Course, S-Turns, Turns Around a Point)
- Perfects the knowledge of the effect of the angle of bank on the radius of turn
- Demonstrate how wind affects the path of the airplane over the ground
- To gain experience in the visualization of the results of planning before the execution of the maneuver
- Trains the student to think and plan ahead of the airplane
- Performed with the wind either perpendicular or parallel to the reference line
- The measure of progress in the performance of eights along a road is the smoothness and accuracy of the change in the bank used to counteract drift
- The sooner the drift is detected and correction applied, the smaller will be the required changes
- The more quickly the student can anticipate the corrections needed, the less obvious the changes will be, and the more attention can be diverted to the maintenance of altitude and operation of the airplane
- Errors in coordination must be eliminated, and a constant altitude maintained
-
Eights Along A Road Procedure:
- Determine wind direction
- This is important for the entry heading and reference point
- Commence a clearing turn, looking for traffic and ground obstructions
- Select 2 reference points on either side of the reference line in an area where an emergency landing can be made if necessary
- Establish and maintain 100 KIAS and 1,000' AGL
- Enter the maneuver parallel to the road
- You may need to establish a crab to maintain a straight ground path
- Abeam the first point, roll into a 30° to 40° angle
- Usually, the first turn is made toward a downwind heading
- As ground speed increases, the angle of bank will need to increase to increase the rate
- As ground speed decreases after the first half of the turn, shallow the bank to arrive over the reference line on the entry heading
- Perform the second turn
- Ground speed will slow, requiring a shallow angle of bank
- After 180° of turn, ground speed will increase, requiring an increase in the angle of bank
- Depart the maneuver on the entry heading
- Complete cruise checklist
- Determine wind direction
-
Eights Along A Road Common Errors:
- Failure to adequately clear the area
- Skidding or slipping turns
- Excessive gain or loss of altitude
- Overconcentration on the pylon and failure to observe traffic
- Abrupt control usage
Eights Across A Road:
- Once the fundamentals of Rectangular Course, S-Turns, and Turns Around a Point are understood, next comes eights across a road
- The maneuver is a variation of eights along a road and involves the same principles and techniques
- The primary difference is that at the completion of each loop of the figure eight, the airplane should cross an intersection of roads or a specific point on a straight road
- Wind should be perpendicular to the road
- Consists of two complete adjacent circles of equal radii on each side of a straight road or other reference line on the ground [Figure 8]
- Develops the ability to maneuver the airplane accurately while dividing your attention between the flight path and the selected points on the ground
- Perfects the knowledge of the effect of the angle of bank on the radius of turn
- Demonstrate how wind affects the path of the airplane over the ground
- To gain experience in the visualization of the results of planning before the execution of the maneuver
- Trains the student to think and plan ahead of the airplane
- The measure of progress in the performance of eights along a road is the smoothness and accuracy of the change in the bank angle used to counteract drift
- The sooner the drift is detected and correction applied, the smaller will be the required changes
- The more quickly the student can anticipate the corrections needed, the less obvious the changes will be, and the more attention can be diverted to the maintenance of altitude and operation of the airplane
- Errors in coordination must be eliminated, and a constant altitude maintained
-
Eights Across a Road Procedure:
- Determine wind direction
- This is important for the entry heading and reference point
- Commence a clearing turn, looking for traffic and ground obstructions
- Select 2 reference points on either side of the reference line in an area where an emergency landing can be made if necessary
- Establish and maintain an appropriate airspeed (generally 100 KIAS) and 1,000' AGL
- Enter the maneuver ~30° to the road
- You may need to establish a crab to maintain a straight ground path
- Abeam the first point, roll into a 30° to 40° angle of bank
- Usually, the first turn is made toward a downwind heading
- As ground speed increases, the angle of bank will need to increase to increase the rate
- As ground speed decreases after the first half of the turn, shallow the bank to arrive over the reference line on the entry heading
- Perform the second turn
- Ground speed will slow, requiring a shallow angle of bank
- After 180° of turn, ground speed will increase, requiring an increase in the angle of bank
- Depart the maneuver on the entry heading
- Complete cruise checklist
- Determine wind direction
-
Eights Across a Road Common Errors:
- Failure to adequately clear the area
- Skidding or slipping turns
- Excessive gain or loss of altitude
- Overconcentration on the pylon and failure to observe traffic
- Abrupt control usage
Eights Around Pylons:
- Consists of a figure eight pattern at a pivotal altitude as two points, or pylons, are used as references for turns [Figure 1]
- Involves flying downwind between the pylons and upwind outside of the pylons
- Develops the ability to maneuver the airplane accurately while dividing your attention between the flight path and the selected points on the ground
- The most advanced and most difficult of the low-altitude flight training maneuvers
- Should not be introduced until the student has a complete grasp on fundamentals (Rectangular Course, S-Turns, Turns Around a Point)
- Perfects the knowledge of the effect of the angle of bank on the radius of turn
- Demonstrate how wind affects the path of the airplane over the ground
- To gain experience in the visualization of the results of planning before the execution of the maneuver
- Trains the student to think and plan ahead of the airplane
-
Eights Around Pylons Procedure:
- Determine wind direction
- This is important for the entry heading and reference point
- Commence a clearing turn, looking for traffic and ground obstructions
- Select 2 reference points in an area where an emergency landing can be made if necessary
- The pylons selected should be on a line 90° to the direction of the wind and should be in an area away from communities, livestock, or groups of people to avoid possible annoyance or hazards to others
- Establish and maintain 100 KIAS (approx. 2200 RPM) and 1,000' AGL
- Enter the maneuver on a downwind heading when passing between the pylons
- Abeam the first point, roll into a 30° to 40° angle
- The distance between the pylons and the wind velocity will determine the initial angle of bank required to maintain a constant radius from the pylons during each turn
- Steepest banks will be required just after entry and just before roll-out from each turn, as ground speed is highest with the tailwind
- The bank will shallow as you continue through the 180° point where it will be the shallowest, gradually increasing
- Perform the second turn
- The roll-out from each turn must be completed on the proper heading with sufficient wind correction angle to ensure that after the brief straight-and-level flight, the airplane will arrive at the point where a turn of the same radius can be made around the other pylon
- The straight-and-level flight segments must be tangent to both circular patterns
- Depart the maneuver on the entry heading
- Complete cruise checklist
- Determine wind direction
-
Eights Around Pylons Common Errors:
- Failure to adequately clear the area
- Poor choice of pylons
- Improper entry to the maneuver
- Incorrect initial bank
- Skidding or slipping turns
- Excessive gain or loss of altitude
- Overconcentration on the pylon and failure to observe traffic
- Not entering the pylon turns into the wind
- Failure to roll out of turns on proper heading
- Failure to assume a heading when flying between pylons that will compensate sufficiently for drift
- Failure to time the bank so that the turn entry is completed with the pylon in position
- Abrupt control usage
- Loss of orientation
Eights on Pylons:
-
Eights on Pylons Purpose:
- Eights on Pylons develop the ability to maneuver the airplane accurately while dividing your attention between the flight path and the selected points on the ground, perfecting the knowledge of the effect of the angle of bank on the radius of turn
-
Eights on Pylons Description:
- Consists of a figure eight pattern at a pivotal altitude as two points, or pylons, are used as references for turns [Figure 4]
- The most advanced and most difficult of the low-altitude flight training maneuvers
- Should not be introduced until the student has a complete grasp on fundamentals (Rectangular Course, S-Turns, Turns Around a Point)
- Demonstrate how wind affects the path of the airplane over the ground
- To gain experience in the visualization of the results of planning before the execution of the maneuver
- Trains the student to think and plan ahead of the airplane
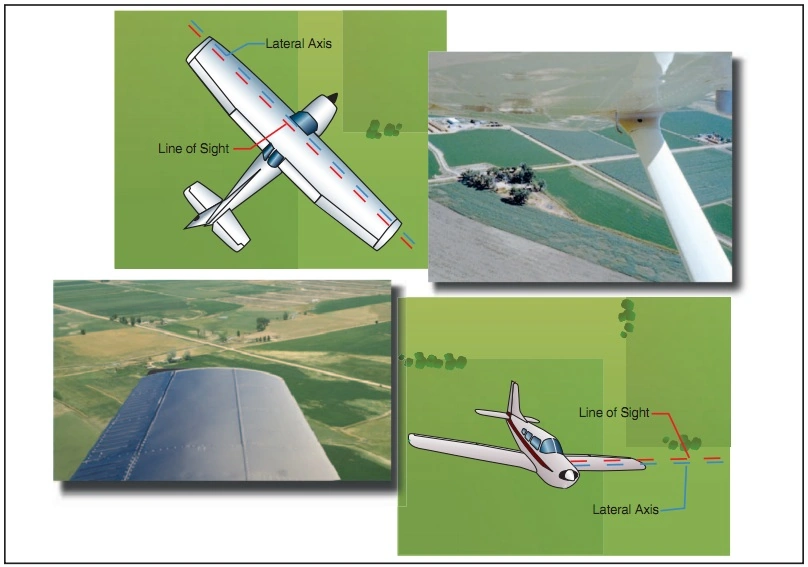
- Elevators are the primary control for holding the pylons
- As the airplane approaches a position where the pylon appears to be just ahead of the wingtip, the turn should be started by lowering the upwind wing to place the pilot's line of sight reference on the pylon
- As the turn is continued, the line of sight reference can be held on the pylon by gradually increasing the bank
- The roll-out must be completed with the proper wind correction angle to correct for wind drift so that the airplane will arrive at a point downwind from the second pylon at the same distance it was from the first pylon at the beginning of the maneuver
- Upon reaching that point, a turn is started in the opposite direction by lowering the upwind wing to again place the pilot's line of sight reference on the pylon
- The turn is then continued just as in the turn around the first pylon but in the opposite direction
- Corrections for temporary variations, such as those caused by gusts or inattention, may be made by shallowing the bank to fly relatively straight to bring forward a lagging wing or by steepening the bank temporarily to turn back a wing that has crept ahead
- As proficiency is gained, increase the complexity of the maneuver by entering at a distance from the pylon that will result in a specific bank angle at the steepest point in the pylon turn
-
Pivotal Altitude:
- Pivotal altitude: A height above ground at which, from the pilot's line of sight, the extended lateral axis of an aircraft doing a 360° level turn [in nil wind conditions] would appear to be fixed to one ground point, and the aircraft's wingtip, thus pivoting on that point
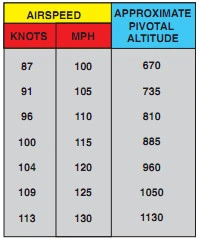
- Governed by the ground speed
- GS^2 / 11.3 = Pivotal Altitude in Knots
- GS^2 / 15 = Pivotal Altitude in Miles Per Hour
- Since the headings throughout the turns continually vary from directly downwind to directly upwind, the ground speed will constantly change
- This will result in the proper pivotal altitude varying slightly throughout the eight
- Adjustment is made for this by climbing or descending, as necessary, to hold the reference line or point on the pylons
- Pivotal altitude is not always correct; high-wing, low-wing, swept-wing, and so on will show different angles; therefore, you must have a lateral reference
- Since different airplanes fly at different airspeeds, the ground speed will be different
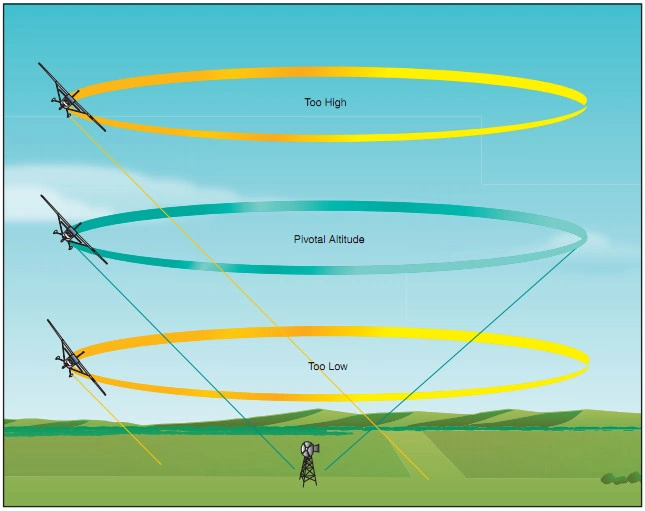
- Therefore, each airplane will have its own pivotal altitude [Figure 10]
- At any altitude above that pivotal altitude, the projected reference line will appear to move rearward in a circular path in relation to the pylon
- Conversely, when the airplane is below the pivotal altitude, the projected reference line will appear to move forward in a circular path
- Distance from the pylon affects the angle of bank
- The pivotal altitude does not vary with the angle of bank being used unless the bank is steep enough to affect the ground speed
-
Pivotal Altitude Demonstration:
- Fly the airplane at normal cruising speed and at an altitude estimated to be below the proper pivotal altitude, and then begin a medium-banked turn
- It will be seen that the projected reference line of sight appears to move forward along the ground (the pylon moves back) as the airplane turns
- A climb is then made to an altitude well above the pivotal altitude, and when the airplane is again at normal cruising speed, it is placed in a medium-banked turn
- At this higher altitude, the projected reference line of sight now appears to move backward across the ground (the pylon moves forward) in a direction opposite that of flight
- After the high altitude extreme has been demonstrated, the power is reduced, and a descent at cruising speed begins by continuing medium bank around the pylon
- The apparent backward travel of the projected reference line with respect to the pylon will slow down as altitude is lost, stop for an instant, then start to reverse itself, and would move forward if the descent were allowed to continue below the pivotal altitude
- The altitude at which the line of sight apparently ceased to move across the ground was the pivotal altitude
- Pivotal altitude: A height above ground at which, from the pilot's line of sight, the extended lateral axis of an aircraft doing a 360° level turn [in nil wind conditions] would appear to be fixed to one ground point, and the aircraft's wingtip, thus pivoting on that point
-
Eights On Pylons Procedure:
- Determine wind direction
- This is important for the entry heading and reference point
- Commence a clearing turn, looking for traffic and ground obstructions
- Select 2 reference points in an area where an emergency landing can be made if necessary
- Select the first point
- Turn downwind, fly for 15-20 seconds, and select a second point
- They should be sufficiently prominent to be readily seen by the pilot when completing the turn around one pylon and heading for the next, and should be adequately spaced to provide time for planning the turns and yet not cause unnecessary straight-and-level flight between the pylons (usually about a mile apart)
- The selected pylons should also be at the same elevation since differences of over a very few feet will necessitate climbing or descending between each turn
- Establish and maintain airspeed and pivotal altitude
- Enter the maneuver on a 45° to the downwind between the two points
- Abeam the first point, roll into a 30° to 40° angle
- Keep the point under the wingtip
- The reference line should appear to pivot on the pylon
- If the point moves forward, push forward, reducing some power
- If the point moves backward, pull up, adding some power
- Since a constant distance from the pylon is not required on this maneuver, no correction to counteract drifting should be applied during the turns
- Continue turn and level off 3/4 through the turn straight-and-level
- Fly for 3-5 seconds in level flight
- Perform the second turn
- Ground speed will be slowest
- Depart the maneuver on the entry heading
- Should be at your pivotal altitude on exit
- Complete cruise checklist
- Determine wind direction
-
Eights on Pylons Common Errors:
- Failure to adequately clear the area
- Improper entry to the maneuver
- Skidding or slipping turns
- Excessive gain or loss of altitude
- Overconcentration on the pylon and failure to observe traffic
- Poor choice of pylons
- Not entering the pylon turns into the wind
- Failure to assume a heading when flying between pylons that will compensate sufficiently for drift
- Failure to time the bank so that the turn entry is completed with the pylon in position
- Abrupt control usage
- Inability to select pivotal altitude
- The most common error in attempting to hold a pylon is incorrect use of the rudder

Private Pilot - Ground Reference Maneuvers Airman Certification Standards:
- To determine that the applicant exhibits satisfactory knowledge, risk management, and skills associated with ground reference maneuvering which may include a rectangular course, Sturns, and turns around a point
- Note: See Appendix 7: Aircraft, Equipment, and Operational Requirements & Limitations
- References: 14 CFR part 61; FAA-H-8083-2, FAA-H-8083-3
- Ground reference maneuvers lesson plan
Ground Reference Maneuvers Knowledge:
The applicant must demonstrate an understanding of:Ground Reference Maneuvers Risk Management:
The applicant demonstrates the ability to identify, assess, and mitigate risks, encompassing:-
PA.V.B.R1:
Failure to divide attention between airplane control and orientation -
PA.V.B.R2:
Collision hazards, to include aircraft, terrain, obstacles, and wires -
PA.V.B.R3:
Low altitude maneuvering including stall, spin, or CFIT -
PA.V.B.R4:
Distractions, improper task management, loss of situational awareness, or disorientation -
PA.V.B.R5:
Failure to maintain coordinated flight
Ground Reference Maneuvers Skills:
The applicant demonstrates the ability to:-
PA.V.B.S1:
Clear the area -
PA.V.B.S2:
Select a suitable ground reference area, line, or point as appropriate -
PA.V.B.S3:
Plan the maneuver: (the evaluator must select at least one maneuver for the applicant to demonstrate)-
PA.V.B.S3a:
Rectangular course: enter a left or right pattern, 600 to 1,000 feet above ground level (AGL) at an appropriate distance from the selected reference area, 45° to the downwind leg -
PA.V.B.S3b:
S-turns: enter perpendicular to the selected reference line, 600 to 1,000 feet AGL at an appropriate distance from the selected reference area -
PA.V.B.S3c:
Turns around a point: enter at an appropriate distance from the reference point, 600 to 1,000 feet AGL at an appropriate distance from the selected reference area
-
-
PA.V.B.S4:
Apply adequate wind-drift correction during straight and turning flight to maintain a constant ground track around a rectangular reference area, or to maintain a constant radius turn on each side of a selected reference line or point -
PA.V.B.S5:
If performing S-Turns, reverse the turn directly over the selected reference line; if performing turns around a point, complete turns in either direction, as specified by the evaluator -
PA.V.B.S6:
Divide attention between airplane control, traffic avoidance and the ground track while maintaining coordinated flight -
PA.V.B.S7:
Maintain altitude ±100 feet; maintain airspeed ±10 knots
Commercial Pilot - Eights on Pylons Airman Certification Standards:
- To determine that the applicant exhibits satisfactory knowledge, risk management, and skills associated with eights on pylons
- Note: See Appendix 7: Aircraft, Equipment, and Operational Requirements & Limitations
- References: 14 CFR part 61; FAA-H-8083-2, FAA-H-8083-3
Eights on Pylons Knowledge:
The applicant must demonstrate an understanding of:-
PA.V.B.K1:
Purpose of eights on pylons -
PA.V.B.K2:
Aerodynamics associated with the eights on pylons to include coordinated and uncoordinated flight -
PA.V.B.K3:
Pivotal altitude and factors that affect it -
PA.V.B.K4:
Effect of wind on ground track -
PA.V.B.K5:
Phases of the eights on pylons maneuver from entry to recovery
Eights on Pylons Risk Management:
The applicant demonstrates the ability to identify, assess, and mitigate risks, encompassing:-
CA.V.E.R1:
Failure to divide attention between airplane control and orientation -
CA.V.E.R2:
Collision hazards, to include aircraft, terrain, obstacles, and wires -
CA.V.E.R3:
Low altitude maneuvering including stall, spin, or CFIT -
CA.V.E.R4:
Distractions, improper task management, loss of situational awareness, or disorientation -
CA.V.E.R5:
Failure to maintain coordinated flight -
CA.V.E.R5:
Failure to manage energy state -
CA.V.E.R5:
Emergency landing considerations
Eights on Pylons Skills:
The applicant demonstrates the ability to:-
CA.V.E.S1:
Clear the area -
CA.V.E.S2:
Determine the approximate pivotal altitude -
CA.V.E.S3:
Select suitable pylons that will permit straight-and-level flight between the pylons -
CA.V.E.S4:
Enter the maneuver in the correct direction and position using an appropriate altitude and airspeed -
CA.V.E.S5:
Establish the correct bank angle for the conditions, not to exceed 40° -
CA.V.E.S6:
Apply smooth and continuous corrections so that the line-of-sight reference line remains on the pylon -
CA.V.E.S7:
Divide attention between accurate, coordinated airplane control and outside visual references -
CA.V.E.S8:
Maintain pylon position using appropriate pivotal altitude, avoiding slips and skids
Ground Reference Maneuvers Case Studies:
- National Transportation Safety Board (NTSB) Identification: CEN23LA009:
- The NTSB determines the probable cause(s) of this accident to be: The pilot's exceedance of the airplane's critical angle of attack in the traffic pattern, which resulted in an aerodynamic stall and loss of airplane control at too low of an altitude to recover. Contributing to the accident was the partial loss of engine power due to improper management of the fuel system
Conclusion:
- We usually think of air in the form of wind, like a stream flowing from one point long the surface to another however, air is more dynamic
- Air can also flow up, producing thermals used in gliding
- Air can also flow downwards, producing downdrafts like those seen in microbursts
- Ground reference maneuvers demand pilots face atmospheric conditions and apply appropriate corrections
- Consider flying ground reference maneuvers at night (safety pilot recommended) to practice with limited horizon and visual cues, better getting after the basics
- Consider practicing maneuvers on a flight simulator to introduce yourself to maneuvers or knock off rust
- Still looking for something? Continue searching:
References:
- Federal Aviation Administration - Pilot/Controller Glossary
- Airplane Flying Handbook - Eights Along A Road
- Airplane Flying Handbook - Eights Across A Road
- Airplane Flying Handbook - Elementary Eights
- Airplane Flying Handbook - Drift and Ground Track Control
- Airplane Flying Handbook - Rectangular Course
- Airplane Flying Handbook - S-Turns
- FAA - Airman Certification Standards
- AOPA - Understanding the most basic ground reference maneuver
- NASA - Cross Winds
- Airplane Flying Handbook (6-12) Eights On Pylons
- Airplane Flying Handbook (6-9) Elementary Eights
- AOPA - Pivotal Altitude Explained