Airport Diagram
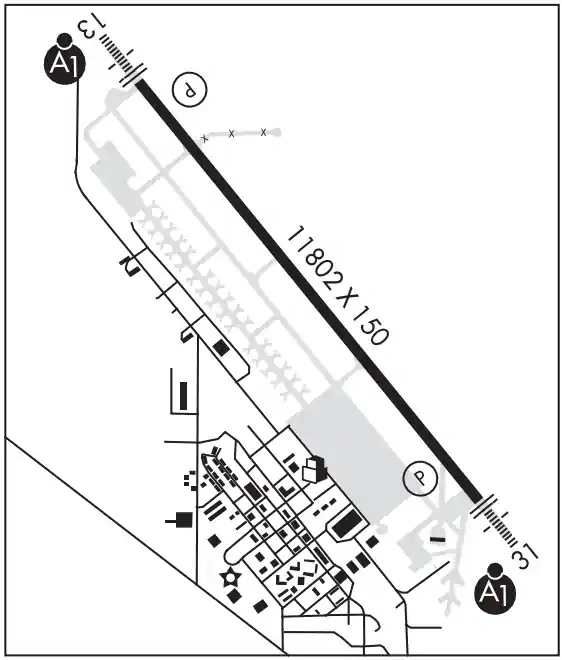
Airport diagrams are pictorial maps of the airport environment to gain and maintain situational awareness in the terminal area.
Introduction to Airport Diagram
- Airport diagrams are specifically designed to assist in the movement of ground traffic at locations with complex runway/taxiway configurations and provide information for updating computer based navigation systems (INS) aboard aircraft
- Runway dimensions, elevations, and gradient (if greater than 0.3° up or down)
- Airport diagram scales are variable
- Runway heading to the nearest tenth of a degree
- Dimensions of runway overruns
- Runway identification number
- Location of arresting gear, barriers, and displaced thresholds
- Position and identification of taxiways, ramps and parking areas
- Type of runway surface
- Closed runways/taxiways
- Location/identification of buildings, control tower, airport beacon, and other structures
- True/magnetic north orientation, date, and annual rate of change - true/magnetic north orientation may vary from diagram to diagram, i.e., north may not be at the top of the page
- Location/elevation of obstructions
- Geographical coordinate grid - Coordinate values are shown in 1 or 1/2 minute increments. They are further broken down into 5 second ticks, within each 1-minute increments
- Runway weight-bearing capacity
- Airport diagrams are not intended to be used for approach and landing or departure operations
- Reinforce your understanding of Airport Diagram by completing the knowledge quiz and interactive scenario, comparing your performance with the applicable Airman Certification Standards, and reviewing the topic summary before moving on.
Help Us Grow
Enjoy CFI Notebook? A one-time donation helps us create more high-quality lessons, quizzes, scenarios, graphics, and interactive tools.
Airport Diagram Key Highlights
- Airport diagrams provide pilots with detailed airport layout information for taxi, runway, ramp, and surface movement operations.
- Diagrams identify runways, taxiways, aprons, terminals, hotspots, hold-short lines, and other important airport surface features.
- Pilots use airport diagrams during preflight planning, taxi briefings, arrivals, departures, and ground movement operations.
- Hot spots on airport diagrams identify areas with increased risk of runway incursions or surface movement confusion.
- Airport diagrams help pilots comply with taxi instructions, runway assignments, and air traffic control clearances.
- Runway dimensions, lighting information, elevation data, and communication frequencies may be included on airport diagrams.
- Pilots should review airport diagrams before operating at unfamiliar or complex airports to reduce workload and navigation errors.
- Electronic Flight Bags (EFBs) and moving map displays can improve airport surface situational awareness.
- Outdated or misread airport diagrams can contribute to taxi errors, wrong-runway events, and runway incursions.
- Understanding airport diagrams improves ground navigation, airport safety, and overall operational awareness.
Airport Surface Hot-spots
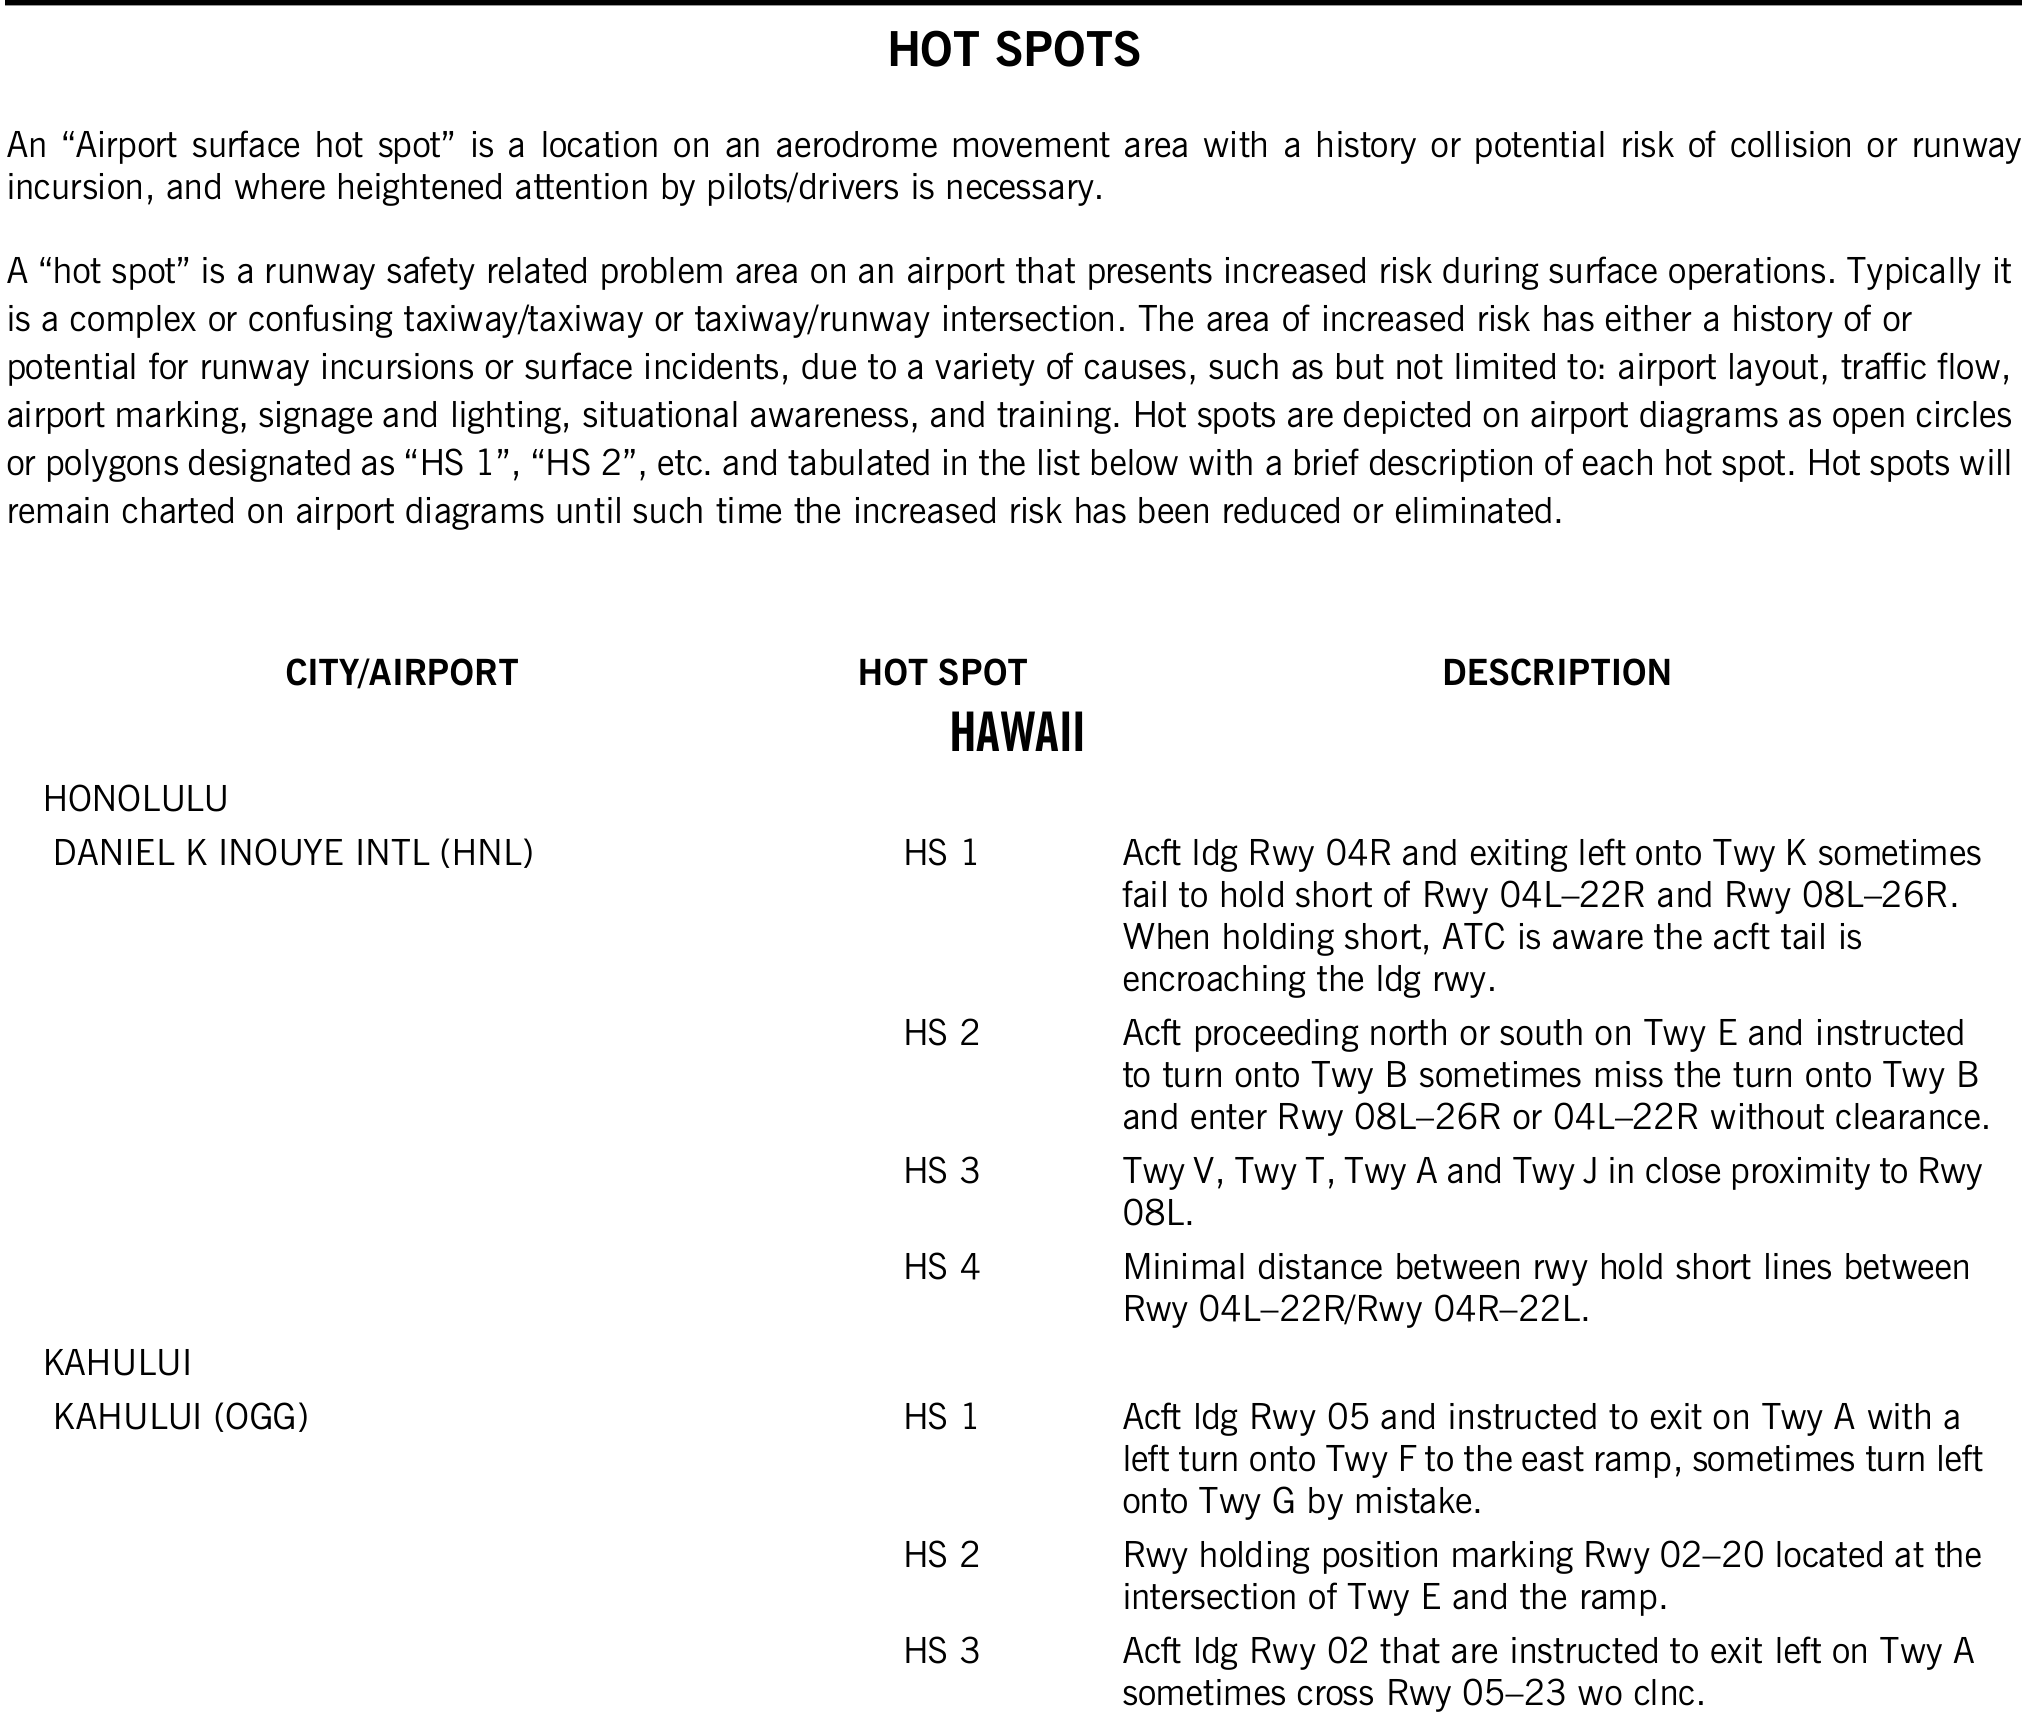
- An airport surface hot spot is a location on an airport movement area with a history or potential risk of collision or runway incursion, where heightened attention by pilots and drivers is necessary.
- It is a runway-safety problem area that presents increased risk during surface operations.
- A hot spot is typically a complex or confusing taxiway/taxiway or taxiway/runway intersection.
- Contributing factors include airport layout, traffic flow, airport markings, signage and lighting, situational awareness, and training.
- Circles or ellipses identify ground-movement hot spots.
- These may involve hold-short line infractions, approach-hold issues, complex taxiways, movement/nonmovement boundaries, tower line-of-sight problems, or marking and signage issues.
- Cylinders identify wrong-surface hot spots.
- These mark locations where aircraft have inadvertently attempted to, or actually did, depart from or land on the wrong surface.
- Labels such as HS 1, HS 2, and HS 3 connect each diagram location to a brief description in the Chart Supplement U.S..
- Read the description on the hot spot table to understand why the location is highlighted.
- Hot spots remain charted until the increased risk has been reduced or eliminated.
- The FAA’s From the Flight Deck videos provide additional airport-specific coverage of hot spots and surface-safety concerns.
- Brief the route: Before taxiing, identify hot spots along the assigned route, the specific hazard at each, and applicable holding positions.
- Check current conditions: Review current airport information, notices, and closures; construction or temporary changes may affect the route.
- Reduce distractions: Keep the diagram available, maintain an outside scan, and postpone nonessential tasks while navigating the hot spot.
- Stop if uncertain: On a taxiway, stop and request clarification from air traffic control if unsure of your position or clearance. Obtain an explicit runway-crossing clearance when operating under tower control.
Reading a hot-spot listing

- HS 1: The sample identifies a complex area, calls for verification of the correct taxi route, and notes that areas south of Taxiways A and G are private ramp.
- HS 2: The sample identifies traffic congestion from the large volume of aircraft proceeding to and from Runway 31.
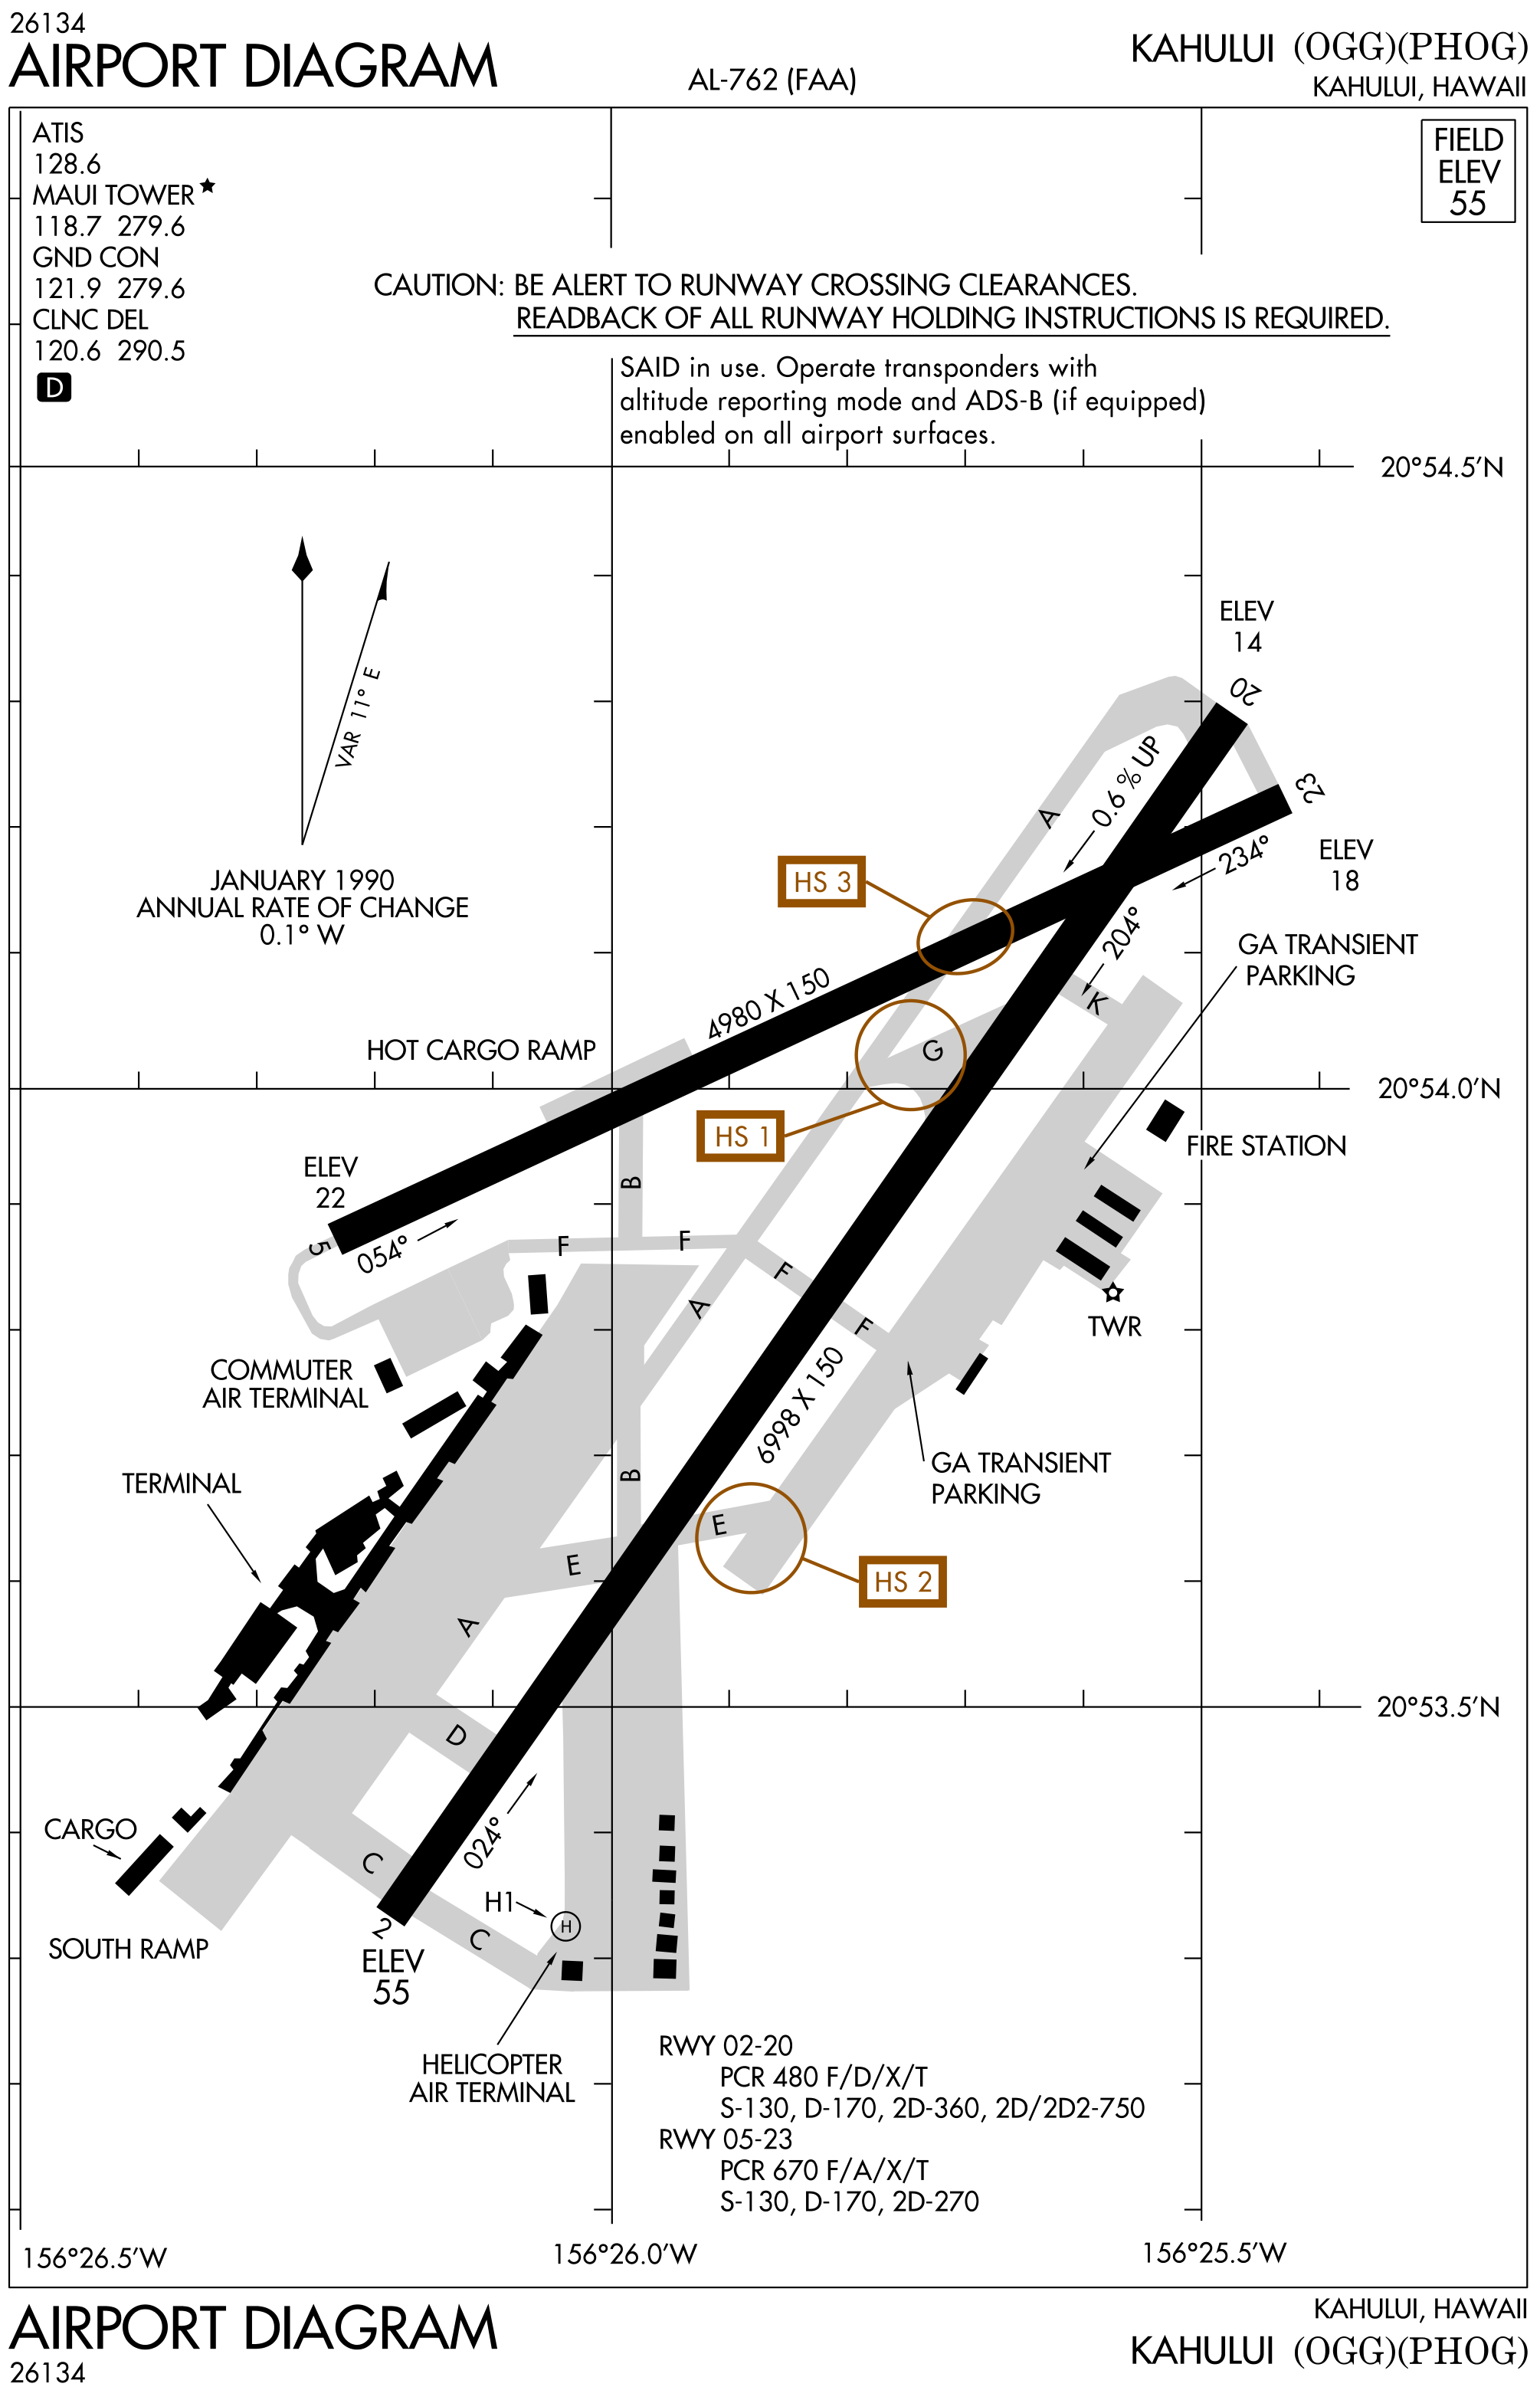
Explore Hot Spots at Kahului (OGG).
- Hover or tap an outlined location.
Read all 3 explanations
HS 1 — Taxiway F versus Taxiway G
FAA description: “Acft ldg Rwy 05 and instructed to exit on Twy A with a left turn onto Twy F to the east ramp, sometimes turn left onto Twy G by mistake.”
In plain language: after landing on Runway 05 and exiting onto Taxiway A, a left turn intended for Taxiway F toward the east ramp can be confused with Taxiway G.
HS 2 — Runway 02–20 holding position
FAA description: “Rwy holding position marking Rwy 02–20 located at the intersection of Twy E and the ramp.”
In plain language: the holding position for Runway 02–20 is at the Taxiway E/ramp intersection. Locate the marking before moving toward the runway.
HS 3 — Crossing Runway 05–23
FAA description: “Acft ldg Rwy 02 that are instructed to exit left on Twy A sometimes cross Rwy 05–23 wo clnc.”
In plain language: aircraft landing on Runway 02 and exiting left onto Taxiway A may cross Runway 05–23 without clearance. Identify the crossing while planning the exit.
Read the FAA hot-spot source excerpt
Airport Diagram Legend
-
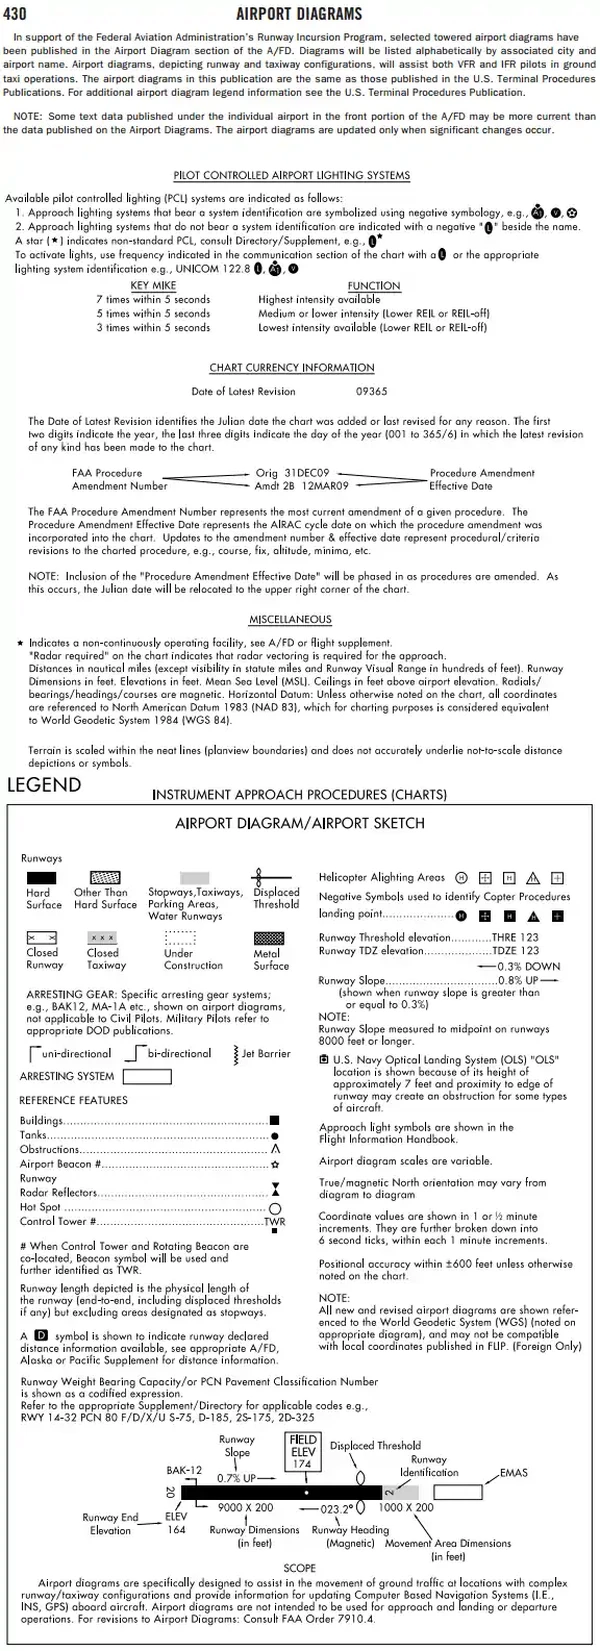
Instrument Approach Procedures Airport Diagram Legend - A legend can be found at the front of the Instrument Approach Procedures publications. []
-
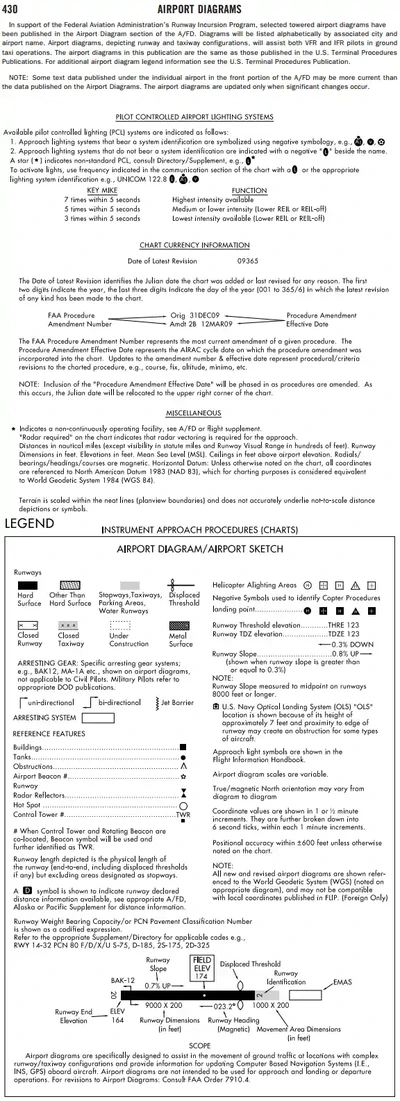
Instrument Approach Procedures Airport Diagram Legend

Locating Airport Diagrams
- Current FAA airport diagrams are available from official sources:
- Full-page airport diagrams are published in the Terminal Procedures Publication and are available as individual Airport Diagram charts through the FAA's digital Terminal Procedures Publication search.
- Selected airport diagrams are also published in the Chart Supplement U.S.
- Pilots should verify that the diagram is current and review applicable Notices to Airmen before use.
Airport Diagram Interactive Scenario
The Night Taxi Across Two Intersecting Runways
Use an airport diagram to brief, taxi, detect a routing error, and avoid a runway incursion at an unfamiliar field. Abbreviations used in this scenario: Notice to Airmen (NOTAM).
Scenario Complete
Airport Diagram Knowledge Check
Choose the knowledge check that matches your current training for Airport Diagram.
 Private Pilot
PPL knowledge check
Core Knowledge Review
Review foundational knowledge, key concepts, and practical considerations. Topic: Airport Diagram.
- Immediate feedback
- Answer explanations
- Account progress tracking
 Commercial Pilot
CPL knowledge check
Advanced Application
Apply knowledge to advanced operations, risk management, and aeronautical decision-making. Topic: Airport Diagram.
- Immediate feedback
- Answer explanations
- Account progress tracking
Why Take a Quiz?
Quizzes reinforce key concepts, identify knowledge gaps, and build confidence for real-world decisions. Quiz material is representative of the information provided here and is not based on or sourced from the Federal Aviation Administration test bank.
Airport Diagram-Related Airman Certification Standards
Commercial Pilot (Helicopter) Hover Taxi Airman Certification Standards
- Objective: To determine the applicant exhibits satisfactory knowledge, risk management, and skills associated with hover taxi operations, including runway incursion avoidance.
- References: AC 91-73; AIM; Chart Supplements; FAA-H-8083-2, FAA-H-8083-21, FAA-H-8083-25; POH/RFM
▤ Knowledge 8 ACS Elements
-
CH.IV.B.K1: Current airport aeronautical references and information resources such as the Chart Supplement, airport diagram, and Notices to Air Missions (NOTAMs). -
CH.IV.B.K2: Hover taxi instructions, clearances, and limitations. -
CH.IV.B.K3: Airport/heliport/helipad/landing area, signs, markings, and lighting. -
CH.IV.B.K4: Visual indicators for wind. -
CH.IV.B.K5: Aircraft lighting, as appropriate. -
CH.IV.B.K6: Procedures for:-
CH.IV.B.K6a: Pilot activities during taxiing -
CH.IV.B.K6b: Safe hover taxi at towered and non-towered airports/heliports/helipads/landing areas -
CH.IV.B.K6c: Entering or crossing runways
-
-
CH.IV.B.K7: Height/Velocity (H/V) considerations. -
CH.IV.B.K8: Aircraft operating limitations.
! Risk Management 8 ACS Elements
-
CH.IV.B.R1: Distractions, task prioritization, loss of situational awareness, or disorientation. -
CH.IV.B.R2: Reduced visibility or night taxi operations. -
CH.IV.B.R3: Runway incursion. -
CH.IV.B.R4: Other aircraft, vehicles, persons, and hazards. -
CH.IV.B.R5: Hazardous effects of downwash. -
CH.IV.B.R6: Main rotor, tail rotor, and tail strike hazards. -
CH.IV.B.R7: Height/Velocity (H/V) considerations. -
CH.IV.B.R8: Confirmation or expectation bias as related to taxi instructions.
✓ Skills 12 ACS Elements
-
CH.IV.B.S1: Complete the appropriate checklist(s). -
CH.IV.B.S2: Receive and correctly read back clearances/instructions, if applicable. -
CH.IV.B.S3: Use an airport diagram or taxi chart during taxi, if published, and maintain situational awareness. -
CH.IV.B.S4: Comply with airport/heliport taxiway markings, signals, and signs. -
CH.IV.B.S5: Maintain powerplant and main rotor (Nr) speed within normal limits. -
CH.IV.B.S6: Maintain a straight ground track within ±2 feet of a designated ground track. -
CH.IV.B.S7: Maintain recommended hovering altitude, ±1/2 of that altitude within 10 feet of the surface, if above 10 feet, ±5 feet. -
CH.IV.B.S8: Hover taxi over specified ground references, demonstrating forward, sideward, and rearward hovering and hovering turns. -
CH.IV.B.S9: Maintain a constant rate of turn at pivot points. -
CH.IV.B.S10: Maintain a position within 2 feet of each pivot point during turns. -
CH.IV.B.S11: Make a 360° pivoting turn, left and right, stopping within 10° of a specified heading. -
CH.IV.B.S12: Make smooth, timely, and correct control application during the maneuver.
Commercial Pilot (Helicopter) Air Taxi Airman Certification Standards
- Objective: To determine the applicant exhibits satisfactory knowledge, risk management, and skills associated with air taxi operations.
- References: AC 91-73; AIM; Chart Supplements; FAA-H-8083-2, FAA-H-8083-21, FAA-H-8083-25; POH/RFM
▤ Knowledge 7 ACS Elements
-
CH.IV.C.K1: Current airport aeronautical references and information resources such as the Chart Supplement, airport diagram, and Notices to Air Missions (NOTAMs). -
CH.IV.C.K2: Air taxi instructions, clearances, and limitations. -
CH.IV.C.K3: Airport/heliport/helipad/landing area, signs, markings, and lighting. -
CH.IV.C.K4: Visual indicators for wind. -
CH.IV.C.K5: Aircraft lighting, as appropriate. -
CH.IV.C.K6: Procedures for:-
CH.IV.C.K6a: Pilot activities during taxiing -
CH.IV.C.K6b: Safe air taxi at towered and nontowered airports -
CH.IV.C.K6c: Overflying of runways
-
-
CH.IV.C.K7: Height/Velocity (H/V) considerations.
! Risk Management 6 ACS Elements
-
CH.IV.C.R1: Distractions, task prioritization, loss of situational awareness, or disorientation. -
CH.IV.C.R2: Reduced visibility or night taxi operations. -
CH.IV.C.R3: Runway incursion. -
CH.IV.C.R4: Main rotor, tail rotor, and tail strike hazards. -
CH.IV.C.R5: H/V diagram performance in case of powerplant failure. -
CH.IV.C.R6: Confirmation or expectation bias as related to taxi instructions.
✓ Skills 7 ACS Elements
-
CH.IV.C.S1: Complete the appropriate checklist(s). -
CH.IV.C.S2: Use an airport diagram or taxi chart during taxi, if published, and maintain situational awareness. -
CH.IV.C.S3: Select a safe airspeed and altitude. -
CH.IV.C.S4: Maintain desired track and groundspeed in headwind and crosswind conditions, avoiding conditions that might lead to loss of tail rotor/antitorque effectiveness. -
CH.IV.C.S5: Maintain powerplant and main rotor (Nr) speed within normal limits. -
CH.IV.C.S6: Comply with airport/heliport/helipad/landing area markings, lights, signs, and ATC instructions. -
CH.IV.C.S7: Maintain specified altitude, ±10 feet.
Commercial Pilot (Helicopter) Taxiing with Wheel-Type Landing Gear Airman Certification Standards
- Objective: To determine the applicant exhibits satisfactory knowledge, risk management, and skills associated with ground taxi operations, in a wheel-type aircraft, including runway incursion avoidance.
- References: AC 91-73; AIM; Chart Supplements; FAA-H-8083-2, FAA-H-8083-21, FAA-H-8083-25; POH/RFM
▤ Knowledge 6 ACS Elements
-
CH.IV.D.K1: Current airport aeronautical references and information resources such as the Chart Supplement, airport diagram, and Notices to Air Missions (NOTAMs). -
CH.IV.D.K2: Taxi instructions/clearances. -
CH.IV.D.K3: Airport/heliport/helipad/landing area, signs, markings, and lighting. -
CH.IV.D.K4: Visual indicators for wind. -
CH.IV.D.K5: Aircraft lighting, as appropriate. -
CH.IV.D.K6: Procedures for:-
CH.IV.D.K6a: Appropriate flight deck activities prior to taxi, including route planning and identifying the location of Hot Spots -
CH.IV.D.K6b: Safe taxi at towered and nontowered airports -
CH.IV.D.K6c: Entering or crossing runways
-
! Risk Management 6 ACS Elements
-
CH.IV.D.R1: Activities and distractions. -
CH.IV.D.R2: Confirmation or expectation bias as related to taxi instructions. -
CH.IV.D.R3: Runway incursion. -
CH.IV.D.R4: Speed during taxi and turns. -
CH.IV.D.R5: Appropriate thrust vector and brake use. -
CH.IV.D.R6: Airframe and rotor clearances during taxi.
✓ Skills 10 ACS Elements
-
CH.IV.D.S1: Complete the appropriate checklist(s). -
CH.IV.D.S2: Use an appropriate airport/heliport diagram or taxi chart, if published. -
CH.IV.D.S3: Properly position nosewheel/tailwheel, if applicable, locked or unlocked. -
CH.IV.D.S4: Position the flight controls properly for the existing wind conditions, with the landing gear in contact with the surface, avoiding conditions that might lead to loss of directional control. -
CH.IV.D.S5: Properly use cyclic, collective, and brakes as applicable to control speed while taxiing. -
CH.IV.D.S6: Maintain powerplant and main rotor (Nr) speed within normal limits. -
CH.IV.D.S7: Maintain specified track within 2 feet. -
CH.IV.D.S8: Position the helicopter relative to hold lines or a specified point. -
CH.IV.D.S9: Receive and comply with ATC clearances/instructions, if applicable. -
CH.IV.D.S10: Comply with airport/heliport taxiway markings, lights, and signals.
Commercial Pilot (Airplane) Taxiing and Sailing (ASES, AMES) Airman Certification Standards
- Objective: To determine whether the applicant exhibits satisfactory knowledge, risk management, and skills associated with taxiing and Sailing operations, including runway incursion avoidance
- References: AC 91-73; AIM; Chart Supplements; FAA-H-8083-2 (Risk Management Handbook), FAA-H-8083-3 (Airplane Flying Handbook), FAA-H-8083-23 (Seaplane, Skiplane, and Float/Ski Equipped Helicopter Operations Handbook), FAA-H-8083-25 (Pilot Handbook of Aeronautical Knowledge); POH/AFM.
▤ Knowledge 6 ACS Elements
-
CA.II.E.K1: Airport information resources, including Chart Supplements, Airport diagram, and appropriate references. -
CA.II.E.K2: -
CA.II.E.K3: -
CA.II.E.K4: -
CA.II.E.K5: -
CA.II.E.K6: Procedures for:-
CA.II.E.K6a: Appropriate flight deck activities during taxiing or sailing. -
CA.II.E.K6b: Radio communications at towered and nontowered seaplane bases.
-
! Risk Management 5 ACS Elements
-
CA.II.E.R1: -
CA.II.E.R2: -
CA.II.E.R3: Low visibility taxi and sailing operations. -
CA.II.E.R4: -
CA.II.E.R5: Confirmation or expectation bias as related to taxi instructions.
✓ Skills 10 ACS Elements
-
CA.II.E.S1: Receive and correctly read back clearances/instructions, if applicable. -
CA.II.E.S2: Use an Airport diagram or taxi chart during taxi, if published. -
CA.II.E.S3: -
CA.II.E.S4: Depart the dock/mooring buoy or beach/ramp in a safe manner, considering wind, current, traffic, and hazards. -
CA.II.E.S5: Complete the appropriate checklist(s). -
CA.II.E.S6: Position the flight controls, flaps, doors, water rudders, and power correctly for the existing conditions to follow the desired course while sailing and to prevent or correct for porpoising and skipping during step taxi. -
CA.II.E.S7: Exhibit procedures for steering and maneuvering while maintaining proper situational awareness and desired orientation, path, and position while taxiing using idle, plow, or step taxi technique, as appropriate. -
CA.II.E.S8: Plan and follow the most favorable taxi or sailing course for current conditions. -
CA.II.E.S9: Abide by right-of-way rules, maintain positive airplane control, proper speed, and separation between other aircraft, vessels, and persons. -
CA.II.E.S10: Comply with applicable taxi elements in Task D if the practical test is conducted in an amphibious airplane.
Commercial Pilot (Airplane) Taxiing (ASEL, AMEL) Airman Certification Standards
- Objective: To determine whether the applicant exhibits satisfactory knowledge, risk management, and skills associated with taxi operations, including runway incursion avoidance
- References: AC 91-73; AIM; Chart Supplements; FAA-H-8083-2 (Risk Management Handbook), FAA-H-8083-3 (Airplane Flying Handbook), FAA-H-8083-25 (Pilot Handbook of Aeronautical Knowledge); POH/AFM.
▤ Knowledge 6 ACS Elements
-
CA.II.D.K1: Current airport aeronautical references and information resources such as the Chart Supplement, airport diagram, and Notices to Airmen (NOTAMs). -
CA.II.D.K2: Taxi instructions/clearances. -
CA.II.D.K3: Airport markings, signs, and lights. -
CA.II.D.K4: Visual indicators for wind. -
CA.II.D.K5: Aircraft lighting, as appropriate. -
CA.II.D.K6: Procedures for:-
CA.II.D.K6a: Appropriate flight deck activities prior to taxi, including route planning and identifying the location of Hot Spots. -
CA.II.D.K6b: Radio communications at towered and nontowered airports. -
CA.II.D.K6c: -
CA.II.D.K6d: -
CA.II.D.K6e:
-
! Risk Management 4 ACS Elements
-
CA.II.D.R1: -
CA.II.D.R2: Confirmation or expectation bias as related to taxi instructions. -
CA.II.D.R3: A taxi route or departure runway change. -
CA.II.D.R4:
✓ Skills 8 ACS Elements
-
CA.II.D.S1: Receive and correctly read back clearances/instructions, if applicable. -
CA.II.D.S2: Use an airport diagram or taxi chart during taxi, if published, and maintain situational awareness. -
CA.II.D.S3: Position the flight controls for the existing wind, if applicable. -
CA.II.D.S4: Complete the appropriate checklist(s). -
CA.II.D.S5: Perform a brake check immediately after the airplane begins moving. -
CA.II.D.S6: Maintain positive control of the airplane during ground operations by controlling direction and speed without excessive use of brakes. -
CA.II.D.S7: Comply with airport/taxiway markings, signals, and air traffic control (ATC) clearances and instructions. -
CA.II.D.S8: Position the airplane properly relative to hold lines.
Airport Diagram Airman Certification Standards
- Note: The evaluator must select Tasks C, K, and at least one other Task from this Area of Operation. The evaluator must also select Task P for multiengine applicants.
- Task C: Runway Incursion Avoidance.
- Objective: To determine the applicant understands runway incursion avoidance, can apply that knowledge, manage associated risks, demonstrate appropriate skills, and provide effective instruction.
- References: AC 91-73; AIM; Chart Supplements; FAA-H-8083-2, FAA-H-8083-3, FAA-H-8083-9, FAA-H-8083-25
▤ Knowledge 6 ACS Elements
-
AI.II.C.K1: Runway incursion definition. -
AI.II.C.K2: Taxi instructions/clearances. -
AI.II.C.K3: The importance of recording taxi instructions and reviewing taxi routes on the airport diagram. -
AI.II.C.K4: Airport markings, signs, and lights including the importance of hold lines associated with runways. -
AI.II.C.K5: Appropriate flight deck activities during taxiing, including taxi route planning, briefing the location of Hot Spots, communicating and coordinating with ATC. -
AI.II.C.K6: Communication and operational procedures at uncontrolled airports.
! Risk Management 7 ACS Elements
-
AI.II.C.R1: Distractions, task prioritization, loss of situational awareness, or disorientation. -
AI.II.C.R2: Confirmation or expectation bias as related to taxi instructions. -
AI.II.C.R3: Entering or crossing runways. -
AI.II.C.R4: Night taxi operations. -
AI.II.C.R5: Low visibility taxi operations. -
AI.II.C.R6: Runway incursion after landing. -
AI.II.C.R7: Operating on taxiways between parallel runways.
✓ Skills 1 ACS Element
-
AI.II.C.S1: Deliver instruction on the elements and techniques for runway incursion avoidance.
Airport Diagram Airman Certification Standards
- Note: The evaluator must select at least one Task from this Area of Operation.
- Task D: Taxiing, Airport Signs, and Lighting (ASEL, AMEL).
- Objective: To determine the applicant understands taxiing an airplane, can apply that knowledge, manage associated risks, demonstrate appropriate skills, and provide effective instruction.
- References: AC 91-73; AIM; Chart Supplements; FAA-H-8083-2, FAA-H-8083-3, FAA-H-8083-9, FAA-H-8083-25; POH/ AFM
▤ Knowledge 7 ACS Elements
-
AI.V.D.K1: Elements of safe taxi operations. -
AI.V.D.K2: Current airport aeronautical references and information resources such as the Chart Supplement, airport diagram, and Notices to Airmen (NOTAMs). -
AI.V.D.K3: Taxi instructions/clearances. -
AI.V.D.K4: Airport markings, signs, and lights. -
AI.V.D.K5: Visual indicators for wind. -
AI.V.D.K6: Aircraft lighting, as appropriate. -
AI.V.D.K7: Procedures for:-
AI.V.D.K7a: Appropriate flight deck activities prior to taxi, including route planning and identifying the location of Hot Spots -
AI.V.D.K7b: Radio communications at towered and nontowered airports -
AI.V.D.K7c: Entering or crossing runways -
AI.V.D.K7d: Night taxi operations -
AI.V.D.K7e: Low visibility taxi operations
-
! Risk Management 4 ACS Elements
-
AI.V.D.R1: Activities and distractions. -
AI.V.D.R2: Confirmation or expectation bias as related to taxi instructions. -
AI.V.D.R3: A taxi route or departure runway change. -
AI.V.D.R4: Runway incursion.
✓ Skills 8 ACS Elements
-
AI.V.D.S1: Receive and correctly read back clearances/instructions, if applicable. -
AI.V.D.S2: Use an airport diagram or taxi chart during taxi, if published, and maintain situational awareness. -
AI.V.D.S3: Position the flight controls for the existing wind, if applicable. -
AI.V.D.S4: Complete the appropriate checklist(s). -
AI.V.D.S5: Perform a brake check immediately after the airplane begins moving. -
AI.V.D.S6: Maintain positive control of the airplane during ground operations by controlling direction and speed without excessive use of brakes. -
AI.V.D.S7: Comply with airport/taxiway markings, signals, and air traffic control (ATC) clearances and instructions. -
AI.V.D.S8: Position the airplane properly relative to hold lines.
Airport Diagram Airman Certification Standards
- Note: The evaluator must select at least one Task from this Area of Operation.
- Task E: Taxiing and Sailing (ASES, AMES).
- Objective: To determine the applicant understands taxiing and sailing, can apply that knowledge, manage associated risks, demonstrate appropriate skills, and provide effective instruction.
- References: AC 91-73; AIM; Chart Supplements; FAA-H-8083-2, FAA-H-8083-9, FAA-H-8083-23, FAA-H-8083-25; POH/AFM; USCG Navigation Rules
▤ Knowledge 7 ACS Elements
-
AI.V.E.K1: Procedures for various types of taxiing and sailing. -
AI.V.E.K2: Current airport aeronautical references and information resources such as the Chart Supplement, airport diagram, and Notices to Airmen (NOTAMs). -
AI.V.E.K3: Taxi instructions/clearances. -
AI.V.E.K4: Airport/seaplane base markings, signs, and lights. -
AI.V.E.K5: Visual indicators for wind. -
AI.V.E.K6: Airplane lighting. -
AI.V.E.K7: Procedures for:-
AI.V.E.K7a: Appropriate flight deck activities during taxiing or sailing -
AI.V.E.K7b: Radio communications at towered and nontowered seaplane bases
-
! Risk Management 5 ACS Elements
-
AI.V.E.R1: Activities and distractions. -
AI.V.E.R2: Porpoising and skipping. -
AI.V.E.R3: Low visibility taxi and sailing operations. -
AI.V.E.R4: Other aircraft, vessels, and hazards. -
AI.V.E.R5: Confirmation or expectation bias as related to taxi instructions.
✓ Skills 10 ACS Elements
-
AI.V.E.S1: Receive and correctly read back clearances/instructions, if applicable. -
AI.V.E.S2: Use an appropriate airport diagram or taxi chart, if published. -
AI.V.E.S3: Comply with seaplane base/airport/taxiway markings, signals, and signs. -
AI.V.E.S4: Depart the dock/mooring buoy or beach/ramp in a safe manner, considering wind, current, traffic, and hazards. -
AI.V.E.S5: Complete the appropriate checklist(s). -
AI.V.E.S6: Position the flight controls, flaps, doors, water rudders, and power correctly for the existing conditions to follow the desired course while sailing and to prevent or correct for porpoising and skipping during step taxi. -
AI.V.E.S7: Exhibit procedures for steering and maneuvering while maintaining proper situational awareness and desired orientation, path, and position while taxiing using idle, plow, or step taxi technique, as appropriate. -
AI.V.E.S8: Plan and follow the most favorable taxi or sailing course for current conditions. -
AI.V.E.S9: Abide by right-of-way rules, maintain positive airplane control, proper speed, and separation between other aircraft, vessels, and persons. -
AI.V.E.S10: Comply with applicable taxi elements in Task D if the practical test is conducted in an amphibious airplane.
Airport Diagram Airman Certification Standards
- Objective: To determine whether the applicant exhibits satisfactory knowledge, risk management, and skills associated with taxiing and sailing operations, including runway incursion avoidance.
- References: AC 91-73; AIM; Chart Supplements; FAA-H-8083-2 (Risk Management Handbook), FAA-H-8083-3 (Airplane Flying Handbook), FAA-H-8083-23 (Seaplane, Skiplane, and Float/Ski Equipped Helicopter Operations Handbook), FAA-H-8083-25 (Pilot Handbook of Aeronautical Knowledge); POH/AFM.
▤ Knowledge 6 ACS Elements
-
PA.II.E.K1: Airport information resources, including Chart Supplements, Airport diagram, and appropriate references. -
PA.II.E.K2: -
PA.II.E.K3: -
PA.II.E.K4: -
PA.II.E.K5: -
PA.II.E.K6: Procedures for:-
PA.II.E.K6a: Appropriate flight deck activities during taxiing or sailing. -
PA.II.E.K6b: Radio communications at towered and nontowered seaplane bases.
-
! Risk Management 5 ACS Elements
-
PA.II.E.R1: -
PA.II.E.R2: -
PA.II.E.R3: -
PA.II.E.R4: -
PA.II.E.R5: Confirmation or expectation bias as related to taxi instructions.
✓ Skills 10 ACS Elements
-
PA.II.E.S1: Receive and correctly read back clearances/instructions, if applicable. -
PA.II.E.S2: Use an appropriate Airport diagram or taxi chart, if published. -
PA.II.E.S3: -
PA.II.E.S4: Depart the dock/mooring buoy or beach/ramp in a safe manner, considering wind, current, traffic, and hazards. -
PA.II.E.S5: Complete the appropriate checklist(s). -
PA.II.E.S6: Position the flight controls, flaps, doors, water rudders, and power correctly for the existing conditions to follow the desired course while sailing and to prevent or correct for porpoising and skipping during step taxi. -
PA.II.E.S7: Exhibit procedures for steering and maneuvering while maintaining proper situational awareness and desired orientation, path, and position while taxiing using idle, plow, or step taxi technique, as appropriate. -
PA.II.E.S8: Plan and follow the most favorable taxi or sailing course for current conditions. -
PA.II.E.S9: Abide by right-of-way rules, maintain positive airplane control, proper speed, and separation between other aircraft, vessels, and persons. -
PA.II.E.S10: Comply with applicable taxi elements in Task D (taxiing lesson plan) if the practical test is conducted in an amphibious airplane.
Airport Diagram Airman Certification Standards
- Objective: To determine whether the applicant exhibits satisfactory knowledge, risk management, and skills associated with taxi operations, including runway incursion avoidance.
- References: AC 91-73; AIM; Chart Supplements; FAA-H-8083-2 (Risk Management Handbook), FAA-H-8083-3 (Airplane Flying Handbook), FAA-H-8083-25 (Pilot Handbook of Aeronautical Knowledge); POH/AFM.
▤ Knowledge 6 ACS Elements
-
PA.II.D.K1: Current airport aeronautical references and information resources such as the Chart Supplement, Airport diagram, and Notices to Airmen (NOTAMs). -
PA.II.D.K2: -
PA.II.D.K3: -
PA.II.D.K4: -
PA.II.D.K5: Aircraft lighting, as appropriate. -
PA.II.D.K6: Procedures for:-
PA.II.D.K6a: Appropriate flight deck activities prior to taxi, including route planning and identifying the location of Hot Spots. -
PA.II.D.K6b: Radio communications at towered and nontowered airports. -
PA.II.D.K6c: -
PA.II.D.K6d: -
PA.II.D.K6e:
-
! Risk Management 4 ACS Elements
-
PA.II.D.R1: -
PA.II.D.R2: Confirmation or expectation bias as related to taxi instructions. -
PA.II.D.R3: -
PA.II.D.R4:
✓ Skills 8 ACS Elements
-
PA.II.D.S1: Receive and correctly read back clearances/instructions, if applicable. -
PA.II.D.S2: Use an Airport diagram or taxi chart during taxi, if published, and maintain situational awareness. -
PA.II.D.S3: Position the flight controls for the existing wind, if applicable. -
PA.II.D.S4: Complete the appropriate checklist(s). -
PA.II.D.S5: -
PA.II.D.S6: Maintain positive control of the airplane during ground operations by controlling direction and speed without excessive use of brakes. -
PA.II.D.S7: Comply with airport/taxiway markings, signals, and Air Traffic Control (ATC) clearances and instructions. -
PA.II.D.S8: Position the airplane properly relative to hold lines.
Airport Diagram Airman Certification Standards
- Task C: Air Taxi.
- Objective: To determine the applicant exhibits satisfactory knowledge, risk management, and skills associated with air taxi operations.
- References: AC 91-73; AIM; Chart Supplements; FAA-H-8083-2, FAA-H-8083-21, FAA-H-8083-25; POH/RFM
▤ Knowledge 7 ACS Elements
-
PH.IV.C.K1: Current airport aeronautical references and information resources such as the Chart Supplement, airport diagram, and Notices to Airmen (NOTAMs). -
PH.IV.C.K2: Air taxi instructions, clearances, and limitations. -
PH.IV.C.K3: Airport/heliport/helipad/landing area, signs, markings, and lighting. -
PH.IV.C.K4: Visual indicators for wind. -
PH.IV.C.K5: Aircraft lighting, as appropriate. -
PH.IV.C.K6: Procedures for:-
PH.IV.C.K6a: Pilot activities during taxiing -
PH.IV.C.K6b: Safe air taxi at towered and nontowered airports -
PH.IV.C.K6c: Overflying of runways
-
-
PH.IV.C.K7: Height/Velocity (H/V) considerations.
! Risk Management 6 ACS Elements
-
PH.IV.C.R1: Distractions, task prioritization, loss of situational awareness, or disorientation. -
PH.IV.C.R2: Reduced visibility or night taxi operations. -
PH.IV.C.R3: Runway incursion. -
PH.IV.C.R4: Main rotor, tail rotor, and tail strike hazards. -
PH.IV.C.R5: H/V diagram performance in case of powerplant failure. -
PH.IV.C.R6: Confirmation or expectation bias as related to taxi instructions.
✓ Skills 7 ACS Elements
-
PH.IV.C.S1: Complete the appropriate checklist(s). -
PH.IV.C.S2: Use an airport diagram or taxi chart during taxi, if published, and maintain situational awareness. -
PH.IV.C.S3: Select a safe airspeed and altitude. -
PH.IV.C.S4: Maintain desired track and groundspeed in headwind and crosswind conditions, avoiding conditions that might lead to loss of tail rotor/antitorque effectiveness. -
PH.IV.C.S5: Maintain powerplant and main rotor (Nr) speed within normal limits. -
PH.IV.C.S6: Comply with airport/heliport/helipad/landing area markings, lights, signs, and ATC instructions. -
PH.IV.C.S7: Maintain specified altitude, ±10 feet.
Airport Diagram Airman Certification Standards
- Task B: Hover Taxi.
- Objective: To determine the applicant exhibits satisfactory knowledge, risk management, and skills associated with hover taxi operations, including runway incursion avoidance.
- References: AC 91-73; AIM; Chart Supplements; FAA-H-8083-2, FAA-H-8083-21, FAA-H-8083-25; POH/RFM
▤ Knowledge 8 ACS Elements
-
PH.IV.B.K1: Current airport aeronautical references and information resources such as the Chart Supplement, airport diagram, and Notices to Airmen (NOTAMs). -
PH.IV.B.K2: Hover taxi instructions, clearances, and limitations. -
PH.IV.B.K3: Airport/heliport/helipad/landing area, signs, markings, and lighting. -
PH.IV.B.K4: Visual indicators for wind. -
PH.IV.B.K5: Aircraft lighting, as appropriate. -
PH.IV.B.K6: Procedures for:-
PH.IV.B.K6a: Pilot activities during taxiing -
PH.IV.B.K6b: Safe hover taxi at towered and non-towered airports/heliports/helipads/landing areas -
PH.IV.B.K6c: Entering or crossing runways
-
-
PH.IV.B.K7: Height/Velocity (H/V) considerations. -
PH.IV.B.K8: Aircraft operating limitations.
! Risk Management 8 ACS Elements
-
PH.IV.B.R1: Distractions, task prioritization, loss of situational awareness, or disorientation. -
PH.IV.B.R2: Reduced visibility or night taxi operations. -
PH.IV.B.R3: Runway incursion. -
PH.IV.B.R4: Other aircraft, vehicles, persons, and hazards. -
PH.IV.B.R5: Hazardous effects of downwash. -
PH.IV.B.R6: Main rotor, tail rotor, and tail strike hazards. -
PH.IV.B.R7: Height/Velocity (H/V) considerations. -
PH.IV.B.R8: Confirmation or expectation bias as related to taxi instructions.
✓ Skills 12 ACS Elements
-
PH.IV.B.S1: Complete the appropriate checklist(s). -
PH.IV.B.S2: Receive and correctly read back clearances/instructions, if applicable. -
PH.IV.B.S3: Use an airport diagram or taxi chart during taxi, if published, and maintain situational awareness. -
PH.IV.B.S4: Comply with airport/heliport taxiway markings, signals, and signs. -
PH.IV.B.S5: Maintain powerplant and main rotor (Nr) speed within normal limits. -
PH.IV.B.S6: Maintain a straight ground track within ±4 feet of a designated ground track. -
PH.IV.B.S7: Maintain recommended hovering altitude, ±1/2 of that altitude within 10 feet of the surface, if above 10 feet, ±5 feet. -
PH.IV.B.S8: Hover taxi over specified ground references, demonstrating forward, sideward, and rearward hovering and hovering turns. -
PH.IV.B.S9: Maintain a constant rate of turn at pivot points. -
PH.IV.B.S10: Maintain a position within 4 feet of each pivot point during turns. -
PH.IV.B.S11: Make a 360° pivoting turn, left and right, stopping within 10° of a specified heading. -
PH.IV.B.S12: Make smooth, timely, and correct control application during the maneuver.
Airport Diagram Airman Certification Standards
- Task D: Taxiing with Wheel-Type Landing Gear.
- Objective: To determine the applicant exhibits satisfactory knowledge, risk management, and skills associated with ground taxi operations, in a wheel-type aircraft, including runway incursion avoidance.
- References: AC 91-73; AIM; Chart Supplements; FAA-H-8083-2, FAA-H-8083-21, FAA-H-8083-25; POH/RFM
▤ Knowledge 6 ACS Elements
-
PH.IV.D.K1: Current airport aeronautical references and information resources such as the Chart Supplement, airport diagram, and Notices to Airmen (NOTAMs). -
PH.IV.D.K2: Taxi instructions/clearances. -
PH.IV.D.K3: Airport/heliport/helipad/landing area, signs, markings, and lighting. -
PH.IV.D.K4: Visual indicators for wind. -
PH.IV.D.K5: Aircraft lighting, as appropriate. -
PH.IV.D.K6: Procedures for:-
PH.IV.D.K6a: Appropriate flight deck activities prior to taxi, including route planning and identifying the location of Hot Spots -
PH.IV.D.K6b: Safe taxi at towered and nontowered airports -
PH.IV.D.K6c: Entering or crossing runways
-
! Risk Management 6 ACS Elements
-
PH.IV.D.R1: Activities and distractions. -
PH.IV.D.R2: Confirmation or expectation bias as related to taxi instructions. -
PH.IV.D.R3: Runway incursion. -
PH.IV.D.R4: Speed during taxi and turns. -
PH.IV.D.R5: Appropriate thrust vector and brake use. -
PH.IV.D.R6: Airframe and rotor clearances during taxi.
✓ Skills 10 ACS Elements
-
PH.IV.D.S1: Complete the appropriate checklist(s). -
PH.IV.D.S2: Use an appropriate airport/heliport diagram or taxi chart, if published. -
PH.IV.D.S3: Properly position nosewheel/tailwheel, if applicable, locked or unlocked. -
PH.IV.D.S4: Position the flight controls properly for the existing wind conditions, with the landing gear in contact with the surface, avoiding conditions that might lead to loss of directional control. -
PH.IV.D.S5: Properly use cyclic, collective, and brakes as applicable to control speed while taxiing. -
PH.IV.D.S6: Maintain powerplant and main rotor (Nr) speed within normal limits. -
PH.IV.D.S7: Maintain specified track within 4 feet. -
PH.IV.D.S8: Position the helicopter relative to hold lines or a specified point. -
PH.IV.D.S9: Receive and comply with ATC clearances/instructions, if applicable. -
PH.IV.D.S10: Comply with airport/heliport taxiway markings, lights, and signals.
Sport Pilot (Helicopter) Air Taxi Airman Certification Standards
- Area of Operation IV: Hovering Maneuvers.
- Task C: Air Taxi.
- Objective: To determine the applicant exhibits satisfactory knowledge, risk management, and skills associated with air taxi operations.
- References: AC 91-73; AIM; Chart Supplements; FAA-H-8083-2, FAA-H-8083-21, FAA-H-8083-25; POH/RFM
- Sport Pilot (Helicopter) Air Taxi Lesson Plan.
▤ Knowledge 7 ACS Elements
-
SH.IV.C.K1: Current airport aeronautical references and information resources such as the Chart Supplement, airport diagram, and Notices to Airmen (NOTAMs). -
SH.IV.C.K2: Air taxi instructions, clearances, and limitations. -
SH.IV.C.K3: Airport/heliport/helipad/landing area, signs, markings, and lighting. -
SH.IV.C.K4: Visual indicators for wind. -
SH.IV.C.K5: Aircraft lighting, as appropriate. -
SH.IV.C.K6: Procedures for:-
SH.IV.C.K6a: Pilot activities during taxiing -
SH.IV.C.K6b: Safe air taxi at towered and non-towered airports -
SH.IV.C.K6c: Overflying of runways
-
-
SH.IV.C.K7: Height/Velocity (H/V) considerations, as applicable.
! Risk Management 6 ACS Elements
-
SH.IV.C.R1: Distractions, task prioritization, loss of situational awareness, or disorientation. -
SH.IV.C.R2: Reduced visibility taxi operations. -
SH.IV.C.R3: Runway incursion. -
SH.IV.C.R4: Main rotor(s), tail rotor, and tail strike hazards, as applicable. -
SH.IV.C.R5: H/V diagram performance in case of powerplant failure, as applicable. -
SH.IV.C.R6: Confirmation or expectation bias as related to taxi instructions or intentions.
✓ Skills 7 ACS Elements
-
SH.IV.C.S1: Complete the appropriate checklist(s). -
SH.IV.C.S2: Use an airport diagram or taxi chart during taxi, if published, and maintain situational awareness. -
SH.IV.C.S3: Select a safe airspeed and altitude. -
SH.IV.C.S4: Maintain desired track and groundspeed in headwind and crosswind conditions, avoiding conditions that might lead to loss of tail rotor/antitorque effectiveness, as applicable. -
SH.IV.C.S5: Maintain powerplant and main rotor(s) (Nr) speed within normal limits. -
SH.IV.C.S6: Comply with airport/heliport/helipad/landing area markings, lights, signs, and ATC instructions, as applicable. -
SH.IV.C.S7: Maintain specified altitude, ±10 feet.
Sport Pilot (Helicopter) Hover Taxi Airman Certification Standards
- Area of Operation IV: Hovering Maneuvers.
- Task B: Hover Taxi.
- Objective: To determine the applicant exhibits satisfactory knowledge, risk management, and skills associated with hover taxi operations, including runway incursion avoidance.
- References: AC 91-73; AIM; Chart Supplements; FAA-H-8083-2, FAA-H-8083-21, FAA-H-8083-25; POH/RFM
- Sport Pilot (Helicopter) Hover Taxi Lesson Plan.
▤ Knowledge 8 ACS Elements
-
SH.IV.B.K1: Current airport aeronautical references and information resources such as the Chart Supplement, airport diagram, and Notices to Airmen (NOTAMs). -
SH.IV.B.K2: Hover taxi instructions, clearances and limitations. -
SH.IV.B.K3: Airport/heliport/helipad/landing area, signs, markings, and lighting. -
SH.IV.B.K4: Visual indicators for wind. -
SH.IV.B.K5: Aircraft lighting, as appropriate. -
SH.IV.B.K6: Procedures for:-
SH.IV.B.K6a: Pilot activities during taxiing. -
SH.IV.B.K6b: Safe hover taxi at towered and non-towered airports/heliports/helipads/landing areas. -
SH.IV.B.K6c: Entering or crossing runways.
-
-
SH.IV.B.K7: Height/Velocity (H/V) considerations, as applicable. -
SH.IV.B.K8: Aircraft operating limitations.
! Risk Management 8 ACS Elements
-
SH.IV.B.R1: Distractions, task prioritization, loss of situational awareness, or disorientation. -
SH.IV.B.R2: Reduced visibility. -
SH.IV.B.R3: Runway incursion. -
SH.IV.B.R4: Other aircraft, vehicles, persons, and hazards. -
SH.IV.B.R5: Hazardous effects of downwash. -
SH.IV.B.R6: Main rotor(s), tail rotor, and tail strike hazards, as applicable. -
SH.IV.B.R7: Height/Velocity (H/V) considerations, as applicable. -
SH.IV.B.R8: Confirmation or expectation bias as related to taxi instructions or intentions.
✓ Skills 12 ACS Elements
-
SH.IV.B.S1: Complete the appropriate checklist(s). -
SH.IV.B.S2: Receive and correctly read back clearances/instructions, as applicable. -
SH.IV.B.S3: Use an airport diagram or taxi chart during taxi, if published, and maintain situational awareness. -
SH.IV.B.S4: Comply with airport/heliport taxiway markings, signals, and signs. -
SH.IV.B.S5: Maintain powerplant and main rotor(s) (Nr) speed within normal limits. -
SH.IV.B.S6: Maintain a straight ground track within ±4 feet of a designated ground track. -
SH.IV.B.S7: Maintain recommended hovering altitude, ±1/2 of that altitude within 10 feet of the surface, if above 10 feet, ±5 feet. -
SH.IV.B.S8: Hover taxi over specified ground references, demonstrating forward, sideward, and rearward hovering and hovering turns. -
SH.IV.B.S9: Maintain a constant rate of turn at pivot points. -
SH.IV.B.S10: Maintain a position within 4 feet of each pivot point during turns. -
SH.IV.B.S11: Make a 360° pivoting turn, left and right, stopping within 10° of a specified heading. -
SH.IV.B.S12: Make smooth, timely, and correct control application during the maneuver.
Sport Pilot (Helicopter) Taxiing with Wheel-Type Landing Gear Airman Certification Standards
- Area of Operation IV: Hovering Maneuvers.
- Task D: Taxiing with Wheel-Type Landing Gear.
- Objective: To determine the applicant exhibits satisfactory knowledge, risk management, and skills associated with ground taxi operations, in a wheel-type aircraft, including runway incursion avoidance.
- References: AC 91-73; AIM; Chart Supplements; FAA-H-8083-2, FAA-H-8083-21, FAA-H-8083-25; POH/RFM
- Sport Pilot (Helicopter) Taxiing with Wheel-Type Landing Gear Lesson Plan.
▤ Knowledge 6 ACS Elements
-
SH.IV.D.K1: Current airport aeronautical references and information resources such as the Chart Supplement, airport diagram, and Notices to Airmen (NOTAMs). -
SH.IV.D.K2: Taxi instructions/clearances. -
SH.IV.D.K3: Airport/heliport/helipad/landing area, signs, markings, and lighting. -
SH.IV.D.K4: Visual indicators for wind. -
SH.IV.D.K5: Aircraft lighting, as appropriate. -
SH.IV.D.K6: Procedures for:-
SH.IV.D.K6a: Appropriate flight deck activities prior to taxi, including route planning and identifying the location of Hot Spots -
SH.IV.D.K6b: Safe taxi at towered and non-towered airports -
SH.IV.D.K6c: Entering or crossing runways
-
! Risk Management 6 ACS Elements
-
SH.IV.D.R1: Activities and distractions. -
SH.IV.D.R2: Confirmation or expectation bias as related to taxi instructions or intentions. -
SH.IV.D.R3: Runway incursion. -
SH.IV.D.R4: Speed during taxi and turns. -
SH.IV.D.R5: Appropriate thrust vector and brake use. -
SH.IV.D.R6: Airframe and rotor clearances during taxi.
✓ Skills 10 ACS Elements
-
SH.IV.D.S1: Complete the appropriate checklist(s). -
SH.IV.D.S2: Use an appropriate airport/heliport diagram or taxi chart, if published. -
SH.IV.D.S3: Properly position nosewheel/tailwheel, as applicable, locked or unlocked. -
SH.IV.D.S4: Position the flight controls properly for the existing wind conditions, with the landing gear in contact with the surface, avoiding conditions that might lead to loss of directional control. -
SH.IV.D.S5: Properly use cyclic, collective or simplified flight controls, and brakes as applicable to control speed while taxiing. -
SH.IV.D.S6: Maintain powerplant and main rotor(s) (Nr) speed within normal limits. -
SH.IV.D.S7: Maintain specified track within 4 feet. -
SH.IV.D.S8: Position the helicopter-simplified flight controls relative to hold lines or a specified point. -
SH.IV.D.S9: Receive and comply with ATC clearances/instructions, if applicable. -
SH.IV.D.S10: Comply with airport/heliport taxiway markings, lights, and signals.
Airport Diagram Conclusion
- Airport diagrams support safe surface navigation and runway-incursion avoidance
- Keep a current airport diagram available for immediate reference during taxi, and review the assigned route before releasing the brakes
- See also:
- Still looking for something? Continue searching: