Emergency Approach & Landing
Emergency Approach and Landing simulate an emergency where an aircraft is required to descend as rapidly as possible to a forced landing.
Introduction to Emergency Approach & Landing
- Emergency Approach and Landing simulate an emergency situation where an aircraft is required to descend as rapidly as possible to a forced landing with little or no power (engine failure) available
- Additionally, Emergency Approach and Landing improve pilot technique for power off turns, wind drift control, planning, orientation, and division of attention
- Emergency landings can vary depending on the operation flown and the response required
- Precautionary landings are those conducted out of an abundance of caution whereby continued fly is likely to result in a forced landing
- Forced landings are required when no other option is available, like after an engine failure in a single engine aircraft
- Ditching is required when an immediate landing is required, and water is your only option
- Gliding distance varies by airspeed, altitude, obstructions, wind direction, landing directions, landing surface and gradient, and landing distance required
- When conducted for training expect the instructor to callout (over the ICS) "Simulate Emergency Landing"
WARNING:
All procedures are GENERALIZED.
Use the Pilot Operating Handbook (POH) procedures for specific aircraft performance and limitations.
and/or current Standard Operating Procedures (SOPs).
Emergency Approach & Landing Key Highlights
- Emergency approach and landing procedures help pilots safely land the aircraft following engine failures or other in-flight emergencies.
- Pilots should prioritize aircraft control and establish best glide speed promptly following loss of engine power.
- Selection of a suitable landing area requires evaluation of terrain, wind direction, obstacles, and aircraft performance.
- Energy management and proper glide planning are critical to reaching the intended touchdown area safely.
- Pilots should complete applicable emergency checklists and attempt engine restart procedures when conditions permit.
- Passenger briefings and emergency preparation improve occupant readiness and survivability before touchdown.
- Approach patterns may be modified during emergencies to maximize landing options and maintain safe glide capability.
- Improper airspeed management or delayed decision-making can increase the risk of stall, spin, or off-airport landing hazards.
- Communication with air traffic control and activation of emergency equipment improve rescue coordination following landing.
- Understanding emergency approach and landing procedures improves emergency preparedness, aeronautical decision-making, and overall flight safety.
Forced Landings
- Forested or rough terrain considerations:
- Consider wires, even in remote locations
- Slow to minimum airspeed, but do not risk losing control of the aircraft
- Announce your position on guard or to ATC before landing in a remote location to hopefully aid search and rescue
- Minimizing injuries means touching down with minimal kinetic energy, which is proportional to the square of groundspeed
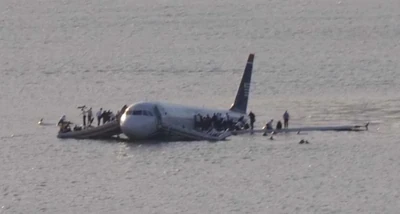
Aircraft Ditching
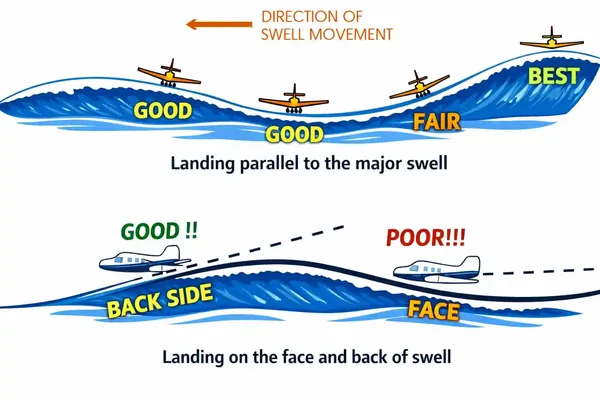
- If ditching into the water, touch down on the top of the swell if parallel or on the backside if perpendicular
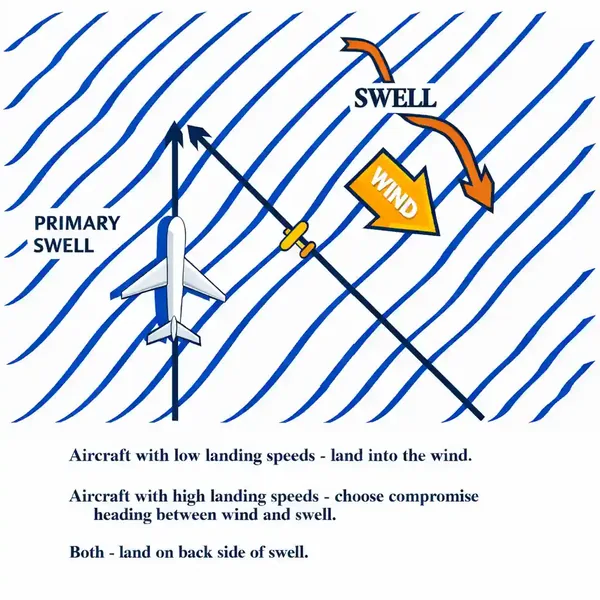
- Ditching at slow speeds, ditch into the wind, high speeds must compromise between winds and swells
- If two swells differ in height, land on the higher one if possible
- Remember whitecaps fall forward of the waves and the more whitecaps you see, the greater the wind experienced at the surface
- Deceleration will be very quick resulting in possible aircraft breakup and bending
- Only about 500' will be needed to stop the aircraft
- Touchdown at the slowest possible speed with the lowest possible rate of descent
- Experienced sea pilots prefer to make contact with the water in a semi-stalled attitude, cutting power as the tail makes contact to avoid misjudging altitude
- It is common to misjudge altitude by 50'
- Touching down on the face of the swell may cause the aircraft to be swamped or thrown violently into the air, dropping heavily into the next swell
- When landing parallel to a swell system, little difference is noted between landing on top of a crest or in the trough
- If the wings of aircraft are trimmed to the surface of the sea rather than the horizon, there is little need to worry about a wing hitting a swell crest
-
Ditching in Water:
- A successful aircraft ditching is dependent on three primary factors.
- In order of importance they are:
- Sea conditions and wind.
- Type of aircraft.
- Skill and technique of pilot.
-
Common Oceanographic Terminology:
- Sea: The condition of the surface that is the result of both waves and swells.
- Wave (or Chop): The condition of the surface caused by the local winds.
- Swell: The condition of the surface which has been caused by a distance disturbance.
- Swell Face: The side of the swell toward the observer. The backside is the side away from the observer. These definitions apply regardless of the direction of swell movement.
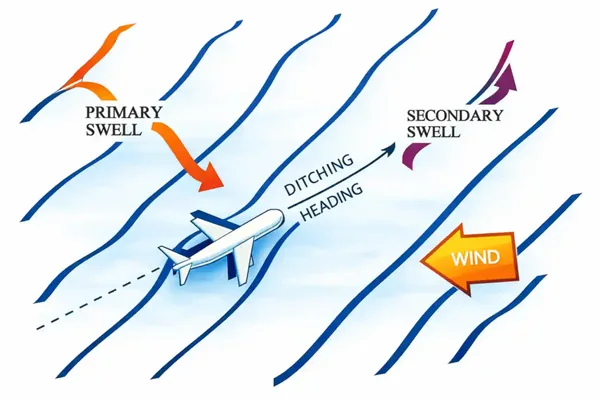
- Primary Swell: The swell system having the greatest height from trough to crest.
- Secondary Swells: Those swell systems of less height than the primary swell.
- Fetch: The distance the waves have been driven by a wind blowing in a constant direction, without obstruction.
- Swell Period: The time interval between the passage of two successive crests at the same spot in the water, measured in seconds.
- Swell Velocity: The speed and direction of the swell with relation to a fixed reference point, measured in knots. There is little movement of water in the horizontal direction. Swells move primarily in a vertical motion, similar to the motion observed when shaking out a carpet.
- Swell Direction: The direction from which a swell is moving. This direction is not necessarily the result of the wind present at the scene. The swell may be moving into or across the local wind. Swells, once set in motion, tend to maintain their original direction for as long as they continue in deep water, regardless of changes in wind direction.
- Swell Height: The height between crest and trough, measured in feet. The vast majority of ocean swells are lower than 12 to 15 feet, and swells over 25 feet are not common at any spot on the oceans. Successive swells may differ considerably in height.
-
Ditching Procedure:
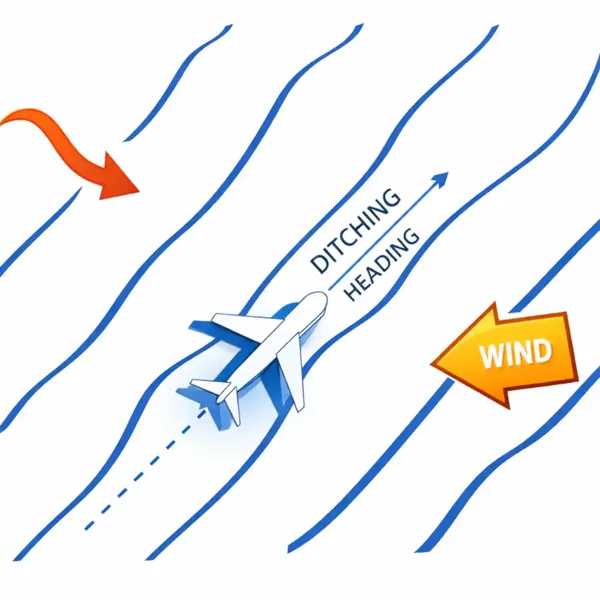
- To select a good heading when ditching an aircraft, a basic evaluation of the sea is required.
- Selection of a good ditching heading may well minimize damage and could save your life.
- It can be extremely dangerous to land into the wind without regard to sea conditions; the swell system, or systems, must be taken into consideration.
- Remember one axiom- AVOID THE FACE OF A SWELL.
Procedure:
- In ditching parallel to the swell, it makes little difference whether touchdown is on the top of the crest or in the trough. It is preferable, however, to land on the top or back side of the swell, if possible. After determining which heading (and its reciprocal) will parallel the swell, select the heading with the most into the wind component.
- If only one swell system exists, the problem is relatively simple-even with a high, fast system. Unfortunately, most cases involve two or more swell systems running in different directions. With more than one system present, the sea presents a confused appearance. One of the most difficult situations occurs when two swell systems are at right angles. For example, if one system is eight feet high, and the other three feet, plan to land parallel to the primary system, and on the down swell of the secondary system. If both systems are of equal height, a compromise may be advisable-select an intermediate heading at 45 degrees down swell to both systems. When landing down a secondary swell, attempt to touch down on the back side, not on the face of the swell. []
- If the swell system is formidable, it is considered advisable, in landplanes, to accept more crosswind in order to avoid landing directly into the swell. []
- The secondary swell system is often from the same direction as the wind. Here, the landing may be made parallel to the primary system, with the wind and secondary system at an angle. There is a choice to two directions paralleling the primary system. One direction is downwind and down the secondary swell, and the other is into the wind and into the secondary swell, the choice will depend on the velocity of the wind versus the velocity and height of the secondary swell.
- The simplest method of estimating the wind direction and velocity is to examine the windstreaks on the water. These appear as long streaks up and down wind. Some persons may have difficulty determining wind direction after seeing the streaks on the water. Whitecaps fall forward with the wind but are overrun by the waves thus producing the illusion that the foam is sliding backward. Knowing this, and by observing the direction of the streaks, the wind direction is easily determined. Wind velocity can be estimated by noting the appearance of the whitecaps, foam and wind streaks.
- The behavior of the aircraft on making contact with the water will vary within wide limits according to the state of the sea. If landed parallel to a single swell system, the behavior of the aircraft may approximate that to be expected on a smooth sea. If landed into a heavy swell or into a confused sea, the deceleration forces may be extremely great-resulting in breaking up of the aircraft. Within certain limits, the pilot is able to minimize these forces by proper sea evaluation and selection of ditching heading.
- When on final approach the pilot should look ahead and observe the surface of the sea. There may be shadows and whitecaps-signs of large seas. Shadows and whitecaps close together indicate short and rough seas. Touchdown in these areas is to be avoided. Select and touchdown in any area (only about 500 feet is needed) where the shadows and whitecaps are not so numerous.
- Touchdown should be at the lowest speed and rate of descent which permit safe handling and optimum nose up attitude on impact. Once first impact has been made, there is often little the pilot can do to control a landplane. [//]
- Once pre-ditching preparations are completed,the pilot should turn to the ditching heading and commence let-down. The aircraft should be flown low over the water, and slowed down until ten knots or so above stall. At this point, additional power should be used to overcome the increased drag caused by the nose up attitude. When a smooth stretch of water appears ahead, cut power, and touchdown at the best recommended speed as fully stalled as possible. By cutting power when approaching a relatively smooth area, the pilot will prevent overshooting and will touchdown with less chance of planing off into a second uncontrolled landing. Most experienced seaplane pilots prefer to make contact with the water in a semi-stalled attitude, cutting power as the tail makes contact. This technique eliminates the chance of misjudging altitude with a resultant heavy drop in a fully stalled condition. Care must be taken not to drop the aircraft from too high altitude or to balloon due to excessive speed. The altitude above water depends on the aircraft. Over glassy smooth water, or at night without sufficient light, it is very easy, for even the most experienced pilots to misjudge altitude by 50 feet or more. Under such conditions, carry enough power to maintain nine to twelve degrees nose up attitude, and 10 to 20 percent over stalling speed until contact is made with the water. The proper use of power on the approach is of great importance. If power is available on one side only, a little power should be used to flatten the approach; however, the engine should not be used to such an extent that the aircraft cannot be turned against the good engines right down to the stall with a margin of rudder movement available. When near the stall, sudden application of excessive unbalanced power may result in loss of directional control. If power is available on one side only, a slightly higher than normal glide approach speed should be used. This will ensure good control and some margin of speed after leveling off without excessive use of power. The use of power in ditching is so important that when it is certain that the coast cannot be reached, the pilot should, if possible, ditch before fuel is exhausted. The use of power in a night or instrument ditching is far more essential than under daylight contact conditions.
- If no power is available, a greater than normal approach speed should be used down to the flare-out. This speed margin will allow the glide to be broken early and more gradually, thereby giving the pilot time and distance to feel for the surface - decreasing the possibility of stalling high or flying into the water. When landing parallel to a swell system, little difference is noted between landing on top of a crest or in the trough. If the wings of aircraft are trimmed to the surface of the sea rather than the horizon, there is little need to worry about a wing hitting a swell crest. The actual slope of a swell is very gradual. If forced to land into a swell, touchdown should be made just after passage of the crest. If contact is made on the face of the swell, the aircraft may be swamped or thrown violently into the air, dropping heavily into the next swell. If control surfaces remain intact, the pilot should attempt to maintain the proper nose above the horizon attitude by rapid and positive use of the controls.
- After Touchdown. In most cases drift, caused by crosswind can be ignored; the forces acting on the aircraft after touchdown are of such magnitude that drift will be only a secondary consideration. If the aircraft is under good control, the "crab" may be kicked out with rudder just prior to touchdown. This is more important with high wing aircraft, for they are laterally unstable on the water in a crosswind and may roll to the side in ditching.
- Prior to touchdown kick out any crab and touchdown
- This is more important with high wing aircraft, for they are laterally unstable in the water in a crosswind and may roll to the side in ditching
- Turn off the master switch and cut fuel to prevent a fire
- Consider broadcasting on UNICOM/Guard as able
-
Ditching Precautions:
- When an aircraft must be crash landed on either land or water, the sudden shifting of cargo, equipment, and other heavy items may cause injury or loss of life
- All units shall arrange and secure equipment in their aircraft to guard against such dangers Emergency gear, such as life rafts, should be properly stowed for quick availability
- Responsibility for proper security of cargo and equipment lies with the PIC of each aircraft. []
- If a gear up landing is required, consideration should be given to pavement vs. grass, to ensure a smoother landing (no bumps, etc.
- Consideration, if time allows, should also be given to fields with the appropriate services desired after an emergency landing
- Ditching in water with fixed gear/gear down risks flipping the aircraft
-
Ditching/Water Survival Training:
- Underwater egress training, as well as what to do after a crash in water is available at various locations across the country
-
Aircraft Ditching Case Studies:
- NTSB Identification: WPR14CA087: The National Transportation Safety Board determines the probable cause(s) of this accident to be: A total loss of engine power during cruise flight for reasons that could not be determined because the airplane was not recovered
- NTSB Identification: WPR13LA378: The National Transportation Safety Board determines the probable cause(s) of this accident to be: A loss of engine power during cruise flight for reasons that could not be determined because the engine was not properly preserved to prevent corrosion after the wreckage was recovered from the lake


Emergency Landings
- Consider conducting a no-flap landing to increase glide distance and allowing the deployment of flaps when the field is sure to be made
Emergency Approach and Landing Procedure
- Perform clearing turns.
- Establish best glide attitude for 68 KIAS
- Ensure that the flaps are up
- Trim to maintain airspeed
- Determine the wind direction
- Select a reference point that is near an area where an emergency landing can be made
- Fields are best, roads may contain powerlines
- Look for flat, high populated, low obstruction areas
- Turn the aircraft toward the landing site
- Complete the engine failure during flight checklist:
- If engine restart is unsuccessful, plan and fly a pattern
- Establish a high-key point at 1,000' AGL downwind and abeam to the touchdown point
- Establish a low-key point at 500' AGL on base before the turn to final
- Maneuver as necessary to reach the high-key point
- Not to exceed 60°
- Clear the engine on the upwind legs every turn
- Operating the engine at idle speed for prolonged periods may result in excessive engine cooling or spark plug fouling
- Check engine operation during the glide by "clearing" the engine on every upwind or every 1,000' AGL (to minimize any variation in ground-speed and turn radius) as appropriate
- NOTE: When spiraling, the bank angle can be adjusted to vary altitude loss so as to arrive at the high key point at the appropriate altitude. The Cessna 172S loses approx. 800-1000' in a 20° bank - 360° turn; and approximately 4-500' in a 45° bank - 360° turn. If altitude does not permit the use of a high-key point, proceed to a low key point
- Turn onto the base leg to be able to conserve or dissipate altitude to reach the desired landing point
- At low-key position, set flaps to 10° if desired
- Turn final to align with the landing site and, when the landing is assured, set the flaps to 30° if desired
- Complete the engine failure during flight checklist to secure the engine
- Touchdown slightly tail low and apply brakes as required
- Fly slightly high with options to slip than too low with no options
- NOTE: Unless the approach is made to an airport runway, the simulated emergency approach and landing should be terminated as soon as it can be determined that a safe landing could have been made, or 500' AGL, whichever occurs first
- Complete the cruise checklist
Emergency Approach and Landing Common Errors
- Failure to adequately clear the area.
- Poor coordination, resulting in skidding and/or slipping
- Inadequate wind drift correct
- Failure to coordinate the controls, so that no increase/decrease in speed results when straight glide is resumed
- Failure to scan for other traffic
- Failure to maintain orientation
- Failure to raise the flaps
- Improper checklist use
- Failure to choose and fly by a high and low-key point
- Flying an approach too high or low
Private Pilot (Airplane) Emergency Approach and Landing (Simulated) (ASEL, ASES) Airman Certification Standards
- Objective: To determine whether the applicant exhibits satisfactory knowledge, risk management, and skills associated with emergency approach and landing procedures
- Note: See Appendix 2: Safety of Flight
- References: FAA-H-8083-2 (Risk Management Handbook), FAA-H-8083-3 (Airplane Flying Handbook), FAA-H-8083-25 (Pilot Handbook of Aeronautical Knowledge); POH/AFM.
Private Pilot (Airplane) Emergency Approach and Landing Knowledge:
The applicant demonstrates an understanding of:-
PA.IX.B.K1:
Immediate action items and emergency procedures. -
PA.IX.B.K2:
Airspeed, including:-
PA.IX.B.K2a:
Importance of best glide speed and its relationship to distance. -
PA.IX.B.K2b:
Difference between best glide speed and minimum sink speed. -
PA.IX.B.K2c:
Effects of wind on glide distance.
-
-
PA.IX.B.K3:
Effects of atmospheric conditions on emergency approach and landing. -
PA.IX.B.K4:
A stabilized approach, including energy management concepts. -
PA.IX.B.K5:
Emergency Locator Transmitters (ELTs) and other emergency locating devices. -
PA.IX.B.K6:
Air traffic control (ATC) services to aircraft in distress.
Private Pilot (Airplane) Emergency Approach and Landing (Simulated) Risk Management:
The applicant is able to identify, assess, and mitigate risks associated with:-
PA.IX.B.R1:
Altitude, wind, terrain, obstructions, gliding distance, and available landing distance considerations. -
PA.IX.B.R2:
Following or changing the planned flightpath to the selected landing area. -
PA.IX.B.R3:
Collision hazards. -
PA.IX.B.R4:
Configuring the airplane. -
PA.IX.B.R5:
Low altitude maneuvering, including stall, spin, or controlled flight into terrain (CFIT). -
PA.IX.B.R6:
Distractions, task prioritization, loss of situational awareness, or disorientation.
Private Pilot (Airplane) Emergency Approach and Landing (Simulated) Skills:
The applicant exhibits the skills to:-
PA.IX.B.S1:
Establish and maintain the recommended best glide airspeed, ±10 knots. -
PA.IX.B.S2:
Configure the airplane in accordance with the Pilot's Operating Handbook (POH)\Airplane Flight Manual (AFM) and existing conditions. -
PA.IX.B.S3:
Select a suitable landing area considering altitude, wind, terrain, obstructions, and available glide distance. -
PA.IX.B.S4:
Plan and follow a flightpath to the selected landing area considering altitude, wind, terrain, and obstructions. -
PA.IX.B.S5:
Prepare for landing as specified by the evaluator. -
PA.IX.B.S6:
Complete the appropriate checklist(s).
Emergency Approach & Landing Knowledge Check


Emergency Approach & Landing Conclusion
- Remain mindful that performance calculations are usually more optimistic than actual performance.
- In the words of Bob Hoover, "If you're faced with a forced landing, fly the thing as far into the crash as possible"
- In other words, accept what it is, and don't give up
- The higher you fly, the more time, visibility, and therefore options you may have
- When practicing emergency landings, the lower you go, the higher the risk
- If the desire is to take it to near landing or actually touchdown, chose runways to keep it save
- Consider the impact of leaving gear up vs. leaving them in the wells
- I.e., the potential to flip in water or potential to smoothen the landing on hard surfaces
- Consider the type of flying you are doing and think about investing in a Aviation Crash Kit [Amazon], just in case
- Ditching into a soft field is likely to flip the aircraft
- Consider actual versus realized performance when doing any performance calculations
- Consider practicing maneuvers on a flight simulator to introduce yourself to maneuvers or knock off rust
- The landing is only the beginning, check out the AOPA's article, Survive: Beyond the Forced Landing".
- Still looking for something? Continue searching:
Emergency Approach & Landing References
- Aeronautical Information Manual (6-3-3) Ditching Procedures.
- Airplane Flying Handbook.
- Federal Aviation Administration - General Aviation Survival.
- Federal Aviation Administration - Pilot/Controller Glossary.
- Federal Aviation Administration - When Pan-Pan Becomes Mayday.
- National Search and Rescue Manual (Appendix H)
- Pilot Workshops - Emergency Off-Field Landing Choices.