Approach & Landing
Approach and landing procedures enable an aircraft's transition from the en route to the terminal phase of flight.
Introduction to Approach & Landing
- Approach and landings begin with appropriate descent planning.
- More austere and even urban airport environments require unique confined area approaches and landing procedures.
- Faced with unimproved surfaces, pilots may elect to perform soft-field approach and landing procedures so as to maximize aircraft performance
- No matter the landing type performance, every good landing starts with a stabilized approach.
- Occasionally, to correct for atmospherics or errors in procedure, pilots can perform forward slips to landing to reestablish proper position
- Think you've got a solid understanding of approach and landing? Don't miss the approach and landing quiz below, and topic summary.
WARNING:
All procedures are GENERALIZED.
Use the Pilot Operating Handbook (POH) procedures for specific aircraft performance and limitations.
and/or current Standard Operating Procedures (SOPs).
Approach & Landing Key Highlights
- Approach and landing procedures transition the aircraft safely from cruise or traffic pattern flight to touchdown and rollout.
- Stabilized approaches help pilots maintain proper airspeed, descent rate, alignment, and configuration during landing operations.
- Pilots should manage aircraft energy carefully to maintain safe airspeed and descent profiles throughout the approach.
- Runway conditions, wind, density altitude, aircraft weight, and obstacles significantly affect landing performance.
- Proper use of flaps, trim, and power settings improves aircraft control and landing accuracy.
- Crosswind landings require coordinated control inputs to maintain runway alignment and directional control during touchdown.
- The landing flare reduces descent rate and allows smooth touchdown at an appropriate airspeed and attitude.
- Go-arounds should be initiated promptly whenever a safe landing cannot be assured.
- Visual glide slope indicators, runway markings, and approach lighting systems assist pilots during approach operations.
- Understanding approach and landing procedures improves aircraft control proficiency, situational awareness, and overall flight safety.
Descent Planning, Briefing, and Descent Flow/Checklist
- Descent planning sets the pilot up for success and occurs long before the descent by gathering any relevant information or documents before landing
- Descent briefing enables the pilot to prepare for landing to mitigate one of the most dangerous phases of flight.
- Finally, the descent flow/checklist is performed to ensure the aircraft is configured appropriately for the type of landing to be performed
-
Descent Planning:
- Perform descent planning calculations, if desired, and if not already completed before flight.
- Listen to ATIS/AWOS/ASOS to:
- Determine weather conditions at the airfield.
- Determine the active runway.
- Gather relevant documents you want ready during the approach and immediately after landing:
- Airport diagrams
-
Descent Briefing:
- Review each step to be performed, including but not limited to:
- Frequencies needed and information required for radio calls (i.e., ATIS information, requests)
- Type of landing to be performed
- Key airspeeds to hit
- Roll-out and runway exit plan
- Taxi plan/request (pending ATC instructions)
- Parking plan
- Review each step to be performed, including but not limited to:
-
Descent/Flow Checklist:
- Check that the mixture is full rich
- Turn on the fuel pump
- Put on shoulder harnesses.
- This should include a quick briefing of the airport (i.e., runway vs. taxiway orientation to avoid a wrong surface landing) where an approach and landing procedure being conducted
-
Gust Factor:
- On all approaches, but especially crosswind approaches, you'll want to determine the gust factor
- Gust factors are agnostic to the wind direction
- To calculate, take your gusts and subtract them from the sustained wind
- If your wind is 10 knots and the gusts are 20, then we can subtract 20 from 10 to get 10 as our gust factor (half the gust)
- On approach, we'll want to add half of the gust factor to our approach speed to create a margin of safety within a gusty environment
Initial Contact
- Remember, when flying an instrument approach, approach control may clear you for an approach, but the tower clears you to land
- To provide controllers with the information they need to clear you to land, pilots must declare their intentions
- Intentions may be to conduct touch and go's, low approaches, or landing, and to where you will taxi to park
Normal Approach & Landing
- Normal approaches and landings are the building blocks from which all other landings build []
- While this procedure is for normal landing, assuming the wind is blowing right down the runway, that will rarely be the case
-
Normal Approach & Landing Procedure:
- Complete the Descent Flows/Checklists
- This should include a quick briefing of the airport (i.e., runway vs. taxiway orientation to avoid a wrong surface landing) where an approach and landing procedure being conducted
- Gather any documents you may want to have ready during the approach or immediately after landing
- Talk to the tower as appropriate to the airspace you're operating within
- Controlled: "[Tower], [Callsign], [Location], [Information], [Intentions]"
- Example: "Palms tower, Cessna One Seven Two Seven Victor, fives miles to the west for touch and go's"
- Uncontrolled: "[Facility Name], [Callsign], [Location], [Information], [Intentions], [Facility Name]"
- Example: "Palms tower, Cessna one seven two seven victor, five miles to the west for touch and goes, palms tower"
- Controlled: "[Tower], [Callsign], [Location], [Information], [Intentions]"
- Abide by the tower's instructions and plan to enter the traffic pattern at Traffic Pattern Altitude (TPA) on a 45° entry to the downwind, maintaining a one-half mile distance from the runway on the downwind leg
- Alternatively, if approved, you may enter the pattern through the overhead approach maneuver.
- Set power to establish and maintain traffic pattern speed
- Trim as necessary
- Abeam the point of intended landing, reduce power, lower the landing gear, set the flaps, and begin a gentle descent and call
- Keeping your hand on the landing gear until given the down and locked indication will prevent forgetting
- Controlled: "[Tower], [Callsign] abeam, gear 3 down and locked, [Landing Type]"
- ATC: "[Callsign], [Winds], cleared for [Runway], [Landing Type]"
- ATC: Cessna 1727V, wind 130 at 5 knots, runway 12, cleared to land
- Uncontrolled: None
- Anticipate the balloon effect when lowering the flaps
- Trim as necessary
- At the 45° point to the intended touchdown point, commence a turn to the base leg
- ICS: "Cleared left, forward, clear right, turning [Left/Right]"
- Controlled: None
- Uncontrolled: "[Facility Name], [Callsign], turning base for [Runway], [Facility Name]"
- The wind is now at your side, so depending on its strength, you will need to compensate for drift with a crab angle
- Set the flaps, then establish and maintain base leg airspeed
- Anticipate the balloon effect when lowering the flaps
- Trim as necessary
- Visually verify that the final approach (including the extended final and the opposite base leg) is clear, and turn final
- ICS: "Cleared left, forward, clear right, turning [Left/Right]"
- Controlled: None
- Uncontrolled: "[Facility Name], [Callsign], turning base for [Runway], [Facility Name]"
- Check your heading indicator against the runway heading to ensure you're lined up with the correct runway
- Avoid bank angles in excess of 15°
- Be mindful of wake turbulence considerations
- That is look for larger, slower, heavier aircraft and offset your flight path higher & upwind)
- ATC will generally include "caution wake turbulence" before giving winds when clearing an aircraft to land
- If landing to an airport with pilot-controlled lighting, refresh the light timer
- Remember pitch for airspeed, power for altitude.
- When landing is assured, set the flaps for landing and establish approach speed
- Anticipate the balloon effect when lowering the flaps
- Trim as necessary
- Shift your scan to the glideslope indicators, if available, runway alignment, airspeed, and VSI
- By 300' above landing, complete a GUMP check
- GUMP Check:
- Gas: Fuel Selector and Pumps - SET
- Undercarriage: Gear - DOWN AND LOCKED (if applicable)
- Mixture: Mixture - FULL FORWARD
- Prop: Prop - FULL FORWARD (if applicable)
- If the approach is stabilized, call out, "300 feet, stabilized, continuing"
- If the approach is not stabilized, callout (over the ICS), "300 feet, not stabilized, going around," and execute a go-around
- When descending beneath area obstructions like buildings, trees, or otherwise, be prepared for wind shifts
- GUMP Check:
- Approaching the runway threshold, verify the runway number (heading) matches your clearance
- You are checking to verify you are landing on the correct runway as this is your last opportunity to wave off
- As you cross the threshold, begin reducing power as necessary to "roundout" and transitioning to the flare, holding the airplane 1-2 feet off the surface in ground effect, now at idle, as long as possible (to gradually dissipate forward speed)
- When within 10-20 feet, about the height of a hangar, begin the roundout
- Don't focus on the runway, but instead look long (at least a few hundred feet) to flare
- You will see the horizon flatten as if you're sitting on the ground
- Avoid closing the throttle so rapidly that an immediate increase in the rate of descent leads to a hard landing
- Touch down at minimum controllable airspeed with a power-off stall pitch attitude on the main wheels first (minimum float) and with the throttle at the idle (closed) position
- Hold the nose wheel off with back pressure throughout the roll-out; allowing settling gently
- Increase aileron deflection into the wind if present or has shifted from expected
- Maintain directional control throughout the roll-out with the rudder, slowing sufficiently before turning on a taxiway
- Exit the runway without delay at the first available taxiway or on a taxiway as instructed by ATC
- An aircraft is considered clear of the runway when all parts of the aircraft are past the runway edge and there are no restrictions to its continued movement beyond the runway holding position markings
- Proceed with taxi procedures.
- Complete the Descent Flows/Checklists
-
Normal Approach and Landing Common Errors:
- Inadequate wind drift correction on the base leg
- Overshooting or undershooting the turn onto the final approach, resulting in too steep or too shallow a turn onto the final approach
- Flat or skidding turns from base leg to final approach as a result of overshooting/inadequate wind drift correction
- Poor coordination during the turn from base to final approach
- Failure to complete the landing checklist in a timely manner
- Un-stabilized approach
- Failure to adequately compensate for flap extension
- Poor trim technique on the final approach
- Attempting to maintain altitude or reach the runway using the elevator alone
- Focusing too close to the airplane, resulting in too high a round-out
- Focusing too far from the airplane, resulting in too low a round-out
- Touching down before attaining a proper landing attitude
- Failure to hold sufficient back-elevator pressure after touchdown
- Excessive braking after touchdown
-
Private Pilot (Airplane) Normal Takeoff and Climb Airman Certification Standards:
.- Objective: To determine whether the applicant exhibits satisfactory knowledge, risk management, and skills associated with normal approach and landing with emphasis on proper use and coordination of flight controls
- Note: If a crosswind condition does not exist, the applicant's knowledge of crosswind elements must be evaluated through oral testing
- References: AIM; FAA-H-8083-2 (Risk Management Handbook), FAA-H-8083-3 (Airplane Flying Handbook), FAA-H-8083-23 (Seaplane, Skiplane, and Float/Ski Equipped Helicopter Operations Handbook), FAA-H-8083-25 (Pilot Handbook of Aeronautical Knowledge); POH/AFM.
- Private Pilot (Airplane) Normal Approach and Landing Lesson Plan.
Normal Approach and Landing Knowledge:
The applicant demonstrates an understanding of:-
PA.IV.B.K1:
A stabilized approach, including energy management concepts. -
PA.IV.B.K2:
Effects of atmospheric conditions, including wind, on approach and landing performance. -
PA.IV.B.K3:
Wind correction techniques on approach and landing.
Normal Approach and Landing Risk Management:
The applicant is able to identify, assess, and mitigate risks associated with:-
PA.IV.B.R1:
Selection of runway/landing surface, approach path, and touchdown area based on pilot capability, aircraft performance and limitations, available distance, and wind. -
PA.IV.B.R2:
Effects of:-
PA.IV.B.R2a:
Crosswind. -
PA.IV.B.R2b:
Windshear. -
PA.IV.B.R2c:
Tailwind. -
PA.IV.B.R2d:
Wake turbulence. -
PA.IV.B.R2e:
Runway surface/condition.
-
-
PA.IV.B.R3:
Planning for:-
PA.IV.B.R3a:
Rejected landing and go-around. -
PA.IV.B.R3b:
Land and hold short operations (LAHSO).
-
-
PA.IV.B.R4:
Collision hazards. -
PA.IV.B.R5:
Low altitude maneuvering, including stall, spin, or controlled flight into terrain (CFIT). -
PA.IV.B.R6:
Distractions, task prioritization, loss of situational awareness, or disorientation.
Normal Approach and Landing Skills:
The applicant exhibits the skills to:-
PA.IV.B.S1:
Complete the appropriate checklist(s). -
PA.IV.B.S2:
Make radio calls as appropriate. -
PA.IV.B.S3:
Ensure the airplane is aligned with the correct/assigned runway or landing surface. -
PA.IV.B.S4:
Scan the runway or landing surface and adjoining area for traffic and obstructions. -
PA.IV.B.S5:
Select and aim for a suitable touchdown point considering the wind, landing surface, and obstructions. -
PA.IV.B.S6:
Establish the recommended approach and landing configuration, airspeed, and trim, and adjust pitch attitude and power as required to maintain a stabilized approach. -
PA.IV.B.S7:
Maintain manufacturer's published approach airspeed or in its absence not more than 1.3 times the stalling speed or the minimum steady flight speed in the landing configuration (VSO), +10/-5 knots with gust factor applied. -
PA.IV.B.S8:
Maintain directional control and appropriate crosswind correction throughout the approach and landing. -
PA.IV.B.S9:
Make smooth, timely, and correct control application during round out and touchdown. -
PA.IV.B.S10:
Touch down at a proper pitch attitude, within 400 feet beyond or on the specified point, with no side drift, and with the airplane's longitudinal axis aligned with and over the runway center/landing path. -
PA.IV.B.S11:
Execute a timely go-around if the approach cannot be made within the tolerances specified above or for any other condition that may result in an unsafe approach or landing. -
PA.IV.B.S12:
Utilize runway incursion avoidance procedures.
-
Commercial Pilot (Airplane) Normal Approach and Landing Airman Certification Standards:
.- Objective: To determine whether the applicant exhibits satisfactory knowledge, risk management, and skills associated with normal approach and landing with emphasis on proper use and coordination of flight controls
- Note: If a crosswind condition does not exist, the applicant's knowledge of crosswind elements must be evaluated through oral testing
- References: AIM; FAA-H-8083-2 (Risk Management Handbook), FAA-H-8083-3 (Airplane Flying Handbook), FAA-H-8083-23 (Seaplane, Skiplane, and Float/Ski Equipped Helicopter Operations Handbook), FAA-H-8083-25 (Pilot Handbook of Aeronautical Knowledge); POH/AFM.
- Commercial Pilot (Airplane) Normal Approach and Landing Lesson Plan.
Commercial Pilot (Airplane) Normal Approach and Landing Knowledge:
The applicant demonstrates an understanding of:-
CA.IV.B.K1:
A stabilized approach, including energy management concepts. -
CA.IV.B.K2:
Effects of atmospheric conditions, including wind, on approach and landing performance. -
CA.IV.B.K3:
Wind correction techniques on approach and landing.
Commercial Pilot (Airplane) Normal Approach and Landing Risk Management:
The applicant is able to identify, assess, and mitigate risks associated with:-
CA.IV.B.R1:
Selection of runway/landing surface, approach path, and touchdown area based on pilot capability, aircraft performance and limitations, available distance, and wind. -
CA.IV.B.R2:
Effects of:-
CA.IV.B.R2a:
Crosswind. -
CA.IV.B.R2b:
Windshear. -
CA.IV.B.R2c:
Tailwind. -
CA.IV.B.R2d:
Wake turbulence. -
CA.IV.B.R2e:
Runway surface/condition.
-
-
CA.IV.B.R3:
Planning for:-
CA.IV.B.R3a:
Rejected landing and go-around. -
CA.IV.B.R3b:
Land and hold short operations (LAHSO).
-
-
CA.IV.B.R4:
Collision hazards. -
CA.IV.B.R5:
Low altitude maneuvering, including stall, spin, or controlled flight into terrain (CFIT). -
CA.IV.B.R6:
Distractions, task prioritization, loss of situational awareness, or disorientation.
Commercial Pilot (Airplane) Normal Approach and Landing Skills:
The applicant exhibits the skills to:-
CA.IV.B.S1:
Complete the appropriate checklist(s). -
CA.IV.B.S2:
Make radio calls as appropriate. -
CA.IV.B.S3:
Ensure the airplane is aligned with the correct/assigned runway or landing surface. -
CA.IV.B.S4:
Scan the runway or landing surface and adjoining area for traffic and obstructions. -
CA.IV.B.S5:
Select and aim for a suitable touchdown point considering the wind, landing surface, and obstructions. -
CA.IV.B.S6:
Establish the recommended approach and landing configuration, airspeed, and trim, and adjust pitch attitude and power as required to maintain a stabilized approach. -
CA.IV.B.S7:
Maintain manufacturer's published approach airspeed or in its absence not more than 1.3 times the stalling speed or the minimum steady flight speed in the landing configuration (VSO), ±5 knots with gust factor applied. -
CA.IV.B.S8:
Maintain directional control and appropriate crosswind correction throughout the approach and landing. -
CA.IV.B.S9:
Make smooth, timely, and correct control application during round out and touchdown. -
CA.IV.B.S10:
Touch down at a proper pitch attitude, within 200 feet beyond or on the specified point, with no side drift, and with the airplane's longitudinal axis aligned with and over the runway center/landing path. -
CA.IV.B.S11:
Execute a timely go-around if the approach cannot be made within the tolerances specified above or for any other condition that may result in an unsafe approach or landing. -
CA.IV.B.S12:
Utilize runway incursion avoidance procedures.
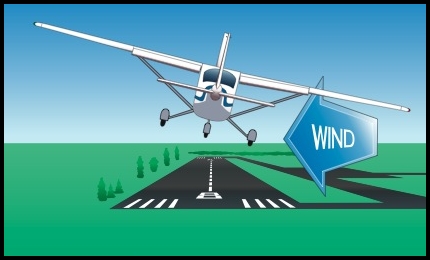
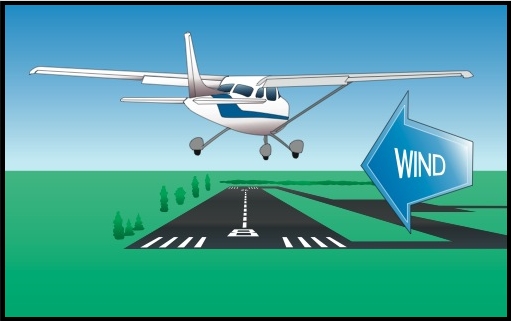
Crosswind Approach & Landing
- The goal of a crosswind landing is to safely and accurately establish and maintain a stabilized approach to landing, correcting for a crosswind during the approach, touchdown, and roll-out []
-
Determining Crosswind Component:
- Pilots calculate crosswinds through many methods that each serve a purpose, depending on the flight phase.
- When calculating the crosswind, always use the full gust component, meaning calculate crosswind as a "worst case" scenario
- Consider your source for winds (true vs. magnetic) and remember if it's written, it's true; if it's spoken, it's magnetic:
- ATC reports, a windsock, or ATIS are magnetic
- METARs provide winds in true, but pilots can convert to magnetic.
- Remember, winds are variable, too, so only bother converting if operating at significant deviations.
- When calculating the crosswind, always use the full gust component, meaning calculate crosswind as a "worst-case" scenario.
-
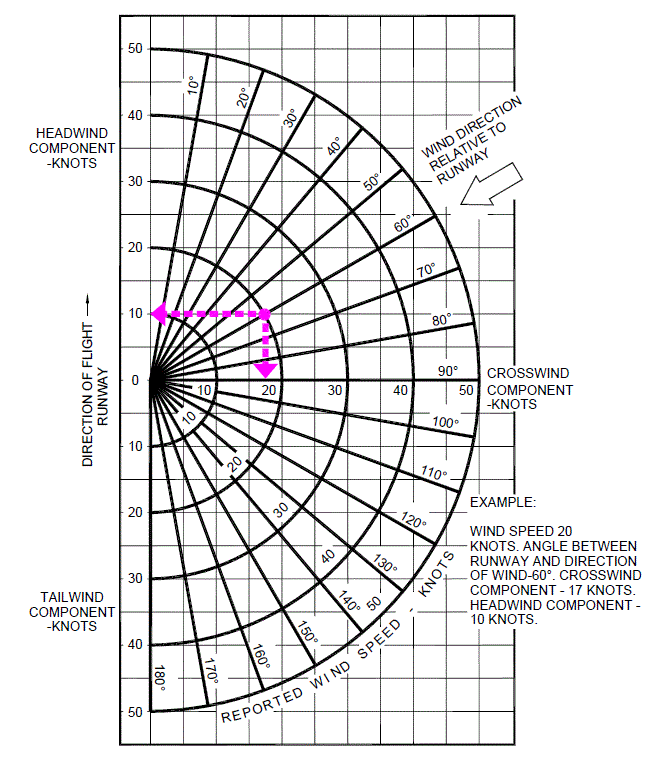
Chart Method:
- Crosswind charts are in nearly every POH/PIM, but are not aircraft-specific, so any will do.
- Using the example provided in [], plot your point using the number of degrees off the runway heading, with the full gust component as strength.
- Let's say we're going to land at runway 360, and the wind is coming from 020 at 20 knots.
- We'll plot the wind strength at the 20° radial line (representing 20° off the runway) on the 20° point (representing the wind strength).
- From the plotted point, we move straight left for the headwind component: roughly 19 knots.
- We can also move straight down for the crosswind component: approximately 6 knots.
-
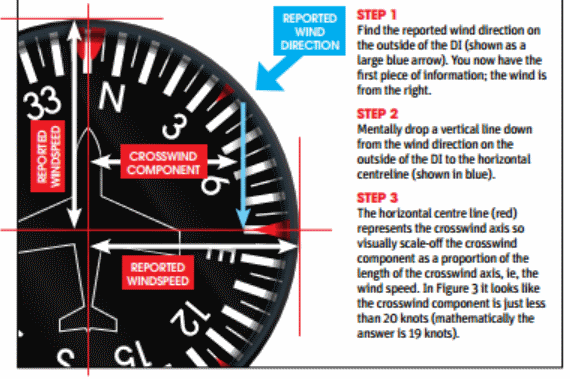
Heading Indicator Rule of Thumb:
- Find the reported wind direction on the outside of the DI (shown as a large blue arrow). You now have the first piece of information: the wind is from the right. []
- Mentally drop a vertical line down from the wind direction on the outside of the DI to the horizontal centerline (shown in blue).
- The horizontal center line (red) represents the crosswind axis, so visually scale off the crosswind component as a proportion of the length of the crosswind axis, i.e., the wind speed.
- Using our example, this means our crosswind component is just less than 20 knots (mathematically, the answer is 19 knots).
-
Sixths Rule of Thumb:
- If the angle is 10°, then the crosswind component equals 1/6 of the wind strength.
- If the angle is 20°, then the crosswind component equals 2/6 (1/3) of the wind strength.
- If the angle is 30°, then the crosswind component equals 3/6 (1/2) of the wind strength.
- If the angle is 40°, then the crosswind component equals 4/6 (2/3) of the wind strength.
- If the angle is 50°, then the crosswind component equals 5/6 of the wind strength.
- If the angle is 60° or greater, then the crosswind component equals the wind strength.
-
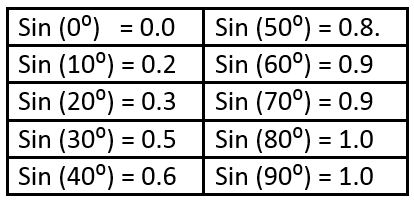
Mathematical Formula:
- The formula for crosswind component = Wind Speed x Sin (Wind Angle). []
- Example: If the wind is 310° at 17 knots and you line up to 330°, you can see you have a wind angle of 20°.
- Refer to the chart to find that the sine of 20° is 0.3. Then, multiply this value by the wind component of 17 knots to obtain a crosswind component of 5 knots.
-
Crosswind Compensation Techniques:
-
Slip:
- A slip is a cross-control procedure where you are using "wing-low, top-rudder" to track the aircraft straight for the purposes of altitude loss (forward-slip) or crosswind compensation (side-slip) []
- In doing this, you will need to lower the nose as the increase in drag without an increase in thrust will cause a rapid loss of airspeed, risking a stall.
- Simply stated, the higher the angle of bank, the lower the nose must be
- A forward-slip allows pilots to increase the aircraft's rate of descent without increasing airspeed in the process
- A side-slip, however, allows pilots to compensate for a crosswind on final approach
-
Side-slip:
- A side-slip is used to compensate for a crosswind on final approach
- First, you apply the aileron into the wind to compensate for the crosswind blowing you off centerline
- Next, you use the rudder to maintain alignment with the runway centerline
- Think: "Point your nose with your toes"
- The horizontal component of lift forces the airplane to move sideways toward the low-wing
- The aircraft's rudder is used to align to the center while the wings are dripped (toward the wind) to maintain track (drift)
- Held all the way to touchdown, this will result in the low side wheel touching down first, followed by the high wheel, and lastly, the nose/tail wheel
- Note that when performing a slip, the Pilot Operating Handbook may impose certain restrictions such as:
- Avoiding slips with full flaps
- Avoiding slips for prolonged periods, which may result in fuel ports becoming uncovered
- Airspeed indications may vary due to static ports receiving direct wind
- If your static port is located on the left side of the fuselage, a slip using the right rudder will cause the perceived static pressure to be higher than actual as ram air is forced into the static port, resulting in your indicated airspeed being less than actual. Therefore, it would normally be advisable to maintain an airspeed comfortably within the middle range of the white arc (flap operating range) to avoid being either too close to a cross-control stall or a flap over-speed condition
- Ensure to check POH for side-slip limitations, as some aircraft do not allow them with full flaps
- A slip is a cross-control procedure where you are using "wing-low, top-rudder" to track the aircraft straight for the purposes of altitude loss (forward-slip) or crosswind compensation (side-slip) []
-
Crab:
- Coordinated flight whereby you are pointing the nose of the aircraft upwind enough to keep the airplane's ground track straight []
- The angle by which the aircraft is flying relative to the runway is considered the crosswind correction
- It is most preferable, in general aviation, to fly a crab and transition to a slip for landing to avoid side-loading the landing gear
- At some point during the final approach, a transition from crab to side-slip for the landing flare and touchdown should be made
-
-
Crosswind Control Mechanics:
- Crab on a final and slip to the landing
- The aircraft will want to weathervane, pointing into the wind
- The rudder is necessary to maintain directional control
- As speed decreases, the control surfaces become less effective as you transition from flying to a taxi, thereby requiring more input to achieve the same effect, leading to increasing control inputs as you decelerate
- The crosswind effect will never completely disappear, meaning that some input will remain
- If, when taking out your inputs, the upwind wing is allowed to rise, it will expose more surface to the crosswind, and a side-skipping action may result
- This side-skipping imposes severe side stresses on the landing gear and could result in structural failure
- As both main wheels contact the runway, ground friction resists drifting
-
Crosswind Approach & Landing Procedure:
- Complete the Descent Flows/Checklists
- This should include a quick briefing of the airport (i.e., runway vs. taxiway orientation to avoid a wrong surface landing) where an approach and landing procedure being conducted
- Gather any documents you may want to have ready during the approach or immediately after landing
- Talk to the tower as appropriate to the airspace you're operating within
- Controlled: "[Tower], [Callsign], [Location], [Information], [Intentions]"
- Example: "Palms tower, Cessna One Seven Two Seven Victor, fives miles to the west for touch and go's"
- Uncontrolled: "[Facility Name], [Callsign], [Location], [Information], [Intentions], [Facility Name]"
- Example: "Palms tower, Cessna one seven two seven victor, five miles to the west for touch and goes, palms tower"
- Abide by the tower's instructions and plan to enter the traffic pattern at Traffic Pattern Altitude (TPA) on a 45° entry to the downwind, maintaining a one-half mile distance from the runway on the downwind leg
- Alternatively, if approved, you may enter the pattern through the overhead approach maneuver.
- Controlled: "[Tower], [Callsign], [Location], [Information], [Intentions]"
- Set power to establish and maintain traffic pattern speed
- Trim as necessary
- Abeam the point of intended landing, reduce power, set the flaps, lower the landing gear, and begin a gentle descent and call
- Keeping your hand on the landing gear until given the down and locked indication will prevent forgetting
- Controlled: "[Tower], [Callsign] abeam, gear 3 down and locked, [Landing Type]"
- ATC: "[Callsign], [Winds], cleared for [Runway], [Landing Type]"
- Uncontrolled: None
- Anticipate the balloon effect when lowering the flaps
- Trim as necessary
- At the 45° point to the intended touchdown point (or as appropriate for wind conditions), commence a turn to the base leg
- ICS: "Cleared left, forward, clear right, turning [Left/Right]"
- Controlled: None
- Uncontrolled: "[Facility Name], [Callsign], turning base for [Runway], [Facility Name]"
- The wind is now at your side, so depending on its strength, you will need to compensate for drift with a crab angle
- Set the flaps, then establish and maintain base leg airspeed
- Anticipate the balloon effect when lowering the flaps
- Trim as necessary
- Visually verify that the final approach (including the extended final and the opposite base leg) is clear, and turn final
- ICS: "Cleared left, forward, clear right, turning [Left/Right]"
- Controlled: None
- Uncontrolled: "[Facility Name], [Callsign], turning base for [Runway], [Facility Name]"
- Check your heading indicator against the runway heading to ensure you're lined up with the correct runway
- Avoid bank angles in excess of 15°
- Be mindful of wake turbulence considerations
- That is look for larger, slower, heavier aircraft and offset your flight path higher & upwind)
- If landing to an airport with pilot-controlled lighting, refresh the timer
- Remember pitch for airspeed, power for altitude.
- When landing is assured, set the flaps for landing and establish approach speed (+1/2 gust factor, if applicable)
- Anticipate the balloon effect when lowering the flaps
- Trim as necessary
- Transition from a crab to a slip
- Shift your scan to the glideslope indicators, if available, runway alignment, airspeed, and VSI
- By 300' above landing, complete a GUMP check
- GUMP Check:
- Gas: Fuel Selector and Pumps - SET
- Undercarriage: Gear - DOWN AND LOCKED (if applicable)
- Mixture: Mixture - FULL FORWARD
- Prop: Prop - FULL FORWARD (if applicable)
- If the approach is stabilized, call out, "300 feet, stabilized, continuing"
- If the approach is not stabilized, callout (over the ICS), "300 feet, not stabilized, going around," and execute a go-around
- When descending beneath area obstructions like buildings, trees, or otherwise, be prepared for wind shifts
- GUMP Check:
- Approaching the runway threshold, verify the runway number (heading) matches your clearance
- You are checking to verify you are landing on the correct runway, as this is your last opportunity to go-around
- As you cross the threshold, begin reducing power as necessary to "roundout" and transitioning to the flare, holding the airplane 1-2 feet off the surface in ground effect, now at idle, as long as possible (to gradually dissipate forward speed)
- When within 10-20 feet, about the height of a hangar, begin the roundout
- Don't focus on the runway, but instead look long (at least a few hundred feet) to flare
- You will see the horizon flatten as if you're sitting on the ground
- Avoid closing the throttle so rapidly that an immediate increase in the rate of descent leads to a hard landing
- Touch down at minimum controllable airspeed with a power-off stall pitch attitude on the main wheels first (minimum float) and with the throttle at the idle (closed) position
- Hold the nose wheel off with back pressure throughout the roll-out; allowing settling gently
- Once the aircraft touches down, it will tend to find the centerline on its own; you need to be judicious with your inputs to avoid any induced oscillations
- Subsequent runway centerline tracking requires only small rudder inputs to initiate directional corrections
- Increase aileron deflection into the wind as you decelerate due to less airflow, decreasing aileron effectiveness
- Maintain directional control throughout the roll-out with the rudder, slowing sufficiently before turning on a taxiway
- Remember to maintain taxi control inputs for winds
- Exit the runway without delay at the first available taxiway or on a taxiway as instructed by ATC
- An aircraft is considered clear of the runway when all parts of the aircraft are past the runway edge, and there are no restrictions to its continued movement beyond the runway holding position markings
- Proceed with taxi procedures.
- Complete the Descent Flows/Checklists
-
Crosswind Approach and Landing Common Errors:
- Attempting to land in crosswinds that exceed the airplane's maximum demonstrated crosswind component.
- Inadequate compensation for wind drift on the turn from base leg to final approach, resulting in under or shooting.
- Flat or skidding turns from base leg to final approach as a result of overshooting/inadequate wind drift correction.
- Poor coordination during the turn from base to final approach.
- Failure to complete the landing checklist in a timely manner.
- Un-stabilized approach.
- Inadequate compensation for wind drift on the final approach (allowing upwind wing to rise).
- Maintaining too much speed on the final approach to compensate for winds.
- Failure to adequately compensate for flap extension.
- Poor trim technique on the final approach.
- Failure to compensate for increased drag during side-slip, resulting in excessive sink rate and/or too low an airspeed.
- Attempting to maintain altitude or reach the runway using the elevator alone.
- Focusing too close to the airplane, resulting in too high a round out.
- Focusing too far from the airplane, resulting in too low a round out.
- Touching down before attaining a proper landing attitude.
- Failure to apply appropriate flight control inputs during roll-out, causing the aircraft to drift, weathervane, or lean (allowing upwind wing to rise).
- Failure to maintain directional control on roll-out.
- Touchdown while drifting (side-loading).
- Excessive airspeed on touchdown, resulting in a late touchdown.
- Excessive braking after touchdown.
- Slip:
- Failure to reduce power to idle.
- Failure to add or increase flaps when available.
- Failure to apply and maintain full rudder deflection.
- Failure to use appropriate rudder/aileron combination during a crosswind situation.
- Failure to reduce pitch to maintain proper safe gliding airspeed.
Short-Field Approach & Landing
- The goal of the short-field approach and landing is to maximize aircraft performance to safely and accurately land when runway distance is limited
- The approach is made with minimum engine power commensurate with flying towards the aiming point on the runway
- This will result in a steeper approach than otherwise flown with other landing procedures
- The speed must be reduced progressively as the aircraft's height reduces, and after reaching the airspeed for the final approach, it must be maintained accurately
- After touchdown, the pilot applies maximum wheel braking and maximum up-elevator to minimize distance traveled
- Wing-flaps are sometimes retracted to allow better braking performance
- Tips:
- Touchdown as close to the approach end as safely possible
- Utilize maximum braking available
- Keep tires on the ground to keep friction
- Land into a headwind
- Land as the lowest weight possible
-
Short-Field Approach & Landing Procedure:
- Complete the Descent Flows/Checklists
- This should include a quick briefing of the airport (i.e., runway vs. taxiway orientation to avoid a wrong surface landing) where, and approach and landing procedure being conducted
- Gather any documents you may want to have ready during the approach or immediately after landing
- Talk to the tower as appropriate to the airspace you're operating within
- Controlled: "[Tower], [Callsign], [Location], [Information], [Intentions]"
- Example: "Palms tower, Cessna one seven two seven victor, fives miles to the west for touch and go's"
- Uncontrolled: "[Facility Name], [Callsign], [Location], [Information], [Intentions], [Facility Name]"
- Example: "Palms tower, Cessna One Seven Two Seven Victor, five miles to the west for touch and goes, palms tower"
- Abide by the tower's instructions and plan to enter the traffic pattern at Traffic Pattern Altitude (TPA) on a 45° entry to the downwind, maintaining a one-half mile distance from the runway on the downwind leg
- Alternatively, if approved, you may enter the pattern through the overhead approach maneuver.
- Controlled: "[Tower], [Callsign], [Location], [Information], [Intentions]"
- Set power to establish and maintain traffic pattern speed
- Trim as necessary
- Abeam the point of intended landing, reduce power, lower the landing gear, set the flaps, begin a gentle descent, and call
- Keeping your hand on the landing gear until given the down and locked indication will prevent forgetting
- Controlled: "[Tower], [Callsign] abeam, gear 3 down and locked, [Landing Type]"
- ATC: "[Callsign], [Winds], cleared for [Runway], [Landing Type]"
- Uncontrolled: None
- Anticipate the balloon effect when lowering the flaps
- Trim as necessary
- At the 45° point to the intended touchdown point (or as appropriate for wind conditions), commence a turn to the base leg
- ICS: "Cleared left, forward, clear right, turning [Left/Right]"
- Controlled: None
- Uncontrolled: "[Facility Name], [Callsign], turning base for [Runway], [Facility Name]"
- The wind is now at your side, so depending on its strength, you will need to compensate for drift with a crab angle
- Set the flaps, then establish and maintain base leg airspeed
- Anticipate the balloon effect when lowering the flaps
- Trim as necessary
- Visually verify that the final approach (including the extended final and the opposite base leg) is clear, and turn final
- ICS: "Cleared left, forward, clear right, turning [Left/Right]"
- Controlled: None
- Uncontrolled: "[Facility Name], [Callsign], turning base for [Runway], [Facility Name]"
- Check your heading indicator against the runway heading to ensure you're lined up with the correct runway
- Avoid bank angles in excess of 15°
- Be mindful of wake turbulence considerations
- That is look for larger, slower, heavier aircraft and offset your flight path higher & upwind)
- If landing to an airport with pilot-controlled lighting, refresh the timer
- Remember pitch for airspeed, power for altitude.
- When landing is assured, set the flaps for landing and establish approach speed (+1/2 gust factor, if applicable)
- Anticipate the balloon effect when lowering the flaps
- Trim as necessary
- Transition from a crab to a slip
- Shift your scan to the glideslope indicators, if available, runway alignment, airspeed, and VSI
- By 300' above landing, complete a GUMP check
- GUMP Check:
- Gas: Fuel Selector and Pumps - SET
- Undercarriage: Gear - DOWN AND LOCKED (if applicable)
- Mixture: Mixture - FULL FORWARD
- Prop: Prop - FULL FORWARD (if applicable)
- If the approach is stabilized, call out, "300 feet, stabilized, continuing"
- If the approach is not stabilized, callout (over the ICS), "300 feet, not stabilized, going around," and execute a go-around
- When descending beneath area obstructions like buildings, trees, or otherwise, be prepared for wind shifts
- GUMP Check:
- Approaching the runway threshold, verify the runway number (heading) matches your clearance
- You are checking to verify you are landing on the correct runway, as this is your last opportunity to go-around
- As you cross the threshold, begin reducing power as necessary to "round-out" and transitioning to the flare, holding the airplane 1-2 feet off the surface in ground effect, now at idle, as long as possible (to gradually dissipate forward speed)
- When within 10-20 feet, about the height of a hangar, begin the roundout
- Don't focus on the runway, but instead look long (at least a few hundred feet) to flare
- You will see the horizon flatten as if you're sitting on the ground
- Avoid closing the throttle so rapidly that an immediate increase in the rate of descent leads to a hard landing
- Touch down at minimum controllable airspeed with a power-off stall pitch attitude on the main wheels first (minimum float) and with the throttle at the idle (closed) position
- Hold the nose wheel off with back pressure throughout the roll-out, settling gently
- Increase aileron deflection into the wind if present or has shifted from expected
- Increase "up" elevator to increase braking effectiveness
- At nose wheel touch down:
- Callout (over the ICS), "flaps up, max braking"
- Retract the flaps to the up (0°) position (for maximum braking effectiveness)
- Hold the control wheel full back, and
- Apply braking as necessary to stop within the shortest distance possible, consistent with safety and controllability
- Maintain directional control throughout the roll-out with the rudder, slowing sufficiently before turning on a taxiway
- Reference board speeds: you should be traveling no faster than twice the distance remaining
- Example: at the 3 board, you should be traveling no more than 60 knots
- If required, raise the flaps, which decreases lift over the wings and, therefore, increase weight on the brakes
- Exit the runway without delay at the first available taxiway or on a taxiway as instructed by ATC
- An aircraft is considered clear of the runway when all parts of the aircraft are past the runway edge, and there are no restrictions to its continued movement beyond the runway holding position markings
- Proceed with taxi procedures.
- Complete the Descent Flows/Checklists
-
Short-Field Approach & Landing Common Errors:
- Inadequate wind drift correction on the base leg
- Overshooting or undershooting the turn onto the final approach, resulting in too steep or too shallow a turn onto the final approach
- Flat or skidding turns from base leg to final approach as a result of overshooting/inadequate wind drift correction
- Poor coordination during the turn from base to final approach
- Failure to complete the landing checklist in a timely manner
- Un-stabilized approach
- Failure to adequately compensate for flap extension
- Poor trim technique on the final approach
- Attempting to maintain altitude or reach the runway using elevator control alone
- Focusing too close to the airplane, resulting in too high a round-out
- Focusing too far from the airplane, resulting in too low a round-out
- Touching down before attaining a proper landing attitude
- Failure to hold sufficient back-elevator pressure after touchdown
- Excessive and/or unnecessary braking after touchdown
- A final approach that necessitates an overly steep approach and high sink rate
- Undue delay in initiating glide path corrections
- Airspeed too low on final resulting in inability to flare properly and landing hard
- Too high an airspeed resulting in floating on round out
- Prematurely reducing power to idle on round out resulting in hard landing
- Touchdown with excessive airspeed
- Failure to maintain directional control
- Failure to recognize and abort a poor approach that cannot be completed safely
-
Private Pilot (Airplane) Short-Field Approach and Landing (ASEL):
.- Objective: To determine whether the applicant exhibits satisfactory knowledge, risk management, and skills associated with short-field approach and landing with emphasis on proper use and coordination of flight controls
- References: AIM; FAA-H-8083-2 (Risk Management Handbook), FAA-H-8083-3 (Airplane Flying Handbook), FAA-H-8083-25 (Pilot Handbook of Aeronautical Knowledge); POH/AFM.
- Private Pilot (Airplane) Short-Field Approach and Landing Lesson Plan.
Short-Field Approach and Landing (ASEL) Knowledge:
The applicant demonstrates an understanding of:-
PA.IV.F.K1:
A stabilized approach, including energy management concepts. -
PA.IV.F.K2:
Effects of atmospheric conditions, including wind, on approach and landing performance. -
PA.IV.F.K3:
Wind correction techniques on approach and landing.
Short-Field Approach and Landing (ASEL) Risk Management:
The applicant is able to identify, assess, and mitigate risks associated with:-
PA.IV.F.R1:
Selection of runway based on pilot capability, airplane performance and limitations, available distance, and wind. -
PA.IV.F.R2:
Effects of:-
PA.IV.F.R2a:
Crosswind. -
PA.IV.F.R2b:
Windshear. -
PA.IV.F.R2c:
Tailwind. -
PA.IV.F.R2d:
Wake turbulence. -
PA.IV.F.R2e:
Runway surface/condition.
-
-
PA.IV.F.R3:
Planning for:-
PA.IV.F.R3a:
Rejected landing and go-around. -
PA.IV.F.R3b:
Land and hold short operations (LAHSO).
-
-
PA.IV.F.R4:
Collision hazards. -
PA.IV.F.R5:
Low altitude maneuvering, including stall, spin, or controlled flight into terrain (CFIT). -
PA.IV.F.R6:
Distractions, task prioritization, loss of situational awareness, or disorientation.
Short-Field Approach and Landing (ASEL) Skills:
The applicant exhibits the skills to:-
PA.IV.F.S1:
Complete the appropriate checklist(s). -
PA.IV.F.S2:
Make radio calls as appropriate. -
PA.IV.F.S3:
Ensure the airplane is aligned with the correct/assigned runway. -
PA.IV.F.S4:
Scan the landing runway and adjoining area for traffic and obstructions. -
PA.IV.F.S5:
Select and aim for a suitable touchdown point considering the wind conditions, landing surface, and obstructions. -
PA.IV.F.S6:
Establish the recommended approach and landing configuration, airspeed, and trim, and adjust pitch attitude and power as required to maintain a stabilized approach. -
PA.IV.F.S7:
Maintain manufacturer's published approach airspeed or in its absence not more than 1.3 VSO, +10/-5 knots with gust factor applied. -
PA.IV.F.S8:
Maintain directional control and appropriate crosswind correction throughout the approach and landing. -
PA.IV.F.S9:
Make smooth, timely, and correct control application before, during, and after touchdown. -
PA.IV.F.S10:
Touch down at a proper pitch attitude within 200 feet beyond or on the specified point, threshold markings, or runway numbers, with no side drift, minimum float, and with the airplane's longitudinal axis aligned with and over the runway centerline. -
PA.IV.F.S11:
Use manufacturer's recommended procedures for airplane configuration and braking. -
PA.IV.F.S12:
Execute a timely go-around if the approach cannot be made within the tolerances specified above or for any other condition that may result in an unsafe approach or landing. -
PA.IV.F.S13:
Use runway incursion avoidance procedures, if applicable.
-
Commercial Pilot (Airplane) Short-Field Approach and Landing (ASEL):
- Objective: To determine whether the applicant exhibits satisfactory knowledge, risk management, and skills associated with short-field approach and landing with emphasis on proper use and coordination of flight controls
- References: AIM; FAA-H-8083-2 (Risk Management Handbook), FAA-H-8083-3 (Airplane Flying Handbook), FAA-H-8083-25 (Pilot Handbook of Aeronautical Knowledge); POH/AFM.
Commercial Pilot (Airplane) Short-Field Approach and Landing (ASEL) Knowledge:
The applicant demonstrates an understanding of:-
PA.IV.F.K1:
A stabilized approach, including energy management concepts. -
PA.IV.F.K2:
Effects of atmospheric conditions, including wind, on approach and landing performance. -
PA.IV.F.K3:
Wind correction techniques on approach and landing.
Commercial Pilot (Airplane) Short-Field Approach and Landing (ASEL) Risk Management:
The applicant is able to identify, assess, and mitigate risks associated with:-
PA.IV.F.R1:
Selection of runway based on pilot capability, airplane performance and limitations, available distance, and wind. -
PA.IV.F.R2:
Effects of:-
PA.IV.F.R2a:
Crosswind. -
PA.IV.F.R2b:
Windshear. -
PA.IV.F.R2c:
Tailwind. -
PA.IV.F.R2d:
Wake turbulence. -
PA.IV.F.R2e:
Runway surface/condition.
-
-
PA.IV.F.R3:
Planning for:-
PA.IV.F.R3a:
Rejected landing and go-around. -
PA.IV.F.R3b:
Land and holding short operations (LAHSO).
-
-
PA.IV.F.R4:
Collision hazards. -
PA.IV.F.R5:
Low altitude maneuvering, including stall, spin, or controlled flight into terrain (CFIT). -
PA.IV.F.R6:
Distractions, task prioritization, loss of situational awareness, or disorientation.
Commercial Pilot (Airplane) Short-Field Approach and Landing (ASEL) Skills:
The applicant exhibits the skills to:-
PA.IV.F.S1:
Complete the appropriate checklist(s). -
PA.IV.F.S2:
Make radio calls as appropriate. -
PA.IV.F.S3:
Ensure the airplane is aligned with the correct/assigned runway. -
PA.IV.F.S4:
Scan the landing runway and adjoining area for traffic and obstructions. -
PA.IV.F.S5:
Select and aim for a suitable touchdown point considering the wind conditions, landing surface, and obstructions. -
PA.IV.F.S6:
Establish the recommended approach and landing configuration, airspeed, and trim, and adjust pitch attitude and power as required to maintain a stabilized approach. -
PA.IV.F.S7:
Maintain manufacturer's published approach airspeed or in its absence not more than 1.3 VSO, ±5 knots with gust factor applied. -
PA.IV.F.S8:
Maintain directional control and appropriate crosswind correction throughout the approach and landing. -
PA.IV.F.S9:
Make smooth, timely, and correct control application before, during, and after touchdown. -
PA.IV.F.S10:
Touch down at a proper pitch attitude within 100 feet beyond or on the specified point, threshold markings, or runway numbers, with no side drift, minimum float, and with the airplane's longitudinal axis aligned with and over the runway centerline. -
PA.IV.F.S11:
Use manufacturer's recommended procedures for airplane configuration and braking. -
PA.IV.F.S12:
Execute a timely go-around if the approach cannot be made within the tolerances specified above or for any other condition that may result in an unsafe approach or landing. -
PA.IV.F.S13:
Use runway incursion avoidance procedures, if applicable.
Soft/Rough-Field Approach & Landing
- The goal of the soft-field approach and landing is to maximize aircraft performance to safely and accurately land the airplane, obtaining maximum performance, by touching down at the slowest possible airspeed (energy).
- Soft/rough fields may or may not be suitable for landing based on their condition, recent weather, obstacles, etc.
- While in the pattern, pilots should pay attention to water spots, tall grass observed blowing, any markings or evidence of previous use.
- Remember any location on the map was at one point a runway, but may not be suitable now.
- Consider the risks of a low-pass in balancing the need for safety relative to careless and reckless operation (Trent Palmer Legal Case).
-
Soft/Rough-Field Approach & Landing Procedure:
- Complete the Descent Flows/Checklists
- This should include a quick briefing of the airport (i.e., runway vs. taxiway orientation to avoid a wrong surface landing) where an approach and landing procedure being conducted
- Gather any documents you may want to have ready during the approach or immediately after landing
- Talk to the tower as appropriate to the airspace you're operating within
- Controlled: "[Tower], [Callsign], [Location], [Information], [Intentions]"
- Example: "Palms tower, Cessna one seven two seven victor, fives miles to the west for touch and go's"
- Uncontrolled: "[Facility Name], [Callsign], [Location], [Information], [Intentions], [Facility Name]"
- Example: "Palms tower, Cessna one seven two seven victor, five miles to the west for touch and goes, palms tower"
- Abide by the tower's instructions and plan to enter the traffic pattern at Traffic Pattern Altitude (TPA) on a 45° entry to the downwind, maintaining a one-half mile distance from the runway on the downwind leg
- Alternatively, if approved, you may enter the pattern through the overhead approach maneuver.
- Controlled: "[Tower], [Callsign], [Location], [Information], [Intentions]"
- Set power to establish and maintain traffic pattern speed
- Trim as necessary
- Abeam the point of intended landing, reduce power, lower the landing gear, set the flaps, and begin a gentle descent and call
- Keeping your hand on the landing gear until given the down and locked indication will prevent forgetting
- Controlled: "[Tower], [Callsign] abeam, gear 3 down and locked, [Landing Type]"
- ATC: "[Callsign], [Winds], cleared for [Runway], [Landing Type]"
- Uncontrolled: None
- Anticipate the balloon effect when lowering the flaps
- Trim as necessary
- At the 45° point to the intended touchdown point (or as appropriate for wind conditions), commence a turn to the base leg
- ICS: "Cleared left, forward, clear right, turning [Left/Right]"
- Controlled: None
- Uncontrolled: "[Facility Name], [Callsign], turning base for [Runway], [Facility Name]"
- The wind is now at your side, so depending on its strength, you will need to compensate for drift with a crab angle
- Set the flaps, then establish and maintain base leg airspeed
- Anticipate the balloon effect when lowering the flaps
- Trim as necessary
- Visually verify that the final approach (including the extended final and the opposite base leg) is clear, and turn final
- ICS: "Cleared left, forward, clear right, turning [Left/Right]"
- Controlled: None
- Uncontrolled: "[Facility Name], [Callsign], turning base for [Runway], [Facility Name]"
- Check your heading indicator against the runway heading to ensure you're lined up with the correct runway
- Avoid bank angles in excess of 15°
- Be mindful of wake turbulence considerations
- That is, look for larger, slower, heavier aircraft and offset your flight path higher & upwind)
- If landing to an airport with pilot-controlled lighting, refresh the timer
- Remember pitch for airspeed, power for altitude.
- Maintain directional control and appropriate crosswind correction throughout the approach and landing.
- When landing is assured, set the flaps for landing and establish approach speed (+1/2 gust factor, if applicable)
- Anticipate the balloon effect when lowering the flaps
- Trim as necessary
- Transition from a crab to a slip
- Shift your scan to the glideslope indicators, if available, runway alignment, airspeed, and VSI
- By 300' above landing, complete a GUMP check
- GUMP Check:
- Gas: Fuel Selector and Pumps - SET
- Undercarriage: Gear - DOWN AND LOCKED (if applicable)
- Mixture: Mixture - FULL FORWARD
- Prop: Prop - FULL FORWARD (if applicable)
- If the approach is stabilized, callout (over the ICS), "300 feet, stabilized, continuing"
- If the approach is not stabilized, callout, "300 feet, not stabilized, going around," and execute a go-around
- When descending beneath area obstructions like buildings, trees, or otherwise, be prepared for wind shifts
- GUMP Check:
- Approaching the runway threshold, verify the runway number (heading) matches your clearance
- You are checking to verify you are landing on the correct runway, as this is your last opportunity to go-around
- As you cross the threshold, begin reducing power as necessary to "roundout" and transitioning to the flare, holding the airplane 1-2 feet off the surface in ground effect, now at idle, as long as possible (to gradually dissipate forward speed)
- Use power throughout the level-off and touchdown to ensure touching down at the slowest possible speed
- When within 10-20 feet, about the height of a hangar, begin the roundout
- Don't focus on the runway, but instead look long (at least a few hundred feet) to flare
- You will see the horizon flatten as if you're sitting on the ground
- Avoid closing the throttle so rapidly that an immediate increase in the rate of descent leads to a hard landing
- Touch down at minimum controllable airspeed with a power-off stall pitch attitude on the main wheels first (minimum float) and with the throttle at the idle (closed) position
- Hold the nose wheel off with back pressure throughout the roll-out, settling gently
- Touch down on the main wheels first, holding the nose wheel off with back pressure throughout the roll-out; allow settling gently
- Use power and control wheel back pressure (elevator deflection) to control the rate at which the airplane's weight is transferred to the main wheels
- Maintain directional control throughout the roll-out, slowing sufficiently before turning onto a taxiway
- Conduct all taxi operations with the control wheel fully aft
- On softer surfaces, additional power may be needed to maintain taxi speed and avoid becoming stuck
- Avoid the use of breaks to prevent imposing a heavy load on the nose gear, causing the nose gear to "dig" into the soft surface
- Complete the Descent Flows/Checklists
-
Soft/Rough-Field Approach & Landing Common Errors:
- Failure to review AFM/POH and performance charts before takeoff
- Failure to adequately clear the area
- Insufficient back-elevator pressure during initial takeoff roll resulting in inadequate AOA
- Failure to cross-check engine instruments for indications of proper operation after applying power
- Poor directional control
- Climbing too high after lift-off and not leveling off low enough to maintain ground effect attitude
- Abrupt and/or excessive elevator control while attempting to level off and accelerate after liftoff
- Allowing the airplane to "mush" or settle, resulting in an inadvertent touchdown after lift-off
- Attempting to climb out of ground effect area before attaining sufficient climb speed
- Failure to anticipate an increase in pitch attitude as the airplane climbs out of ground effect
-
Soft/Rough-Field Approach and Landing (ASEL) Airman Certification Standards:
.- Objective: To determine whether the applicant exhibits satisfactory knowledge, risk management, and skills associated with soft-field approach and landing with emphasis on proper use and coordination of flight controls
- References: AIM; FAA-H-8083-2 (Risk Management Handbook), FAA-H-8083-3 (Airplane Flying Handbook), FAA-H-8083-25 (Pilot Handbook of Aeronautical Knowledge); POH/AFM.
- Soft/Rough-Field Approach and Landing Lesson Plan.
Soft/Rough-Field Approach and Landing (ASEL) Knowledge:
The applicant demonstrates an understanding of:-
PA.IV.D.K1:
A stabilized approach, to include energy management concepts. -
PA.IV.D.K2:
Effects of atmospheric conditions, including wind, on approach and landing performance. -
PA.IV.D.K3:
Wind correction techniques on approach and landing.
Soft/Rough-Field Approach and Landing (ASEL) Risk Management:
The applicant is able to identify, assess, and mitigate risks associated with:-
PA.IV.D.R1:
Selection of runway based on pilot capability, airplane performance and limitations, available distance, and wind. -
PA.IV.D.R2:
Effects of:-
PA.IV.D.R2a:
Crosswind. -
PA.IV.D.R2b:
Windshear. -
PA.IV.D.R2c:
Tailwind. -
PA.IV.D.R2d:
Wake turbulence. -
PA.IV.D.R2e:
Landing surface/condition.
-
-
PA.IV.D.R3:
Planning for:-
PA.IV.D.R3a:
Rejected landing and go-around. -
PA.IV.D.R3b:
Land and hold short operations (LAHSO).
-
-
PA.IV.D.R4:
Collision hazards. -
PA.IV.D.R5:
Low altitude maneuvering, including stall, spin, or controlled flight into terrain (CFIT). -
PA.IV.D.R6:
Distractions, task prioritization, loss of situational awareness, or disorientation.
Soft/Rough-Field Approach and Landing (ASEL) Skills:
The applicant exhibits the skills to:-
PA.IV.D.S1:
Complete the appropriate checklist(s). -
PA.IV.D.S2:
Make radio calls as appropriate. -
PA.IV.D.S3:
Ensure the airplane is aligned with the correct/assigned runway. -
PA.IV.D.S4:
Scan the landing runway and adjoining area for traffic and obstructions. -
PA.IV.D.S5:
Select and aim for a suitable touchdown point considering the wind, landing surface, and obstructions. -
PA.IV.D.S6:
Establish the recommended approach and landing configuration, airspeed, and trim, and adjust pitch attitude and power as required to maintain a stabilized approach. -
PA.IV.D.S7:
Maintain manufacturer's published approach airspeed or in its absence not more than 1.3 VSO, +10/-5 knots with gust factor applied. -
PA.IV.D.S8:
Maintain directional control and appropriate crosswind correction throughout the approach and landing. -
PA.IV.D.S9:
Make smooth, timely, and correct control inputs during the round out and touchdown, and, for tricycle gear airplanes, keep the nose wheel off the surface until loss of elevator effectiveness. -
PA.IV.D.S10:
Touch down at a proper pitch attitude with minimum sink rate, no side drift, and with the airplane's longitudinal axis aligned with the center of the runway. -
PA.IV.D.S11:
Maintain elevator as recommended by manufacturer during rollout and exit the "soft" area at a speed that would preclude sinking into the surface. -
PA.IV.D.S12:
Execute a timely go-around if the approach cannot be made within the tolerances specified above or for any other condition that may result in an unsafe approach or landing. -
PA.IV.D.S13:
Maintain proper position of the flight controls and sufficient speed to taxi while on the soft surface.
Confined Area Approach and Landing (ASES, AMES) Airman Certification Standards
- Objective: To determine whether the applicant exhibits satisfactory knowledge, risk management, and skills associated with confined area approach and landing
- References: AIM; FAA-H-8083-2 (Risk Management Handbook), FAA-H-8083-3 (Airplane Flying Handbook), FAA-H-8083-23 (Seaplane, Skiplane, and Float/Ski Equipped Helicopter Operations Handbook), FAA-H-8083-25 (Pilot Handbook of Aeronautical Knowledge); POH/AFM.
- Confined area approach and landing lesson plan.
Confined Area Approach and Landing (ASES, AMES) Knowledge:
The applicant demonstrates an understanding of:-
PA.IV.H.K1:
A stabilized approach, including energy management concepts. -
PA.IV.H.K2:
Effects of atmospheric conditions, including wind, on approach and landing performance.- Landing performance information
-
PA.IV.H.K3:
Wind correction techniques on approach and landing.
Confined Area Approach and Landing (ASES, AMES) Risk Management:
The applicant is able to identify, assess, and mitigate risks associated with:-
PA.IV.H.R1:
Selection of approach path and touchdown area based on pilot capability, airplane performance and limitations, available distance, and wind. -
PA.IV.H.R2:
Effects of:-
PA.IV.H.R2a:
Crosswind. -
PA.IV.H.R2b:
Windshear. -
PA.IV.H.R2c:
Tailwind. -
PA.IV.H.R2d:
Wake turbulence. -
PA.IV.H.R2e:
Runway surface/condition.
-
-
PA.IV.H.R3:
Planning for a go-around and rejected landing. -
PA.IV.H.R4:
Collision hazards, to include aircraft, terrain, obstacles, wires, vehicles, persons, and wildlife. -
PA.IV.H.R5:
Low altitude maneuvering, including stall, spin, or controlled flight into terrain (CFIT). -
PA.IV.H.R6:
Distractions, task prioritization, loss of situational awareness, or disorientation.
Confined Area Approach and Landing (ASES, AMES) Skills:
The applicant exhibits the skills to:-
PA.IV.H.S1:
Complete the appropriate checklist. -
PA.IV.H.S2:
Make radio calls as appropriate. -
PA.IV.H.S3:
Ensure the airplane is aligned for an approach to the correct/assigned landing surface. -
PA.IV.H.S4:
Scan the landing area for traffic and obstructions. -
PA.IV.H.S5:
Select and aim for a suitable touchdown point considering the wind, landing surface, and obstructions. -
PA.IV.H.S6:
Establish the recommended approach and landing configuration, airspeed, and trim, and adjust pitch attitude and power as required to maintain a stabilized approach. -
PA.IV.H.S7:
Maintain manufacturer's published approach airspeed or in its absence not more than 1.3 VSO, +10/-5 knots with gust factor applied. -
PA.IV.H.S8:
Maintain directional control and appropriate crosswind correction throughout the approach and landing. -
PA.IV.H.S9:
Make smooth, timely, and correct control application before, during, and after touchdown. -
PA.IV.H.S10:
Contact the water at the recommended airspeed with a proper pitch attitude for the surface conditions. -
PA.IV.H.S11:
Touch down at a proper pitch attitude, within 200 feet beyond or on the specified point, with no side drift, minimum float, and with the airplane's longitudinal axis aligned with the projected landing path. -
PA.IV.H.S12:
Execute a timely go-around if the approach cannot be made within the tolerances specified above or for any other condition that may result in an unsafe approach or landing. -
PA.IV.H.S13:
Apply elevator control as necessary to stop in the shortest distance consistent with safety.
No-Flap Approach and Landing
- Faced with an inoperative flap system or strong and gusty winds, pilots may elect to perform a no-flap landing
- Consider the use of no-flaps when landing during icing conditions due to changes in landing performance.
WARNING:
All procedures are GENERALIZED.
Use the Pilot Operating Handbook (POH) procedures for specific aircraft performance and limitations.
and/or current Standard Operating Procedures (SOPs).-
No-Flap Approach & Landing Performance
- When not use flaps, also referred to as "high-lift devices," the wings produce less lift.
- Less lift means higher stall speed.
- Higher stall speed means faster approaches.
- Faster approaches mean longer landing distances.
-
No-Flap Approach & Landing Procedure
- Complete the Descent Flows/Checklists
- Talk to tower as appropriate to the airspace you're operating within
- Controlled: "[Tower], [Callsign], [Location], [Information], [Intentions]"
- Example: "Palms tower, Cessna one seven two seven victor, fives miles to the west for touch and goes"
- Uncontrolled: "[Facility Name], [Callsign], [Location], [Information], [Intentions], [Facility Name]"
- Example: "Palms tower, Cessna one seven two seven victor, five miles to the west for touch and goes, palms tower"
- Abide by tower's instructions and plan to enter the traffic pattern at Traffic Pattern Altitude (TPA) on a 45° entry to the downwind, maintaining a one-half mile distance from the runway on the downwind leg
- Alternatively, if approved, you may enter the pattern through the overhead approach maneuver.
- Controlled: "[Tower], [Callsign], [Location], [Information], [Intentions]"
- Set power to establish and maintain traffic pattern speed
- Trim as necessary
- Abeam the point of intended landing, reduce power lower the landing gear, and begin a gentle descent and call
- Keeping your hand on the landing gear until given the down and locked indication will prevent forgetting
- Controlled: "[Tower], [Callsign] abeam, gear 3 down and locked, [Landing Type]"
- ATC: "[Callsign], [Winds], cleared for [Landing Type], [Runway]"
- Uncontrolled: None
- Anticipate the balloon effect when lowering the flaps
- Trim as necessary
- At the 45° point to the intended touchdown point (or as appropriate for wind conditions), commence a turn to the base leg
- ICS: "Cleared left, forward, clear right, turning [Left/Right]"
- Controlled: None
- Uncontrolled: "[Facility Name], [Callsign], turning base for [Runway], [Facility Name]"
- The wind is now at your side, so depending on its strength, you will need to compensate for drift with a crab angle
- Establish and maintain base leg airspeed
- Trim as necessary
- Visually verify that the final approach (including the extended final and the opposite base leg) is clear, and turn final
- ICS: "Cleared left, forward, clear right, turning [Left/Right]"
- Controlled: None
- Uncontrolled: "[Facility Name], [Callsign], turning base for [Runway], [Facility Name]"
- Check your heading indicator against the runway heading to ensure you're lined up with the correct runway
- Be mindful of wake turbulence considerations
- That is look for larger, slow, heavy aircraft and offset your flight path higher & upwind)
- When landing is assured establish approach speed (+1/2 gust factor, if applicable)
- Final approach speed will be faster than with flaps
- Trim as necessary
- Transition from a crab to a slip
- By 300' above landing, complete a GUMP check
- GUMP Check:
- Gas: Fuel Selector and Pumps - SET
- Undercarriage: Gear - DOWN AND LOCKED (if applicable)
- Mixture: Mixture - FULL FORWARD
- Prop: Prop - FULL FORWARD (if applicable)
- If the approach is stabilized, call out, "300 feet, stabilized, continuing"
- If the approach is not stabilized, callout (over the ICS), "300 feet, not stabilized, going around," and execute a go-around
- GUMP Check:
- Approaching the runway threshold, verify the runway number (heading) matches your clearance
- You are checking to verify you are landing on the correct runway as this is your last opportunity to wave off
- Before the round out, begin smoothly reducing power, continuing the power reduction to idle during the round-out while increasing the pitch to maintain a constant glide path to the desired touchdown point (airspeed will begin decreasing)
- Don't focus on the runway but instead look long to flare
- You will see the horizon flatten as if you're sitting on the ground
- Avoid closing the throttle rapidly, which may result in an immediate increase in the rate of descent and a hard landing
- Round out when the distant trees go out of sight (look long to flare)
- Touch down at minimum controllable airspeed with a power-off stall pitch attitude, on the main wheels first (minimum float), and with the throttle at the idle (closed) position
- Hold the nose wheel off with back pressure throughout the rollout; allowing settling gently
- Don't focus on the runway but instead look long to flare
- Increase aileron deflection into the wind if present or has shifted from expected
- See crosswind landings.
- Increase "up" elevator to increase braking effectiveness
- At nose wheel touch down:
- Callout (over the ICS), "flaps up, max braking"
- Retract the flaps to the up (0°) position (for maximum braking effectiveness)
- Hold the control wheel full back, and
- Apply braking as necessary to stop within the shortest distance possible, consistent with safety and controllability
- Maintain directional control throughout the roll-out with the rudder, slowing sufficiently before turning on a taxiway
- Reference board speeds: you should be traveling no faster than twice the distance remaining
- Example: at the 3 board, you should be traveling no more than 60 knots
- If required, raise the flaps to decrease lift over the wings and therefore increase weight on the brakes
- Exit the runway without delay at the first available taxiway or on a taxiway as instructed by ATC
- An aircraft is considered clear of the runway when all parts of the aircraft are past the runway edge and there are no restrictions to its continued movement beyond the runway holding position markings
- Proceed with taxi procedures.
-
No Flap Approach and Landing Common Errors
Rejected Landings and Go-Arounds
- The traffic pattern provides standardized flow of aircraft transitioning between the approach and landing phases of flight
- This standard flow allows for predictability in an otherwise extremely dangerous environment
- The traffic pattern is the ultimate goal which began with the rectangular course with many hazards
- During a rejected landing/go-around, you're low, slow, and configured for landing (high drag)
-
- Remember that flaps increase lift, and raising those flaps therefore reduce it, requiring flaps be raised slowly and in accordance with POH
- Follow procedures and do not cause the aircraft to stall
- Uncomfortable pilots (new airplane, new airport, new airspace) are especially vulnerable to the spike in blood pressure or stress when unexpected go-around instructions are received
- Consider not pushing in full power immediately to reduce performance surprises yet still be able to achieve a positive rate of climb
- Always give yourself a decision point whereby a go-around shall be executed, and past which you've conceded to a botched landing
- Do not fly on hopes you have the performance, your charts know the answer ahead of time
- Consider the left turning tendencies associated with adding full power
- Fly your airspeeds, resist the urge to pull away from the earth even if that means touching the runway briefly
- Avoid abrupt bank or pitch changes
- Manage flap and gear positions, do not immediately retract either, don't forget to retract them all together
-
Deciding When to Discontinue an Approach
- Pilots must always be in a position to make a safe landing
- When that is determined to no longer be the case, a go-around should be executed
- Go-arounds are always "free" and a stabilized approach is unlikely to be corrected on short final
-
Rejected Landings and Go-Arounds Procedure:
- When the decision to go around is made, the throttles should be (smoothly) advanced to takeoff power and pitch adjusted (sequentially) to arrest the sink rate.
- As you add power you're going to start accelerating.
- Acceleration takes some time as you've got a lot of drag to fight with a rate of descent to arrest and then reverse.
- Often times the addition of power and subsequent airspeed increase is necessary before pulling the nose up as the aircraft may be on the backside of the power curve and performance therefore slower to respond
- Slow airspeed and high power creates the greatest amount of left-turning tendencies
- Anticipate right rudder inputs
- Additionally, as engine power increases, since the aircraft is normally trimmed for approach speed, the nose will also increase in pitch, risking stall
- Expect forward elevator to be required to avoid an elevator stall.
- Maintain coordinated directional control and stay over the centerline in case you touch down
- With adequate airspeed, pitch for Vy or Vx (if obstructions are present).
- With the addition of power and then pitch, left-turning tendencies are at their highest which requires coordinated directional control corrections throughout.
- With adequate airspeed, the flaps should be retracted from full to an intermediate position (not all at once).
- With adequate airspeed and a positive rate of climb, the landing gear should be retracted.
- Flaps should be retracted before the landing gear for two reasons:
- First, on most airplanes, full flaps produce more drag than the extended landing gear.
- Secondly, the airplane tends to settle somewhat with flap retraction, and the landing gear should be down in the event of an inadvertent, momentary touchdown.
- Flaps should be retracted before the landing gear for two reasons:
- If the go-around was initiated due to conflicting traffic on the ground or aloft, the pilot should consider maneuvering to the side to keep the conflicting traffic in sight.
- Follow air traffic control instructions and review checklist items as appropriate.
- If the pilot desires to return for a landing, it is essential to re-accomplish the entire before-landing checklist.
- An interruption to a pilot's habit patterns, such as a go-around, is a classic scenario for a subsequent gear-up landing
- When the decision to go around is made, the throttles should be (smoothly) advanced to takeoff power and pitch adjusted (sequentially) to arrest the sink rate.
-
Multiengine Rejected Landings and Go-Around Considerations:
- Many multiengine airplanes have a landing gear retraction speed significantly less than the extension speed.
- Care should be exercised during the go-around not to exceed the retraction speed.
- Many multiengine airplanes have a landing gear retraction speed significantly less than the extension speed.
-
Rejected Landings and Go-Around Common Errors:
- Delayed decision-making.
- Improper flap retraction.
- Excessive pitch attitude.
- Failure to maintain runway alignment.
- Incomplete power application.
-
Private Pilot (Airplane) Rejected Landings and Go-Arounds Airman Certification Standards
- Objective: To determine whether the applicant exhibits satisfactory knowledge, risk management, and skills associated with go-around/rejected landing with emphasis on factors that contribute to landing conditions that may require a go-around.
- References: AIM; FAA-H-8083-2 (Risk Management Handbook), FAA-H-8083-3 (Airplane Flying Handbook), FAA-H-8083-23 (Seaplane, Skiplane, and Float/Ski Equipped Helicopter Operations Handbook), FAA-H-8083-25 (Pilot Handbook of Aeronautical Knowledge); POH/AFM.
Private Pilot (Airplane) Go-Around/Rejected Landing Knowledge:
The applicant demonstrates an understanding of:-
PA.IV.N.K1:
A stabilized approach, including energy management concepts. -
PA.IV.N.K2:
Effects of atmospheric conditions, including wind and density altitude, on a go-around or rejected landing. -
PA.IV.N.K3:
Wind correction techniques on takeoff/departure and approach/landing.
Private Pilot (Airplane) Go-Around/Rejected Landing Risk Management:
The applicant is able to identify, assess, and mitigate risks associated with:-
PA.IV.N.R1:
Delayed recognition of the need for a go-around/rejected landing. -
PA.IV.N.R2:
Delayed performance of a go-around at low altitude. -
PA.IV.N.R3:
Power application. -
PA.IV.N.R4:
Configuring the airplane. -
PA.IV.N.R5:
Collision hazards. -
PA.IV.N.R6:
Low altitude maneuvering, including stall, spin, or controlled flight into terrain (CFIT). -
PA.IV.N.R7:
Distractions, task prioritization, loss of situational awareness, or disorientation. -
PA.IV.N.R8:
Runway incursion. -
PA.IV.N.R9:
Managing a go-around/rejected landing after accepting a LAHSO clearance.
Private Pilot (Airplane) Go-Around/Rejected Landing Skills:
The applicant exhibits the skills to:-
PA.IV.N.S1:
Complete the appropriate checklist(s). -
PA.IV.N.S2:
Make radio calls as appropriate. -
PA.IV.N.S3:
Make a timely decision to discontinue the approach to landing. -
PA.IV.N.S4:
Apply takeoff power immediately and transition to climb pitch attitude for Vx or Vy as appropriate +10/-5 knots. -
PA.IV.N.S5:
Configure the airplane after a positive rate of climb has been verified or in accordance with airplane manufacturer's instructions. -
PA.IV.N.S6:
Maneuver to the side of the runway/landing area when necessary to clear and avoid conflicting traffic. -
PA.IV.N.S7:
Maintain VY +10/-5 knots to a safe maneuvering altitude. -
PA.IV.N.S8:
Maintain directional control and proper wind-drift correction throughout the climb. -
PA.IV.N.S9:
Use runway incursion avoidance procedures, if applicable.
-
Go-Arounds and Rejected Landings Case Studies
- National Transportation Safety Board Identification: SEA01LA069:
- The NTSB determines the probable cause(s) of this accident to be: The pilot's failure to maintain aircraft control during the aborted takeoff. A factor was gusty crosswinds
- National Transporation Safety Board Identification: NYC01FA189:
- The NTSB determines the probable cause(s) of this accident to be: The pilot's failure to maintain aircraft control while maneuvering during a go-around
- Pilot Workshops Breakdown.
- National Transportation Safety Board Identification: SEA01LA069:
Stabilized Approaches
- A good landing starts with a stabilized approach []
- The definition of a stabilized approach may vary by viewpoint, but it's essentially on or trending in a controlled manner to hit your numbers in the appropriate configuration on final
- In essence, a stabilized approach results from proper energy management
- If carrying too much energy into the flare, it is easy to balloon and land far
- If carrying too little, it is possible to land short or stall
- In essence, a stabilized approach results from proper energy management
- Approach speed is not a static number and must be calculated
- First, start with applicable charts in the pilot operating handbook
- In gusty wind conditions, consider adding half of the gust factor (i.e., if gusts to 20, add 10 knots)
- A commonly referenced optimum glide-path follows a 3:1 principle or descent ratio
- This means that for every 3 nautical miles (nm) flown over the ground, the aircraft should descend 1,000 feet, simulating a 3-degree glideslope
- According to the FAA Safety Team, the probability of being unstable can double as you increasingly fly above a "3:1" flight path profile
- In some instances, this will be with the aid of a visual glide slope indicator, while other times, are flown with a good sight picture from experience
- Lateral alignment, that is, how far left or right from the runway centerline, is relatively easy to judge
- Vertical placement on the approach, often called slope, can be harder to judge
- When assessed high, pilots must increase their descent by reducing power and pitching down to maintain airspeed
- Pilots may assess they're high by watching the touchdown point "fall" in the windscreen
- When approaching glide-slope, simultaneously increasing power and pitching up to maintain airspeed reestablishes a pilot on glide-slope
- When assessed low, pilots must decrease their descent by adding power and pitching up to maintain approach speed
- Pilots may assess they're low by watching the touchdown point "rise" in the windscreen
- When approaching glide-slope, simultaneously reducing power and pitching down to maintain airspeed restablishes a pilot on glide-slope
- When a pilot is steady on a glide slope, the touchdown point will remain static and not move up or down in the windscreen
- When assessed high, pilots must increase their descent by reducing power and pitching down to maintain airspeed
- In general, maneuvers on final (such as S-Turns for spacing) are not recommended when low and slow (go-arounds are free!)
- In the end, a stabilized approach is when speed is stabilized at proper approach speed, the sink rate a stabilized at less than 1000 FPM, and the final flap configuration at a set altitude (likely 500' above touchdown)
-
Energy Management Concepts:
- Realize that power and pitch changes to intercept the appropriate glide slope must be anticipated to avoid creating the opposite situation (low to high, high to low)
- The closer to the runway, the more sensitive these corrections will be
- As such, it is best to make large corrections early so only small corrections are necessary approaching the runway
- If climbing above glideslope, the aircraft has too much energy
- A power reduction or increase in drag is required
- If descending below glideslope, the aircraft has too little energy
- A power addition or reduction in drag is required
- If low and fast, increasing the pitch may be sufficient to climb back onto glide-slope and slow to approach speed
- The reverse is true if high and fast
- Realize that power and pitch changes to intercept the appropriate glide slope must be anticipated to avoid creating the opposite situation (low to high, high to low)
-
Tips for Staying Stable on Final:
- The FAA Safety Team has some recommendations to stay stable on final:
- If it's not right, GO-AROUND! Execute a timely go-around decision when a stabilized approach cannot be made or for any other condition that may result in an unsafe approach or landing
- The further from the runway that you establish a "3:1" flight path profile, the greater your probability of successfully flying a stable approach
- NOTE: Every runway is unique, and the published glidepath should be flown when available
- A method to estimate the appropriate descent rate in feet/minute to maintain a 3-degree glide-path is to multiply the groundspeed in knots by 5
- When available, use a visual approach system such as a VASI or PAPI, or precision instrument approach to help maintain glidepath
- Increase your knowledge of stabilized approaches:
- The GAJSC website (www.gajsc.org/loss-of-control)
- AC 91-79A (www.faa.gov/regulations_policies/advisory_circulars)
- To help you stay on a 3:1 glide-path, estimate your descent rate by multiplying your groundspeed in knots by five (e.g., 90 knots x 5 = 450 feet per minute descent rate)
- Or halve your airspeed and add a zero at the end (e.g., 100 knots / 2 (+ 0) = 500)
- To determine your appropriate altitude for a 3-degree approach on the final, multiply your distance from the runway by three, add two zeroes, and add the touchdown zone elevation
- For example, if you're three miles out with a touchdown zone elevation of 100 feet, your calculation would be: 3 (miles) x 3 = 900 + 100 = 1,000 feet)
- This will help you cross the runway threshold at 50 feet and hold your aiming point for the flare
- You can also use a visual approach system such as a VASI or PAPI or a precision instrument approach to help maintain a proper glide-path
- Consider applying a small piece of painters or masking tapes to the windscreen to keep table in reference to the aim point
- The tape doesn't need to be where the aircraft's aim point is, but only a reference
- If the marked area moves up, you're getting low
- If the marked area moves down, you're getting high
- The goal is to keep the aim point steady in the windscreen to ensure a stable approach
- The FAA Safety Team has some recommendations to stay stable on final:
- If you get distracted, miss a checklist, or just feel rushed, go-around
- Don't attempt to fix problems with the runway fast approaching; that is how mistakes are made
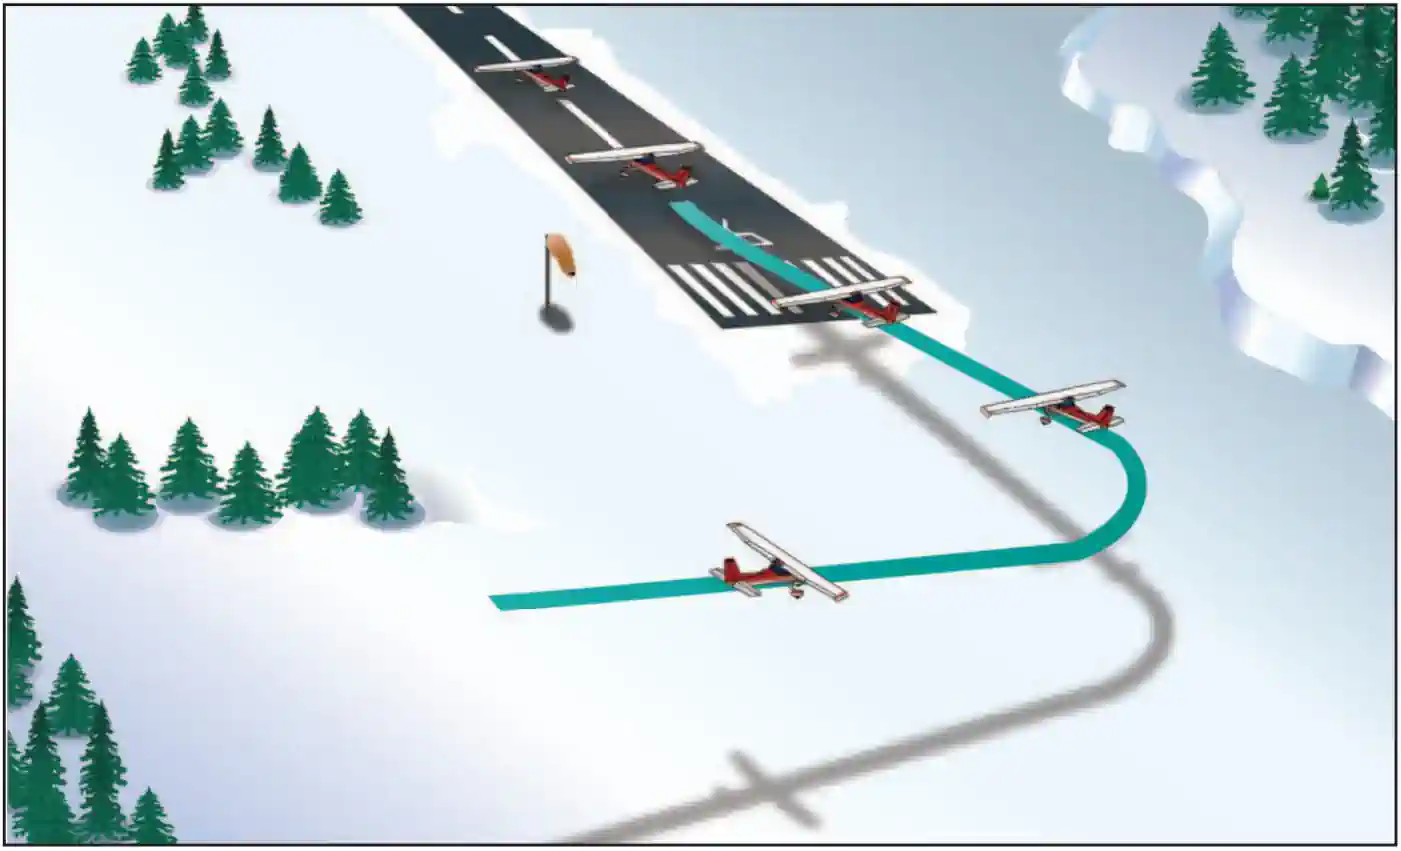
Forward-Slip to Landing
-
Slips to Landing:
- A slip is a cross-control procedure where you use "wing-low, top-rudder" to track the aircraft straight while dropping altitude (forward slip) or to compensate for crosswind (side slip).
- In doing this, you will need to lower the nose as the increase in drag without an increase in thrust will cause a rapid loss of airspeed, risking a stall.
- The higher the angle of bank, the lower the nose must be.
- Slips to landing can be used for obstacle avoidance or (more commonly) when too high on final approach.
- Slips to landing (like flaps) allow for increased rates of descent; however, unlike flaps, these maneuvers reduce an aircraft's lift, not increase it.
- A slip is a cross-control procedure where you use "wing-low, top-rudder" to track the aircraft straight while dropping altitude (forward slip) or to compensate for crosswind (side slip).
-
Forward-slip:
- A forward slip allows pilots to increase the aircraft's rate of descent without increasing airspeed in the process
- The pilot accomplishes a forward slip by hanging as much of the fuselage (increasing drag) in the breeze as possible
- This increase in drag bleeds energy
- Assuming proper runway alignment, the forward slip will allow the aircraft track to be maintained while steepening the descent without adding excessive airspeed
- This is accomplished by applying full rudder and utilizing the angle of bank to maintain a ground track
- Since the heading is not aligned with the runway, the slip must be removed before touchdown to avoid excessive side loading on the landing gear, and if a crosswind is present, an appropriate side-slip may be necessary at touchdown, as described below
- Using the maximum amount of rudder deflection possible will create only one variable (the aileron)
- With the flaps set to the final setting, set the throttle to idle
- Initiate the slip by simultaneously providing aileron input (bank) to lower a wing (upwind wing in a crosswind condition) and rudder input (yaw) in the opposite direction so that the longitudinal axis is at an angle to the original flight path
- Maintain the appropriate amount of bank and yaw to maintain the extended runway centerline
- Note that the amount of slip (sink rate) depends on the bank angle: the steeper the bank-the greater the descent rate-the greater (steeper) the descent angle-the greater the need for opposite direction yaw (rudder) up to the "practical slip limit" (banking capacity exceeds rudder effectiveness)
- Adjust the pitch attitude as appropriate to maintain airspeed
- Trim as necessary
- Note that because of the location of the pitot tube and static course, airspeed indicator error may be observed when performing slips
- Recognize a properly performed slip by the airplane's attitude, sound of the airflow, and flight control feel
- Before the round-out, discontinue the forward slip
- Drag will be decreased, lending to an increase in airspeed
- Complete the appropriate approach and landing procedure
-
Forward-Slips to Landing Procedure:
-
Forward-Slips to Landing Common Errors:
-
Forward-Slips to Landing (ASEL, ASES) Airman Certification Standards:
- Objective: To determine whether the applicant exhibits satisfactory knowledge, risk management, and skills associated with forward slip to a landing
- References: AIM; FAA-H-8083-2 (Risk Management Handbook), FAA-H-8083-3 (Airplane Flying Handbook), FAA-H-8083-25 (Pilot Handbook of Aeronautical Knowledge); POH/AFM.
Forward Slip to a Landing Knowledge:
The applicant demonstrates an understanding of:-
PA.IV.M.K1:
Concepts of energy management during a forward slip approach. -
PA.IV.M.K2:
Effects of atmospheric conditions, including wind, on approach and landing performance. -
PA.IV.M.K3:
Wind correction techniques during forward slip. -
PA.IV.M.K4:
When and why a forward slip approach is used during an approach.
Forward Slip to a Landing Risk Management:
The applicant is able to identify, assess, and mitigate risks associated with:-
PA.IV.M.R1:
Selection of runway/landing surface, approach path, and touchdown area based on pilot capability, aircraft performance and limitations, available distance, and wind. -
PA.IV.M.R2:
Effects of:-
PA.IV.M.R2a:
Crosswind. -
PA.IV.M.R2b:
Windshear. -
PA.IV.M.R2c:
Tailwind. -
PA.IV.M.R2d:
Wake turbulence. -
PA.IV.M.R2e:
Water surface/condition.
-
-
PA.IV.M.R3:
Planning for:-
PA.IV.M.R3a:
Rejected landing and go-around. -
PA.IV.M.R3b:
Land and Hold Short Operations (LAHSO).
-
-
PA.IV.M.R4:
Collision hazards. -
PA.IV.M.R5:
Low altitude maneuvering, including stall, spin, or controlled flight into terrain (CFIT). -
PA.IV.M.R6:
Distractions, task prioritization, loss of situational awareness, or disorientation. -
PA.IV.M.R7:
Forward slip operations, including fuel flowage, tail stalls with flaps, and airspeed control. -
PA.IV.M.R8:
Surface contact with the airplane's longitudinal axis misaligned. -
PA.IV.M.R9:
Unstable approach.
Forward Slip to a Landing Skills:
The applicant exhibits the skills to:-
PA.IV.M.S1:
Complete the appropriate checklist(s). -
PA.IV.M.S2:
Make radio calls as appropriate. -
PA.IV.M.S3:
Plan and follow a flightpath to the selected landing area considering altitude, wind, terrain, and obstructions. -
PA.IV.M.S4:
Select the most suitable touchdown point based on wind, landing surface, obstructions, and airplane limitations. -
PA.IV.M.S5:
Position airplane on downwind leg, parallel to landing runway or selected landing surface. -
PA.IV.M.S6:
Configure the airplane correctly. -
PA.IV.M.S7:
As necessary, correlate crosswind with direction of forward slip and transition to side slip before touchdown. -
PA.IV.M.S8:
Touch down at a proper pitch attitude, within 400 feet beyond or on the specified point, with no side drift, and with the airplane's longitudinal axis aligned with and over the runway center/landing path. -
PA.IV.M.S9:
Maintain a ground track aligned with the runway center/landing path.
Touchdown Considerations
- Flare:
- Looking too close to the nose may cause a misalignment with the runway due to parallax error
- Looking farther down the runway provides greater visual cues/perspective
- Bouncing (porpoising/skipping):
- Bouncing can result from touching down either too fast or with excessive vertical speed
- Bouncing can spiral out of control as each successive bounce can produce a greater effect, resulting in potential loss of control or prop strikes
- Bouncing may be particularly likely with taildragger aircraft when, after touchdown, the tail sinks, increasing the angle of attack
- Releasing back pressure on landing can help offset this tendency
- Consider going around following a significant bounce, and if subsequent bounces, even if minor, start to occur
- Directional Control:
- Directional inputs required should be minor when nearing the point of touchdown
- Pilots should consider the use of the aileron to counter any crosswinds and going around if directional control is in question
- Not being aligned with the runway will be apparent as the aircraft suddenly straightens
- In tricycle-gear aircraft, the CG being in front of nose may cause a pull toward the center
- In tailwheel aircraft, the CG being behind the pilot may cause a pull away from the center as the CG swings around, eventually resulting in a ground loop
- When landing on tricycle gear, set down on the mains and let the nose wheel drop on its own
- pushing the nose forward to "stick" the landing risks "wheel Wheelbarrowing"
- Directional control with the weight on the wheels will reduce directional control
- In the most extreme cases, this could lead to a ground loop
- pushing the nose forward to "stick" the landing risks "wheel Wheelbarrowing"
- To avoid landing with the gear up, establish habits that check for configuration and exercise them
- If it is realized the gear is not down, go-around, as landing gear may not extend in time, and you are likely to lose what may have previously been a stabilized approach
- Utilize a method to double-check the gear and flap levers, to avoid accidental reconfiguration on the ground
- Make configuration changes during periods of low, not high, workload to have bandwidth to double check
- Squat switches may help prevent the gear from coming up, but they can fail - don't rely on them
Noise Abatement
- Aircraft noise problems are a major concern at many airports throughout the country. Many local communities have pressured airports into developing specific operational procedures that help limit aircraft noise while operating over nearby areas. As a result, noise abatement procedures have been developed for many of these airports that include standardized profiles and procedures to achieve these lower noise goals.
- Airports with noise abatement procedures inform pilots, operators, air carriers, air traffic facilities, and other special groups applicable to their airports. These procedures are available to the aviation community by various means. Most of this information comes from the Chart Supplements, local and regional publications, printed handouts, operator bulletin boards, safety briefings, and local air traffic facilities.
- At airports that use noise abatement procedures, reminder signs may be installed at the taxiway hold positions for applicable runways to remind pilots to use and comply with noise abatement procedures on departure. Pilots unfamiliar with these procedures should ask the tower or air traffic facility for the recommended procedures. Pilots should consider the surrounding community while operating their airplane to and from such an airport. This includes operating as quietly and safely as possible
- Noise abatement rules are the domain of the FAA. However, that will not always stop municipalities from creating their own restrictions, such as Scottsdale, AZ
- When flying to new airports, consider researching local rules
- If you hear phrases from ATC such as "noise abatement procedures are in effect," then this can be a huge clue
- While the FAA rules should overrule municipalities, it is always a good idea to be a good neighbor
- Always consult the aircraft's Pilot Operating Handbook for amplifying information regarding noise abatement.
AIM Point Versus Touchdown Point
- When on approach to land, you will select an aim point
- That aim point is your anchor for your approach, but it's not supposed to be where you actually touch down
- Instead, that is where your round-out should occur, making touchdown a few hundred feet down the runway
- Air Traffic Control will not generally provide specific instructions on where to land unless issuing a land and hold short clearance or advising for wake turbulence
- While the Pilot/Controller Glossary describes the touchdown zone as the first 3000 feet of the runway beginning at the threshold, you may land anywhere
- If intending to land long or delay roll-out in favor of exiting the runway at the far end, inform ATC
Ground Roll Versus Landing Distance
- Pilot Operating Handbooks published the landing distance based on the pilot's touchdown point
- If the touchdown point is farther down the runway than the start of the available landing distance, the ground roll calculated will be additive to that distance, resulting in a longer-than-expected landing distance
- As with all performance charts, they are performed under a specific set of conditions on a test aircraft, often resulting in more optimistic performance than experienced in reality
Night Approach & Landing Considerations
- Most pilots are not as proficient at night as in the day, therefore benefiting from a review of night illusions that may be encountered
- Remember additional equipment requirements exist
- If carrying passengers at night, night currency must be considered
- Review Airport Markings and Signs, as they will appear different at night
- Also, review Airport Lighting and consider ahead of time when you plan to turn on (and refresh the pilot-controlled lighting timer, if necessary) airport lighting
-
Black Out Landings:
- Pilots and instructors should consider the potential benefits of training to land without the landing light on
- Training improves both landing light failures and the general feel of the airplane techniques
- Doing so requires pilots to focus on the runway lights and not on the illuminated piece of runway
- It is not important to nail the landing on a specific point but to safely execute the landing, even if that means landing longer than normal
- There is, of course, a risk to landing without a landing light
- Landing without the landing light should be planned and briefed before its conduct - don't decide randomly to try it for the first time one night
- Pilots and instructors should consider the potential benefits of training to land without the landing light on
Exiting the Runway After Landing
- Exit the runway without delay at the first available taxiway or on a taxiway as instructed by ATC
- Pilots must not exit the landing runway onto another runway unless authorized by ATC
- At airports with an operating control tower, pilots should not stop or reverse course on the runway without first obtaining ATC approval
- Taxi clear of the runway unless otherwise directed by ATC
- An aircraft is considered clear of the runway when all parts of the aircraft are past the runway edge, and there are no restrictions to its continued movement beyond the runway holding position markings
- In the absence of ATC instructions, the pilot is expected to taxi clear of the landing runway by taxiing beyond the runway holding position markings associated with the landing runway, even if that requires the aircraft to protrude into or cross another taxiway or ramp area
- Once all parts of the aircraft have crossed the runway holding position markings, the pilot must hold unless further instructions have been issued by ATC
- A pilot who has just landed should not change from the tower frequency to ground control frequency until directed to do so by the controller
- The tower will issue the pilot instructions which will permit the aircraft to enter another taxiway, runway, or ramp area when required
- The guidance contained above is considered an integral part of the landing clearance and satisfies the requirement of 14 CFR Section 91.129
- Immediately change to ground control frequency when advised by the tower and obtain a taxi clearance
- The tower will issue instructions required to resolve any potential conflicts with other ground traffic prior to advising the pilot to contact ground control
- Ground control will issue taxi clearance for parking
- That clearance does not authorize the aircraft to "enter" or "cross" any runways. Pilots not familiar with the taxi route should request specific taxi instructions from ATC
Approach & Landing Lessons & Case Studies
- AOPA's Air Safety Institute finds nearly half of all GA midair collisions occur during the approach and landing when aircraft are on final or over the airport.
- Poor airspeed control is a major factor in landing accidents.
- National Transportation Safety Board (NTSB) Identification: ERA21LA083:
- The NTSB determines the probable cause(s) of this accident to be: The flight crew's delayed decision to initiate a go-around after the approach had become unstabilized, which resulted in a hard landing
Approach & Landing Knowledge Check


Approach & Landing Conclusion
- Remain mindful that performance calculations are usually more optimistic than actual performance.
- Landing is the most dangerous phase of flight, as it is in a terminal area when the pilot is most likely to be fatigued and concentrating on the "get-there-itis"
- Calculate performance data; examples found here.
- Reference traffic pattern.
- The traffic pattern is the ultimate goal, which began with the Rectangular Course.
- Remember that go-arounds are always free
- For this reason, never box yourself into a landing
- Consider clouds/visibility in the terminal area because you may need to go around, and if you're operating under Visual Flight Rules, you need to maintain legal requirements
- Every good landing starts with a stabilized approach
- Avoid any urge to "chop and drop"
- Be smooth and remember slow flight/stall practice/characteristics to settle the aircraft onto the runway
- Check out the FAA stabilized approach and landing fact sheet.
- The direction with which the wind may impact the pattern
- With all things constant, headwinds increase lift, decreasing descent rate, while the opposite is true for tailwinds
- According to the Aviation Safety Information Analysis and Sharing (ASIAS) program, the chances of being unstable can double as you increasingly fly above a 3:1 flight path profile
- Approach speeds, threshold crossing speeds, and landing speeds are all in reference to a pilot's location on approach and should be seen as phases of the approach vs. one continuous phase and airspeed
- Always fly the airplane all the way to the taxiway
- Resist the urge to talk on the radio or switch frequencies if the aircraft is not firmly under control-ATC can wait in this case
- Maintain and increase (as airspeed decreases) any crosswind inputs!
- Landing surface is critical, as landing on fields that are frozen or wet may provide the same control and braking actions of paved runways with ice
- When expecting clearance to land, listen for the wind call to best prepare for crosswinds
- Consider keeping the speed up on the approach to commercial airports when sequenced in with other, generally turbine (faster), aircraft as a courtesy to traffic flow
- Be mindful of terrain on final as shadows can hide structures, and sun position can cause blind spots
- Additional resources are available through tools such as the FAA's Runway Safety Simulator.
- When receiving a clearance to land, pay special attention to the runway for which you're cleared
- This can be especially important when expecting a certain runway either from the ATIS, ATC, or repetitive operations out of the same airfield, whereby procedures are usually the same
- Aircraft are permitted to land on occupied runways provided separation standards in FAA 7110.65 standards are met at towered aircraft and adequate discretion is applied at non-towered airports
- When performed correctly, your traffic pattern leg ground track will be straight as if flying in no wind conditions
- Before every clearance to land, the tower will give you the winds
- Pay attention to this information! It may indicate a wind shift you did not expect!
- Set the heading bug, if available, to wind velocity to keep situational awareness to the direction
- When landing in a significant crosswind, consider a lower flap setting
- If wind shear is a concern, consider carrying a higher airspeed on the final approach to increase stall margin
- Check with your Pilot Operating Handbook for the appropriate limitations for your aircraft
- If flying an instrument approach into a crosswind and you subsequently break out, avoid the temptation to point at the runway if you already have a correction in for the crosswind
- Let it work and adjust as necessary
- Remember the lessons learned while performing power-off stalls, which simulate the conditions and demanded pilot response to a stall experienced while on approach
- The base-to-final turn is when stall margin is thinest
- Note there are forward-slips, and side-slips
- Forward slips allow pilots to increase the aircraft's rate of descent without increasing airspeed in the process (used when performing a forward-slip to landing)
- Side-slips allow pilots to compensate for a crosswind on final approach (used when compensating for crosswinds on landing)
- While not illegal, consider avoiding straight-in approaches to remain predictable to traffic already in the pattern
- The FAA offers an off-airport operations guide for review by pilots operating in more remote locations
- As proficiency builds, it's time to think about power loss in the pattern and a setup for emergency landings.
- Consider telling ATC where you intend to park when reading back the landing clearance to prepare ATC for follow-on instructions
- Pilots are often reluctant to execute a go-around, often to their own detriment
- ADM is more respected when the right call, not the macho call, is made
- Additionally, training for go-arounds may increase comfort in their execution, as the sequence of events to include continuing to monitor traffic and talk to ATC without having planned
- Pilot Workshops says it well: "Some pilots believe that applying rudder during a stall will automatically cause a spin. That’s not always the case. A cross-controlled stall shouldn’t be confused with stalling during a skid. When skidding, yaw and bank are in the same direction. This is the scenario that can kill when it turns into a low-altitude spin. In a cross-controlled stall, the yaw and the bank oppose each other, effectively canceling out the forces that typically lead to a spin. As a result, the airplane remains stable and won’t enter a spin."
- Historical wind information (wind roses) can be found at Windhistory.com.
- Consider actual versus realized performance when doing any performance calculations
- Consider practicing maneuvers on a flight simulator to introduce yourself to maneuvers or knock off rust
- AOPA's takeoffs and landings safety center offers various tips and considerations for pilots.
- Just because you can land doesn't mean you can take off or clear obstacles on the climb out due to overall performance requirements, especially the effects of density altitude.
- Check out the AOPA's density altitude quiz.
- The AOPA also offers a runway safety course.
- Still looking for something? Continue searching:
Approach & Landing References
- Federal Aviation Administration - Pilot/Controller Glossary.
- Advisory Circular (90-66) Recommended Standards Traffic Patterns for Aeronautical Operations at Airports without Operating Control Towers.
- Airplane Flying Handbook (8-1) Normal Approach And Landing.
- AOPA - Avoiding Prop Strikes.
- Bold Method - What's The Difference Between Approach Speed And Threshold Crossing Speed?.
- FAA - Airman Certification Standards.
- FAA Safety Briefing (July/August 2018) Is that My Runway?.
- Pilot Workshops - Tom Turner - Smoother Landings.
- FAA Aviation Safety - Stabilized Approach and Go-around.
- Aeronautical Information Manual (4-3-20) Exiting the Runway After Landing.
- Airplane Flying Handbook (8-16).
- AOPA - Slip Solution.
- BoldMethod - Why Add Half The Gust Factor On Windy Day Landings?.
- Christine's Flying blog - Calculating the Crosswind components.
- FlyingMag - Mastering The Forward Slip.
- Pilot Workshops - Black Out Landings.
- Bold Method - How A Go-Around Can Lead To An Accident.
- Pilot Workshops - The Impossible Go-Around?.
- Pilot Workshops - Takeoff Performance Skepticism.
- JD Marcellin.wordpress.com/.
- Light Aircraft Association - Crosswind Calculations Made Easy.
- Reddit - Crosswind component calculation.
- Pilot Workshops - Pilot Tip of the Week: Crosswind Landing Errors.
- Airplane Flying Handbook (8-1) Short Field Approach And Landing.
- FAA Safety Briefing (July/August 2018) Is that My Runway?.
- Pilot Workshops - Tom Turner - Smoother Landings.
- FAA Aviation Safety - Stabilized Approach and Go-around.