Ground Procedures
Ground procedures cover the often overlooked but arguably more critical operations required on the front and back side of any flight.
Introduction to Ground Procedures
- Flights begin with preflight that set the stage
- With initial planning complete, pilts conduct a preflight briefing to review the plan and inform the crew or passengers on what to expect
- When the planning is complete, pilots are responsible to determine airworthiness through a thorough aircraft preflight.
Ground Procedures Key Highlights
- Ground procedures include aircraft movement, communication, and operational practices conducted before and after flight.
- Proper preflight inspections help pilots identify aircraft discrepancies, verify airworthiness, and prepare for safe operations.
- Taxi operations require careful speed control, situational awareness, and compliance with airport markings and air traffic instructions.
- Pilots should use checklists consistently during engine start, taxi, run-up, shutdown, and securing procedures.
- Airport signs, markings, and lighting systems help pilots navigate safely on movement and non-movement areas.
- Collision avoidance during taxi operations requires visual scanning, sterile cockpit discipline, and awareness of nearby traffic.
- Run-up procedures verify engine performance, flight controls, and aircraft system functionality before departure.
- Proper use of brakes, flight controls, and wind correction techniques improves aircraft control during ground operations.
- Communication with ground control and adherence to airport procedures reduce the risk of runway incursions and operational errors.
- Understanding ground procedures improves operational efficiency, situational awareness, and overall flight safety.
Preflight Procedures
- Flight planning confirms requirements, identifies hazards sets the stage for the entire flight
- Its purpose is to determine requirements, identify hazards, and determine airworthiness of an aircraft before fight
- It all starts with determining fitness for flight.
- While often the most tedious, it is where all planning and "chair flying" is conducted in order to reduce/prevent possible errors and problems in flight
- Before flying, the Pilot-in-Command must determine if an aircraft is in a safe condition for flight, that is, is it airworthy
- Preflight procedures allow pilots to inspect and catch potential mechanical failures before flight
-
Initial Preflight Actions:
- Determine if takeoff weather is adquate
- Rule of Thumb: For VFR, ceilings at or above 500 feet of Traffic Pattern Altitude; for IFR: at or above appropriate approach minimums
- If operating under IFR, review possible departure procedures as applicable
- Determine if takeoff performance is adequate
- Pilots in command shall, before beginning a flight, become familiar with all available information concerning that flight. This information must include:
- For a flight under IFR or a flight not in the vicinity of an airport, weather reports and forecasts, fuel requirements, alternatives available if the planned flight cannot be completed, and any known traffic delays of which the pilot in command has been advised by ATC;
- For any flight, runway lengths at airports of intended use, and the following takeoff and landing distance information:
- For civil aircraft for which an approved Airplane or Rotorcraft Flight Manual containing takeoff and landing distance data is required, the takeoff and landing distance data contained therein; and.
- For civil aircraft other than those specified in paragraph (b)(1) of this section, other reliable information appropriate to the aircraft, relating to aircraft performance under expected values of airport elevation and runway slope, aircraft gross weight, and wind and temperature.
- This information is not only important for ensuring the flight can be conducted safely, but also in determining if an intersection takeoff is acceptable
- Pilots are responsible to comply with 14 CFR 91.137 (Temporary flight restrictions in the vicinity of disaster/hazard areas), 91.138 (Temporary flight restrictions in national disaster areas in the State of Hawaii), 91.141 (Flight restrictions in the proximity of the Presidential and other parties), and 91.143 (Flight limitation in the proximity of space flight operations) when conducting flight in an area where a temporary flight restrictions area is in effect, and should check appropriate NOTAMs during flight planning.
- Though not legally required, additional considerations apply, especially when renting:
- Verify the aircraft Hobbs/Tach times match the recorded times (most flight schools charge by Hobbs time)
- Verify past discrepancies
- Verify all inspections are up-to-date and will not expire during the trip
- Validate aircraft documentation including:
- Maintenance logbooks and records, recent airworthiness directives or service bulletins, manufacturer's service letters, as well as any repair and alteration history
- Use Advisory Circular (91.92) Pilot's Guide to a Preflight Briefing to get started.
- Determine if takeoff weather is adquate
-
Determining Fitness for Flight:
- Determining overall fitness for flight, it is an important self-evaluation that every pilot (and their passengers) must conduct prior to any flight operation.
- Aircraft accident statistics show that pilots should be conducting preflight checklists on themselves as well as their aircraft for pilot impairment contributes to many more accidents than failures of aircraft systems
- Checklists such as the "IM SAFE" and "PAVE" checklists provide a self check on our fitness to fly on any given day
- Finally, pilots must consider the effects of perceived pressures which lead to hazardous attitudes.
Passenger Briefings
- Pilots must provide their passengers with a briefing that satisfies the legal requirements and sets expectations for the flight.
-
Legal Requirements:
- To satisfy FAR 91.519, pilots must orally brief:
-
Smoking:
- Each passenger shall be briefed on when, where, and under what conditions smoking is prohibited.
- This briefing shall include a statement, as appropriate, that the Federal Aviation Regulations require passenger compliance with lighted passenger information signs and no smoking placards, prohibit smoking in lavatories, and require compliance with crewmember instructions.
-
Use of safety belts and shoulder harnesses:
- Each passenger shall be briefed on when, where, and under what conditions it is necessary to have his or her safety belt and, if installed, his or her shoulder harness fastened about them.
- This briefing shall include a statement, as appropriate, that Federal Aviation Regulations require passenger compliance with the lighted passenger sign and/or crewmember instructions.
- Location and means for opening the passenger entry door and emergency exits.
- Location of survival equipment (and its use).
- Ditching procedures and the use of flotation equipment required under FAR 91.509 for a flight over water.
- The normal and emergency use of oxygen equipment installed on the airplane.
-
- To satisfy FAR 91.519, pilots must orally brief:
-
Setting Passenger Expectations:
- Additional items to brief include: [source: BoldMethod]
-
Normal Brief:
- Identify the Pilot in Command (PIC).
- The takeoff runway, its length, and reported winds.
- Type of takeoff and runway length required.
- Abort point.
- Rotate and climb speeds.
- Pattern altitude.
-
Emergency Brief:
- Engine failure or fire on the runway.
- Engine failure or fire in the climb.
- Engine failure or fire at or above pattern altitude.
- Who will fly in an emergency?
- Consider what each altitude cleared means for your options.
- Consider the weather, including ceilings.
-
- Additional items to brief include: [source: BoldMethod]
-
Passenger Briefing Best Practices:
- Standardize your brief into a template that flows, and reinforce that template to conduct your preflight planning.
- Printed cards may supplement pilots for the use of each passenger containing:
- A diagram of, and methods of operating, the emergency exits and other instructions necessary for use of emergency equipment.
- Cards must be in convenient locations on the airplane for passenger use and contain information pertinent only to the type and model of the airplane.
- Consider non-standard topics like aeromedical (hypoxia, carbon monoxide, etc.) symptoms and remedies as they apply to the flight
- The FAA Safety Team publishes a briefing card template, using the acronym S-A-F-E-T-Y
- For operations under Part 91, subpart K, the passenger briefing requirements of FAR 91.1035 apply instead of the requirements of paragraphs (a) through (c) of FAR 91.519.
Preflight Pilot Briefing
- Prior to every flight, pilots should gather all information vital to the nature of the flight, assess whether the flight would be safe, and then file a flight plan.
- Pilots may access Flight Service through www.1800wxbrief.com or by calling 1-800-WX-BRIEF. Flight planning applications are also available for conducting a self-briefing and filing flight plans.
- Alaska only: Pilots filing flight plans via "fast file" who desire to have their briefing recorded, should include a statement at the end of the recording as to the source of their weather briefing.
- Pilots may access Flight Service through www.1800wxbrief.com or by calling 1-800-WX-BRIEF. Flight planning applications are also available for conducting a self-briefing and filing flight plans.
- The information required by the FAA to process flight plans is obtained from FAA Form 7233-4, International Flight Plan. Only DOD users, and civilians who file stereo route flight plans, may use FAA Form 7233-1, Flight Plan.
- FAA and DOD Flight Plan Forms are equivalent.
- Where the FAA specifies Form 7233-1, Flight Plan and FAA Form 7233-4, International Flight Plan, the DOD may substitute their Form DD 175, Military Flight Plan and Form DD-1801, DOD International Flight Plan as necessary.
- NAS automation systems process and convert data in the same manner, although for computer acceptance, input fields may be adjusted to follow FAA format.
- Supplemental Weather Service Locations (SWSLs) do not provide weather briefings
- FSSs are required to advise of pertinent NOTAMs if a standard briefing is requested, but if they are overlooked, do not hesitate to remind the specialist that you have not received NOTAM information.
- Additionally, FSS briefers do not provide FDC NOTAM information for special instrument approach procedures unless specifically asked.
- Pilots authorized by the FAA to use special instrument approach procedures must specifically request FDC NOTAM information for these procedures.
- Pilots who receive the information electronically will receive NOTAMs for special IAPs automatically.
- Domestic Notices and International Notices are not provided during a briefing unless specifically requested by the pilot since the FSS specialist has no way of knowing whether the pilot has already checked the Federal NOTAM System (FNS) NOTAM Search website external links prior to calling.
- Airway NOTAMs, procedural NOTAMs, and NOTAMs that are general in nature and not tied to a specific airport/facility (for example, flight advisories and restrictions, open duration special security instructions, and special flight rules areas) are briefed solely by pilot request.
- Remember to ask for these notices if you have not already reviewed this information, and to request all pertinent NOTAMs specific to your flight.
- Pilots are urged to use only the latest issue of aeronautical charts in planning and conducting flight operations.
- Aeronautical charts are revised and reissued on a regular scheduled basis to ensure that depicted data are current and reliable.
- In the conterminous U.S., Sectional Charts are updated every 56 days, IFR En Route Charts every 56 days, and amendments to civil IFR Approach Charts are accomplished on a 56-day cycle with a change notice volume issued on the 28-day mid-cycle.
- Charts that have been superseded by those of a more recent date may contain obsolete or incomplete flight information.
When requesting a preflight briefing, identify yourself as a pilot and provide the following:
- Type of flight planned; e.g., VFR or IFR.
- Aircraft's number or pilot's name.
- Aircraft type.
- Departure Airport.
- Route of flight.
- Destination.
- Flight altitude(s).
- ETD and ETE.
- Prior to conducting a briefing, briefers are required to have the background information listed above so that they may tailor the briefing to the needs of the proposed flight.
- The objective is to communicate a "picture" of meteorological and aeronautical information necessary for the conduct of a safe and efficient flight.
- Briefers use all available weather and aeronautical information to summarize data applicable to the proposed flight.
- Pilots who have briefed themselves before calling Flight Service should advise the briefer what information has been obtained from other sources.
- AIM, Paragraph 7-1-5 , Preflight Briefings, contains those items of a weather briefing that should be expected or requested.
- FAA by 14 CFR Part 93, Subpart K, has designated High Density Traffic Airports (HDTAs) and has prescribed air traffic rules and requirements for operating aircraft (excluding helicopter operations) to and from these airport.
- Additional information can be found in the Special Notices of the Chart Supplement U.S.
- In addition to the filing of a flight plan, if the flight will traverse or land in one or more foreign countries, it is particularly important that pilots leave a complete itinerary with someone directly concerned and keep that person advised of the flight's progress.
- If serious doubt arises as to the safety of the flight, that person should first contact the FSS.
- Pilots operating under provisions of 14 CFR Part 135 on a domestic flight and not having an FAA assigned 3-letter designator, are urged to prefix the normal registration (N) number with the letter "T" on flight plan filing; e.g., TN1234B
- Pilots may also utilize the acronym: SAFETY
- Seat belts
- Air/ventilation
- Fire extinguisher
- Emergency procedure
- Traffic
- Your questions
- Read more about the FAA's take on the SAFETY acronym: General Aviation Passenger SAFETY Briefing.
Aircraft Preflight
- An aircraft must be two things before it is ready to fly:
-
Determining Legal Airworthiness:
- In order to be legally ready, the aircraft must comply with FAR 91.9/91.409 under the popular acronym, "ARROW". []
- Airworthiness Certificate.
- Registration Certificate.
- Radio station license, if required by the type of operation
- Operating limitations for the aircraft (usually through an Airplane Flight Manual and/or Pilot Operating Handbook)
- Weight and Balance.
- Logbooks:
- Shrtould be inspected prior to operation
- Required to be maintained but not on-board as the FAA/NTSB would not want those documents destroyed in a mishap
- Contain:
- Maintenance records for the airframe, engine, and propeller
- Annual inspections within the preceding 12-calendar months (as per FAR 91.409)
- 100-hour inspections, as required (as per FAR 91.409)
- Emergency Locator Transmitter (ELT) with no more than 1 hour cumulative use or half battery life (as per FAR 91.207)
- Airworthiness Directives completed in accordance with their intervals (as per FAR 91.409)
- In order to be legally ready, the aircraft must comply with FAR 91.9/91.409 under the popular acronym, "ARROW". []
-
Determining Condition for Safe Flight:
- In accordance with Federal Aviation Regulation (FAR), Part 91.7, it is the responsibility of the Pilot-In-Command (PIC) to determine if an aircraft is airworthy
- Must be performed in accordance with the airplane manufacturer checklist. []
-
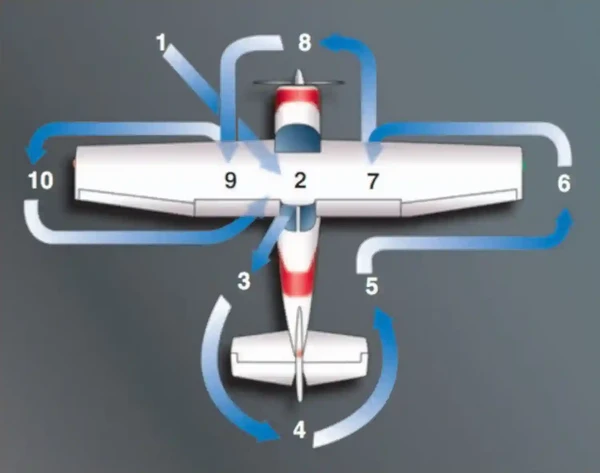
Approaching the aircraft:
[]- Make note of anything unusual (visual, aural, tacticle) from approaching the aircraft until complete
- Landing gear should be level
- No cracks on the airframe
- No leaking fluids (fuel, oil, etc.)
- A battery powered blacklight [Amazon] may aid in finding oil leaks inside of a dark cowling.
- Foreign Object Debris (FOD) not present
- Begin taking note of any remove before flight flags
- Etc.
-
Inside the aircraft:
- Check the door for ease of use, which could be a sign of misalignment/structural damage
- Make sure the inside of the aircraft is not wet, especially if it has rained recently
- Ensure the windshield is in good condition (no crazing) and clean
- If the windscreen requires a cleaning, use a microfiber cloth and distilled or acrylic-grade cleaning solution to wipe in an up and down motion (see AOPA's Training and Safety Tip: Clean and Clear)
- Ensure the seats and belts are in good working condition and secure (locked in position)
- Check for 3 critical areas which will be listed on your checklist:
- Battery and Ignition Switches - OFF
- Control Column Locks - REMOVED
- Landing Gear Control - DOWN AND LOCKED (as applicable)
- Throttle Quadrant:
- Mixture Control - Idle cut-off
- Propeller Control - Full forward
- Throttle Control - Idle
- Engine controls should be manipulated to ensure full range of check for binding or stiffness
- Instruments should be checked for fogging on the panel windows
- Airspeed Indicator should read 0 knots
- Attitude Indicator will read inaccurate
- Altimeter will likely be inaccurate, if you know the altimeter setting, check it to read within 75' of field elevation
- Vertical Speed Indicator should indicate 0, or near 0
- Turn Coordinator will read inaccurate with no power applied (expect an OFF flag)
- Heading Indicator will likely be inaccurate until system engagement, but the magnetic compass should indicate correctly
- The correction card must also be legibile
- Fuel selector should be checked for freedom of movement throuth all positions and returned to the appropriate tank
- Static lines should be drained as appropriate
- Master switch and avionics master switches should be moved into the off position
- ELT should be in the armed position (on will transmit)
- Clean all windows, as required
- Check seatbelts are servicable.
- Overall the aircraft must be equipped for VFR or IFR, depending on the purpose of flight
- Check for required documents and their currency.
- Ensure the gear lever and emergency gear lever, as appropriate, are in the up positions and secure
- Set trim controls to the neutral position
- Alternate Static Source
- Turn on and look for a small increase in the altimeter and VSI
- Turn off/close alternate air selectors
- A jump in the VSI indicates that alternate air is available, but does not provide a measurement of accuracy
- Turn on the battery switch and:
- Note that if the starter switch is stuck in the on position, engaging the aster will engage the starter and the propeller will begin turning.
- While there is no fuel to start the engine, severe injury or death can result from individuals being struck by the propeller; consider shoutint clear prop and checking before engaging the master switch.
- Lower the flaps
- Note fuel gauge quantities
- Check interior/exterior lights.
- Turn on pitot heat and carefully check the pitot tube for warmth
- Take care to not leave the heat on for more than a minute or two
- Check the Pitot tube to ensure there are no blockages
- Pitot tube blockages could result in Pitot-static system malfunctions.
- Check GPS databases are current if required for IFR flight.
- Note that if the starter switch is stuck in the on position, engaging the aster will engage the starter and the propeller will begin turning.
- When complete with the above, don't forget to turn off the master switch
- Remove any control locks and check flight controls to be free and correct
- Move the controls in a box pattern to ensure nothing prevents full range of motion while simultaneously visually inspecting for appropriate movements (i.e., cables are attached correctly).
- Set the parking brake, if not already
- Ensure that no loose articles, such as rags, waste, tools, etc., are present that might foul the controls
- Articles shall be properly stowed to prevent their coming adrift and being lost overboard or damaging the aircraft during maneuvers
- Care shall be taken to ensure proper load-balance distribution of all weights
- Check for the presence of a fire extinguisher, with proper charge, and having been inspected within the last year
- Ensure the fire extinguisher is secured
- Ensure gear levers in the appropriate position before start.
-
Left Empennage:
- First and foremost, make sure you're firm but light when touching the aircraft so as not to cause damage to the structure
- Look for wrinkles in the skin or structure anomalies
- Observe for loose or missing rivets/fasteners.
- Black oxide will be apparently with loose or broken fasteners
- Small dents may be present but excessive or large dents are unacceptable
- If a crack is present you may find a stop drilled in (a hole drilled at the end of the crack) which is acceptable corrective action
- Stains are a sign of fluid leakage
- Depending on the aircraft you may have a cargo area check inside and door secure
- Check the static ports to ensure there are no blockages
- Static port blockages could result in Pitot-static system malfunctions.
- Check any antennas for condition.
-
Tail:
- Same as the empennage with a few extras
- Verify gust locks are removed
- Observe for loose or missing rivets/fasteners.
- Check control surface attachments and movement
- Check trim tab movement
- Check the lights for obvious damage
- Anti-collision/strobe lights are required for day VFR.
- Anti-collision are required for night VFR.
- position lights are required for night VFR.
- Check any antennas for condition.
-
Right Empennage:
- Same as left Empennage.
-
Right Wing:
- Inspect for the same things previously mentioned
- Verify gust locks are removed
- Observe for loose or missing rivets/fasteners.
- Ailerons should move in opposing directions and you should see the yoke move
- Lights and stall warnings should be inspected and clear of obstructions
- Anti-collision/strobe lights are required for day VFR.
- Anti-collision are required for night VFR.
- position lights are required for night VFR.
- Landing lights are required for night VFR, if the aircraft is being operated for hire.
- Pitot Tubes should be checked for obstructions and bugs
- Landing gear should not show excessive wear and be locked (if retractable, to prevent collapse when moved)
- Fuel quantity should be as expected relative to last flight/refueling/cockpit displays (accuracy permitting)
- Ensure the cap is secure
- Fuel stains on the wings, along rivet lines (depending on type of tank), and anywhere fuel tanks are mounted could be a sign of a fuel leak.
- Flaps/Ailerons should be inspected for freedom of movement and/or security of the hinges and actuators
- Inspect static wicks/dischargers and count for expected amount (should match on each side)
- Inspect wing tip/lights for dents or cracks
- Inspect leading edge for dents or cracks
- Inspect fuel quantity as expected
- Fuel vent secure and free of contaminates (dirt, bugs, ice)
- Remove tie-downs/chocks
- Place out of way of tires and preferrably not in water
- Inspect main gear
- Check brake assembly for excessive wear, damage, cracks, or hydraulic fluid
- Check the tire for inflation, flat spots, bulges, cracks, uneven wear, and no cord showing.
- If retractable, check linkages for conditions, obstructions, and up/down lock switches
- Check strut for proper inflation (2.50" +/- .25")
- Ensure any castle nuts are safety pinned
- Drain sump drain
- Check for water, sediment
- Verify proper grade by viewing color - clear color (on the bottom) indicates water
- Ensure to properly dispose of contaminated fuel.
-
Wing Root/Fuel Sump:
- The cabin should be inspected from the other side for over all condition
- Tires should be inspected for proper inflation, FOD, damage, showing chords
- Observe for loose or missing rivets/fasteners.
- Brakes should be checked for corrosion, loose connections, fluid leakage and cracks
- The fuel should be sumped and checked
- The reading you saw on the gauges should be appropriate to what you see in the tanks
- Grade/color should be appropriate and sediment or water should not be present
- Incorrect fuel can result in engine failures, if you're lucky on the ground, if not, during takeoff and climb
- Water will sink to the bottom
- Take samples until all sediment or water that may be found is removed
- Fuel Strainer Drain:
- Drain a small amount of fuel
- Check for water (water will sink), sediment, and verify color for proper grade
- Sumped fuel should be disposed of in accordance with local procedure, and never dumped on the ramp.
-
Nose:
- Observe for loose or missing rivets/fasteners.
- Check engine oil levels and if you're flying the same aircraft often, for sudden drops in fuel usage
- If oil is low, pilots are permitted to add/top-off
- Adding of oil is not formally considered preventative maintenance and does not need to be logged
- The cowling should be secure, all screws in place. []
- Ensure foregin objects (such as birds nests) are not lodged inside, especially if the aircraft has not flown, moreso if it is parked outside, and even more if there are no cowl plugs installed.
- Be sure to close and lock it after you're done
- The propeller and spinner should be checked for damage
- Treat the propeller as though the engine magnetos are always live, so as not to be caught off-guard if any propeller movement results in ignition
- The drive belts should be checked for proper tension and signs of wear
- Leaking fluids should be noted as well as FOD
- All visible wires and lines should be checked fro security and condition
- The shock strut should be properly compressed
- Apply force to verify suspension
- Cooling/induction intake:
- Check clear of foreign debris
- Lights:
- Check as appropriate
- If the nose has a baggage compartment (multi-engine aircraft):
- Check contents are as expected.
- Ensure door fully latched.
- Nose Gear:
- Check springs and struts for damage and cracks
- Check retraction mechanism for obstructions
- Check up/down lock switches
- Check gear doors for condition
- Check strut for prober inflation
- Check tires for prober inflation and wear
- Check components are secure with castle nuts and safety (cotter) pins
- Tie-Down: remove and place to side
- Check engine cowling secure and fastened
- Ensure the engine compartment is clear of FOD such as paper or birds nests.
- Check the fuel sump
- Exhaust Stack:
- Check secure and free from cracks and debris
- Oil Cooler Intake:
- Check free from obstructions or blockages
- Oil Quantity:
- Check oil level appropriate to engine temperature
- Propeller/Spinner:
- Check for nicks, cracks, and that the spinner and each blade is secure
- Check for oil leaks from propeller hub.
-
Left Wing:
- Generally the same as other side
- Verify fuel tank vent is clear
- Blue stains from aviation fuel may be present due to fuel expansion as temperature increases
- Ensure stall warning vane for freedom of movement and that it is not obstructed
- The microswitch contact should be audible
- Pitot Mast:
- Verify ram air intake and drain hole are free of obstructions, and, if applicable, the static porn on mast is clear.
-
Completion:
- Do a final walk-around to ensure nothing was left out or open as part of the preflight just conducted
- Ensure any inoperative equipment is not necessary and appropriately placarded.
-
Winter Pre-Flight Condiderations:
- During preflight in cold or winter weather conditions, check for ice on any moving or aerodynamic part, including landing gear.
-
Night Preflight:
- Night flying requires that pilots be aware of, and operate within, their abilities and limitations
- This means more attention to the details of preflight preparation and planning
- Preparation for a night flight should include a thorough review of the available weather reports and forecasts with particular attention given to temperature/dew point spread
- A narrow temperature/dew point spread may indicate the possibility of fog or clouds
- Emphasis should also be placed on wind direction and speed, since its effect on the airplane cannot be as easily detected at night as during the day
- On night cross-country flights, appropriate aeronautical charts should be selected, including the appropriate adjacent charts
- Course lines should be drawn in black to be more distinguishable
- Prominently lighted checkpoints along the prepared course should be noted
- Rotating beacons at airports, lighted obstructions, lights of cities or towns, and lights from major highway traffic all provide excellent visual checkpoints
- The use of radio navigation aids and communication facilities add significantly to the safety and efficiency of night flying
- All personal equipment should be checked prior to flight to ensure proper functioning
- All airplane lights should be turned ON momentarily and checked for operation
- Emphasis on momentarily when turning on lights such as taxi/landing light and the strobe so as not to blind other pilots
- Position lights can be checked for loose connections by tapping the light fixture
- If the lights blink while being tapped, further investigation to determine the cause should be made prior to flight
- The parking ramp should be examined prior to entering the airplane
- During the day, it is quite easy to see stepladders, chuckholes, wheel chocks, and other obstructions, but at night it is more difficult
- Night flying requires that pilots be aware of, and operate within, their abilities and limitations
-
Aircraft Loading Considerations:
- Once complete with loading the aircraft, check that all equipment inside the cabin and the cargo areas are secure
- Movement of equipment in flight will alter the center of gravity, with the amount of weight of shifting equipment determining by how much the center of gravity shifts
- Once complete with loading the aircraft, check that all equipment inside the cabin and the cargo areas are secure
-
Best Practices:
- When not about to start the aircraft, carefully place the keys in a visible place to demonstrate the magnetos are off
- Don't scrape the windscreen!
- The FAA WINGS program offers two preflight self-briefing courses:
- Consider tools like IMSAFE and PAVE checklists to determine fitness for flight
- Ensure the aircraft meets all airworthiness requirements
- Checking aircraft squawks will give the pilot insight into trends or potential issues that may be found on preflight or in flight
- If ever leaving the area after conducting a safe for flight preflight check (going to car, bathroom, etc.), conduct a 360° walkaround of the aircraft to verify nothing has changed.
- When not about to start the aircraft, carefully place the keys in a visible place to demonstrate the magnetos are off


Start and Run-Up
- Even though most airplanes are equipped with electric starters, it is helpful if a pilot is familiar with the procedures and dangers involved in starting an engine by turning the propeller by hand (hand propping)
- Prior to starting jet, air intakes and the surrounding area shall be inspected to eliminate the possibility of Foreign Object Debris, or FOD
- Whenever an engine is started, personnel with adequate fire extinguishing equipment, if available, shall be stationed in the immediate vicinity of the engine but safely clear of intakes or propellers
- In starting an aircraft, all challenges and signals between the person operating the starting device and the person at the engine controls shall be clearly understood and so indicated by repetition before action is taken by either person
- Where the engines are started entirely from the cockpit, the person at the engine controls should exchange signals with a person observing the engine from outside the aircraft
Hand Propping
- Hand propping enables pilots to start engines of aircraft that lack an electrical system
- Even though most airplanes are equipped with electric starters, it is helpful if a pilot is familiar with the procedures and dangers involved in starting an engine by turning the propeller by hand (hand propping)
- Due to the associated hazards, this method of starting should be used only when absolutely necessary and when proper precautions have been taken
- An engine should not be hand propped unless two people (preferrably both pilots), both familiar with the airplane and hand propping techniques, are available to perform the procedure
-
Hand Propping Precautions:
- The person pulling the propeller blades through directs all activity and is in charge of the procedure
- The other person, thoroughly familiar with the controls, must be seated in the airplane with the brakes set
- Both participants should discuss the procedure and agree on voice commands and expected action
- As an additional precaution, chocks may be placed in front of the main wheels
- If an additional person is unavailable to help, the airplane's tail may be securely tied (with slack removed)
- When hand propping is necessary, the ground surface near the propeller should be stable and free of debris
- Unless a firm footing is available, consider relocating the airplane
- Loose gravel, wet grass, mud, oil, ice, or snow might cause the person pulling the propeller through to slip into the rotating blades as the engine starts
- To begin the procedure, the fuel system and engine controls (tank selector, primer, pump, throttle, and mixture) are set for a normal start
- The ignition magneto switch should be checked to be sure that it is OFF
- Then the descending propeller blade should be rotated so that it assumes a position slightly above the horizontal
- The person doing the hand propping should face the descending blade squarely and stand slightly less than one arm's length from the blade
- Never allow a part of your body to enter the prop arc
- If a stance too far away were assumed, it would be necessary to lean forward in an unbalanced condition to reach the blade
- This may cause the person to fall forward into the rotating blades when the engine starts
- The propeller is swung by forcing the blade downward rapidly, pushing with the palms of both hands
- If the blade is gripped tightly with the fingers, the person's body may be drawn into the propeller blades should the engine misfire and rotate momentarily in the opposite direction
- As the blade is pushed down, the person should step backward, away from the propeller
- If the engine does not start, the propeller should not be repositioned for another attempt until it is certain the ignition/magneto switch is turned OFF
- The words CONTACT (mags ON) and SWITCH OFF (mags OFF) are used because they are significantly different from each other
- Under noisy conditions or high winds, the words CONTACT and SWITCH OFF are less likely to be misunderstood than SWITCH ON and SWITCH OFF
- When removing the wheel chocks after the engine starts, it is essential that the pilot remember that the propeller is almost invisible
- Incredible as it may seem, serious injuries and fatalities occur when people who have just started an engine walk or reach into the propeller arc to remove the chocks
- Before the chocks are removed, the throttle should be set to idle and the chocks approached from the rear of the propeller
- Never approach the chocks from the front or the side
- The procedures for hand propping should always be in accordance with the manufacturer's recommendations and checklist
- Special starting procedures are used when the engine is already warm, very cold, or when flooded or vapor locked
- There will also be a different starting procedure when an external power source is used
-
Hand Propping Procedure:
- Person out front says, "GAS ON, SWITCH OFF, THROTTLE CLOSED, BRAKES SET"
- Pilot seat occupant, after making sure the fuel is ON, mixture is RICH, magneto switch is OFF, throttle is CLOSED, and brakes SET, says, "GAS ON, SWITCH OFF, THROTTLE CLOSED, BRAKES SET"
- Person out front, after pulling the propeller through to prime the engine says, "BRAKES AND CONTACT"
- Pilot seat occupant checks the brakes SET and turns the ignition switch ON, then says, "BRAKES AND CONTACT"
Starting An Aircraft
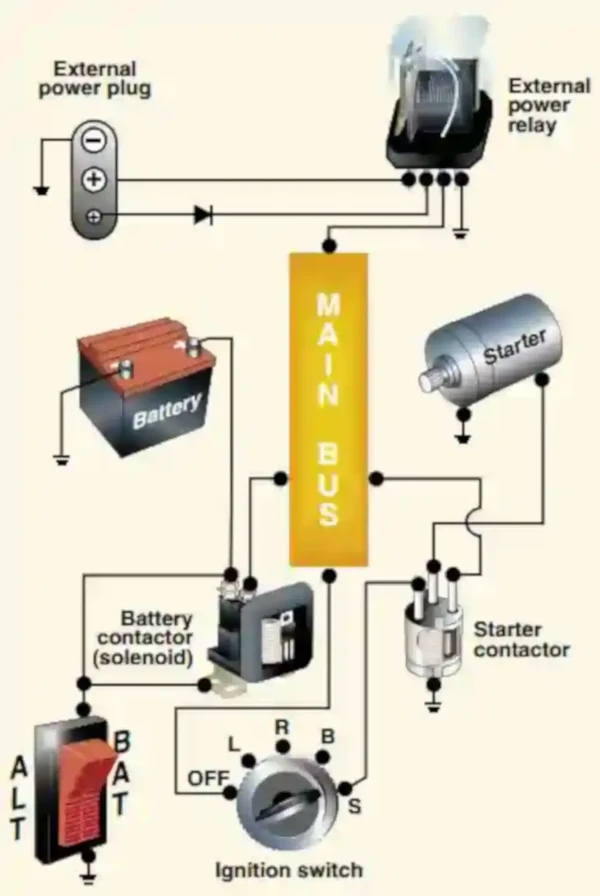
- Most aircraft have starters that automatically engage and disengage when operated, but some older aircraft have starters that are lever-actuated by the pilot.
- The starter engages the aircraft flywheel, rotating the engine to a speed that allows it to start and maintain operation.
- Electrical power for starting is usually supplied by an on-board battery, but can also be supplied by external power through an external power receptacle.
- When the battery switch is turned on, electricity is supplied to the main power bus bar through the battery solenoid.
- Both the starter and the starter switch draw current from the main bus bar, but the starter will not operate until the starting solenoid is energized by the starter switch being turned to the "start" position.
- The starter motor is protected from being driven by the engine through a clutch in the starter drive that allows the engine to run faster than the starter motor. []
- When using a starter, don't hold it for more than a few seconds, or it can burn out from excessive heat.
- To avoid damage to the propeller and property, the aircraft should be in an area where the propeller will not stir up gravel or dust.
-
Use of External Power to Start Aircraft Engines:
- Use of external power requires ground crew who are similarly familiar with the equipment and available to assist.
- Once external power is connected to the aircraft, it will either automatically detect or require a switch to be moved to recognize the source of power for starting.
- Starting procedures remain generally the same from there on out.
- Always follow the pilot operating handbook instructions on external power use.
-
Safety Considerations:
- When starting an engine, the rules of safety and courtesy should be strictly observed.
- Pilots should always shout clear prop prior to starting the engine to not only make sure the prop area is clear of people, but that others around are not surprised when the engine starts.
- Clear the area visually and make a call, "Clear prop!"
- In addition, the wheels should be chocked and the brakes set, to avoid hazards caused by unintentional movement.
-
Surface Area Dangers:
- Personnel must always be aware of the dangers associated with moving surfaces.
- Rotor wash created by the blades of a rotary-winged aircraft or thrust from the exhaust section of a fixed-wing aircraft may cause severe personnel injury.
- The proper safety equipment must always be worn when working on flight decks and flight lines.
-
Night Start and Run-Up Considerations:
- After the pilot is seated in the cockpit and before starting the engine, all items and materials to be used on the flight should be arranged so they are readily available and convenient to use.
- Use extra caution at night to ensure the propeller area is clear.
- Turning the rotating beacon "ON" (in accordance with FARs) or flashing the airplane position lights will alert persons nearby to remain clear of the propeller.
- Pilots should turn off unnecessary electrical equipment to avoid excessive electrical drain on the battery until after starting the engine.
- After starting, but before taxiing, pilots must turn on the taxi or landing lights in accordance with FARs.
- Also, overheating of the landing light could become a problem because of inadequate airflow to carry the heat away.
- Landing lights should be used as necessary while taxiing.
- Continuous use of the landing light with r.p.m. power settings normally used for taxiing may place an excessive drain on the airplane's electrical system.
- When using landing lights, consider other pilots so as not to blind them.
- Taxi slowly, particularly in congested areas.
- If the ramp or taxiway has painted taxi lines, following them ensures proper clearance.
- During the day, pilots can easily detect any forward movement of the airplane during run-up.
- The aircraft can more easily creep forward at night without being noticed unless the pilot is alert.
- Hold or lock the brakes during the run-up and be alert for any forward movement.
-
Engine Priming:
- Priming is helpful for many engines, but the amount of priming is dependent upon the density of the air.
- Warm air requires less priming, cold air requires more, potentially twice as much.
- When starting an engine, it is not necessary to advance the throttle far forward before start.
- Doing so may cause the engine to go from cold to an excessively high RPM on start.
- Often, a closed throttle is sufficient.
- Priming is helpful for many engines, but the amount of priming is dependent upon the density of the air.
-
Cold Temperature Engine Starting:
- Starting an engine in the cold can be challenging.
- Components like metals contract in the cold, impacting how the engine performs as compared to when warm.
- Low vapor pressure, combined with reduced battery efficiency, can make cold-temperature start-ups more difficult.
- Carburetor engines are more likely to have difficulty starting than fuel-injection engines.
- Carbureted engines can benefit from a few pumps of primer during cold-temperature operations.
- When engines fail to start, the chance of overpriming increases, and fuel may pool in the cylinders, disrupting the fuel/air ratio, posing a backfire or engine fire risk.
- Consider an external observer when starting engines in cold weather to provide advanced warning of fires.
- The aircraft's POH/PIM knows what is best for that specific aircraft, but as a rule of thumb, cold weather starts can cause abnormal engine wear, reduced performance, and therefore decreased time between heavy maintenance like an overhaul.
- Some of this is due to metallurgy being out of tolerance, but also reduced oil flow.
- Cold engine temperatures can be mitigated by storing aircraft in heated hangars, or absent that, using a device that heats the engine before starting such as a pre-heater blowing hot air into the cowling, or an electronic engine-mounted heater.
- When using pre-heaters, follow the manufacturers guidance, to include your aircraft.
- Avoid excessive heat to non-metalic equipment.
- Do not leave the heater on for longer than recommended.
- Once complete with pre-heating, inspect the engine for any foreign objects, and once clear, start the engine before the aircraft's engine cools down again.
-
Vapor Lock:
- Vapor lock occurs when fuel effectively boils in the fuel lines, inhibiting fuel flow.
- Vapor lock can occur in fuel-injected engines, but not in carbureted engines.
- To fix, the pilot must push as much fuel through the line as possible, typically using a fuel pump.
- Vapor lock usually occurs on the ground but can also occur in the air due to lower fuel pressure, high fuel temperatures, and excessive fuel turbulence.
- To avoid vapor lock, especially after shutting down with an expected follow-on flight, ensure cowl flaps are open to allow heat to dissipate.
-
Aircraft Engine Flooding:
- An engine is considered flooded when too much fuel enters the cylinder, thereby altering the fuel/air ratio.
- This can be caused by over-priming or too many start attempts.
- Cold weather makes an engine particularly susceptible to flooding with engine pre-heat being a preventative measure.
- Aircraft manufacturers will have specific procedures to clear a flooded engine, but generally speaking, pilots may:
- Reduce the mixture to idle and crank the engine (blowing fuel out of the exhaust).
- Allow the aircraft to sit (for gas to evaporate).
- Of course, extra fuel in the system carries at least some level of risk and so engine fire procedures should be reviewed just in case.
- An engine is considered flooded when too much fuel enters the cylinder, thereby altering the fuel/air ratio.

Engine Run-up
-
Aircraft Run-up Considerations:
- When advancing the throttle, pay attention to engine smoothness and consistency in operation.
- Checking magnetos not only ensures smoothness of operation on a single magneto, but verifies proper timing and unfouled magnetos.
- Checking propeller systems, if appropriate, verifies the functionality of the propeller system and the integrity of the lubrication system.
- Checking carburetor heat verifies functionality should the flight experience or suspect icing conditions.
- Confirming suction gauge reads properly verifies the vacuum system operation is healthy to provide accurate instrument readings for those instruments that require.
- When retarding the throttles, pay attention to engine smoothness and consistency in operation.
- Be mindful of surface conditions, such as ice, that could cause the aircraft to slide when at a high power setting
- Throughout the entirety of the run-up, pay attention to unusual noises or inconsistencies throughout all checks.
- The manifold pressure (if gauge equipped) should be steady
-
Aircraft Positioning:
- When present, aircraft utilize designated run-up areas.
- These areas allow pilots to conduct systems checks without impeding airport taxi operations.
- Run-up areas can be identified by reviewing chart supplements or airport diagrams.
- Aircraft should position themselves in a location where they can leave the run-up area, have sufficient space to get back onto the taxiway centerline, and conduct a visual check of potential traffic on final approach.
- Before conducting a run-up before takeoff, it is generally a good idea to point the aircraft into the wind, and if able, while still able to see final.
- Doing so will allow you to monitor airport traffic and allow airflow over the engine during the run-up.
- Care must be taken to position the aircraft so higher power settings do not kick up debris into other aircraft, vehicles, structures, etc.
- When present, aircraft utilize designated run-up areas.
Setting Up Avionics
- After completely energizing the electrical system, avionics are ready to configure.
- Ensure all avionic test modes run and pass as appropriate.
- Set up navigation equipment with the associated flight plan, initial headings/NAVAIDs, etc.
- Navigation equipment includes setting the CDI/HSI for the initial course expected with the appropriate navigation source selected (GPS, VOR, etc.) as appropriate.
- Using the heading bug to reflect the wind may help indicate crosswind components on takeoff but may negatively impact navigation - depending on the aircraft setup.
- Set navigation maps to the appropriate location with the relevant zoom.
- Set the frequency you expect to talk on first with the next anticipated in the backup.
- It is helpful to set up avionics to perform a radio check on all radios in the aircraft before takeoff (i.e., use COMM 1 for ground and COMM 2 for tower).
- Confirm transponder codes.
Constant-Speed Propeller Considerations
- To check constant-speed propeller functionality, pilots cycle the propeller control:
- When pulling the propeller lever back, pilots are ensuring the governor is working by observing the manifold pressure rise while oil pressure decreases.
- When pushing the propeller forward, pilots are ensuring the governor is working by observing the manifold pressure decreasing while the oil pressure increases.
- It is often suggested to do this three times on the first flight of the day in order to fully cycle warm oil through the system, but once is usually enough on subsequent checks.
- The system can lag a bit, especially when cold, and coming to full throttle slowly will give it time to adjust and not surge or overspeed.
Ground Procedures Interactive Scenario
Interactive Scenario
Loading scenario details...
Decision 1
0%
Scenario Complete
Post-Flight Procedures
- Post-flight procedures must be performed per the airplane manufacturer's checklist
- Ensure no required documentation (airworthiness certificates, etc.) is taken from the aircraft when removing other items.
- Begin walking around the aircraft, noting anything unusual (visual, aural, tactile) until complete with the post-flight.
- Differences from preflight may include leaking fluids, missing panels, dents, cracks, blood (wildlife strikes), missing antennas, etc.
- Remove before flight flags, and gust locks should be re-inserted.
- Ensure controls are in the correct position and the electrical system is de-energized.
- Ensure the aircraft is properly tied down.
- Ensure any discrepancies or "squawks" are detailed and provided to the appropriate front desk or maintenance personnel for them to address.
- Many FBOs may have an aircraft squawk sheet which provides guidance on what information to provide.
- In the absence of guidance, report your name (for any follow-up required), the date, the aircraft in question, what happened (with details), when it happened, and if relevant, where or what phase of flight it happened.
-
Winter Post-Flight Procedures Considerations:
- Consider moving the aircraft into a warmer space or near where a pre-heater can be utilized, if necessary, for the next flight.
-
Night Post-Flight Procedures Considerations:
- Using a flashlight is critical, but exercise caution to not blind yourself or other pilots.
-
Post-Flight Procedures Debriefings:
- Debriefing while information is recent helps draw out more points and facilitate deeper reflection.

Ground Procedures Lessons & Case Studies
- Aviation Safety Reporting System ACN: 1741856:
- The C182 pilot reported loss of directional control after landing that was probably related to the passenger depressing a rudder unintentionally
Ground Procedures Knowledge Check
Private Pilot

Core Knowledge Review
Review the foundational knowledge, key concepts, and practical considerations for Ground Procedures.
Foundational
Immediate Feedback
Answer Explanations
Commercial Pilot

Advanced Application
Apply your knowledge of Ground Procedures to advanced operational scenarios, risk management, and aeronautical decision-making.
Advanced
Scenario Based
Risk Management
Why Take a Quiz?
Quizzes reinforce key concepts, identify knowledge gaps, and build confidence for real-world decisions in the cockpit. Quiz material is representative of the information provided here and is not based on or sourced from the Federal Aviation Administration test bank.
Ground Procedures Conclusion
- Treat every preflight like it is your first with that aircraft
- It's much better to discover an issue on the ground than face it in the air
- Ensure any panel opened is securely latched to prevent in flight deployment, and in the case of a cargo compartment, loosing cargo or having it bind on flight controls
- Consider checking the NTSB, by airport, for each new destination
- Remember, there are two parts to checking if the flight controls are free and correct:
- Free: nothing prevents their movement (bags, kneeboards, your legs)
- Correct: when you turn the flight controls, they indicate the correct direction of movement
- When conducting a preflight briefing, consider addressing some takeoff briefing considerations to address any issues or concerns before sitting at the hold short with the engine running
- Especially at unfamiliar airports, review, and have available the Airport diagram to maintain situational awareness
- If required to obtain airport reservations at airports designated by the FAA given Special Traffic Management Programs, see AIM 4-1-21, Airport Reservation Operations and Special Traffic Management Programs
- Pre-Flight Proceduress are important, but Pre-Flight Procedures following maintenance is especially important.
- Note anything out of the ordinary, especially as it relates to the maintenace performed.
- Dress for prefligt for comfort and to mitigate distractions - don't get too cold, hot, or wet before you're about to conduct a flight
- Pilots that fail to familiarize themselves with all information concerning the flight, and violate airspace or procedures may find themselves subject to FAA Compliance Action, a certificate suspension or revocation, fines, or even criminal penalties
- Consider the use of a flight risk assessment tool, or FRAT, before flight
- Consider practicing maneuvers on a flight simulator to introduce yourself to maneuvers or knock off rust
- Pilots are responsible for appropriately cataloging Inoperative equipment.
- Preflighting an aircraft is a critical step to ensuring safety of flight, catching issues before they can manifest in flight
- Even if landing briefly before taking back off, don't skip preflights!
- Treat every preflight like it is your first with that aircraft
- It's much better to discover an issue on the ground than face it in the air
- Ensure any panel opened is securely latched to prevent in flight deployment, and in the case of a cargo compartment, loosing cargo or having it bind on flight controls
- Consider checking the NTSB, by airport, for each new destination
- Remember, there are two parts to checking if the flight controls are free and correct:
- Free: nothing prevents their movement (bags, kneeboards, your legs)
- Correct: when you turn the flight controls, they indicate the correct direction of movement
- Especially at unfamiliar airports, review, and have available the Airport diagram to maintain situational awareness
- If required to obtain airport reservations at airports designated by the FAA given Special Traffic Management Programs, see AIM 4-1-21, Airport Reservation Operations and Special Traffic Management Programs
- Preflights are important, but preflight following maintenance is especially important.
- Note anything out of the ordinary, especially as it relates to the maintenace performed.
- Dress for prefligt for comfort and to mitigate distractions - don't get too cold, hot, or wet before you're about to conduct a flight
- Pilots that fail to familiarize themselves with all information concerning the flight, and violate airspace or procedures may find themselves subject to FAA Compliance Action, a certificate suspension or revocation, fines, or even criminal penalties
- Aircraft preflight includes not just visual cues, but also aural and tactile cues
- Consider the use of a flight risk assessment tool, or FRAT, before flight
- Consider actual versus realized performance when doing any performance calculations
- There are no specific numbers to hit on how far you must turn, etc. for a clearing turn to be acceptible
- It is, instead, pilot judgement on what is acceptable to call the area cleared
- As stated above, clearing turns may need to be made to a specific direction for a reason however, consider clearing turns to the left first
- This ensures that if anyone is passing to the right in accordance with right-of-way guidelines, you and them remain clear of one another
- Remain mindful that performance calculations are usually more optimistic than actual performance.
- See also: Visual Scanning and Collision Avoidance.
- When hand propping, always be sure to follow the procedures listed in the pilot operating handbook
- To learn more about tie-downs after flight, see: AOPA's Training Tip: How to Tie Down an Airplane and read AOPA - Securing an Airplane on the Ramp.
- Learn more about turbine engine start-up by reviewing hot, hung start
- Consider actual versus realized performance when doing any performance calculations
- Consider practicing maneuvers on a flight simulator to introduce yourself to maneuvers or knock off rust
- When conducting a post-flight, remember to leave the aircraft in the condition you'd want to receive it
- Early identification of issues allows time to fix and even if no maintenance action is to be taken, establishes trends for aircraft mechanics to better diagnose problems when properly annoted
- Still looking for something? Continue searching:
Ground Procedures References
- Federal Aviation Administration - Pilot/Controller Glossary.
- FAA - Airman Certification Standards.
- Advisory Circular (91-92) A Pilot's Guide to a Preflight Briefing.
- Federal Aviation Administration - Pilot/Controller Glossary.
- FAA - Perfecting Your Preflight Inspection.
- Aeronautical Information Manual (4-1-21) Airport Reservation Operations and Special Traffic Management Programs.
- Aeronautical Information Manual (5-1-1) Preflight Preparation.
- Aeronautical Information Manual (5-1-3) Notice to Airmen (NOTAM) System.
- Aeronautical Information Manual (5-1-5) Flight Plan - VFR Flights.
- Aeronautical Information Manual (5-1-6) Flight Plan - IFR Flights.
- Aeronautical Information Manual (5-1-7) Flight Plans For Military/DOD Use Only.
- Aeronautical Information Manual (5-1-8) Flight Plans - Defense VFR (DVFR) Flights.
- Aeronautical Information Manual (5-1-9) Single Flights Conducted with Both VFR And IFR Flight Plans.
- Aeronautical Information Manual (5-1-11) Flights Outside the U.S. and U.S. Territories.
- Aeronautical Information Manual (7-1-2) FAA Weather Services.
- Aeronautical Information Manual (7-1-4) Preflight Briefing.
- Aeronautical Information Manual (9-1-5) General Description of each Chart Series.
- Airplane Flying Handbook (Chapter 2) Ground Operations.
- Airplane Flying Handbook (Chapter 10) Performance Maneuvers.
- Bold Method - Don't Forget To Check These 6 Small Parts On Every Preflight.
- FAA - Seat Belts and Shoulder Harnesses.
- FAA Safety Briefing - Advanced Preflight After Maintenance.
- FAA - Advanced Preflight M-Pamphlet.
- Federal Aviation Regulations (91.7) Civil Aircraft Airworthiness.
- Federal Aviation Regulations (91.103) Preflight action.
- Federal Aviation Regulations (91.107) Use of safety belts, shoulder harnesses, and child restraint systems.
- Pilot Workshops - Avoiding a Deadly Habit.
- Pilot Workshops - Preflighting a Nose Wheel Strut.
- FAA - Advanced Preflight After Maintenance.
- Pilot Workshops - Pilot Tip of The Week: Starting a Flooded Engine.
- Reddit - Witnessed and accident today.